Your cart is empty
Tax included and shipping calculated at checkout

Menú de cajones
Tax included and shipping calculated at checkout
A professional account gives you stylist pricing, priority support, early access to new releases, and education developed by working stylists.


A client is in the chair, the hair is sectioned, and the keratin stick is already warming. The bond starts smoking, the adhesive turns watery, or the applicator temperature doesn't match the product label. That situation is avoidable. Keratin glue sticks aren't interchangeable, and a reliable fusion install begins with product compatibility, controlled heat, clean preparation, and disciplined bond formation.
A professional fusion install depends on matching the adhesive, applicator, hair, and working conditions. A true hair-extension keratin polymer is formulated to soften, encapsulate an extension tip, and create a moldable bond around a prepared section of natural hair. A general-purpose craft hot-melt stick follows a different formulation and workflow. Similar appearance does not confirm compatibility.
Applicator settings require the same care. Some keratin formulations soften around 120–150°C (248–302°F), while other professional products specify 160–170°C (320–338°F) or approximately 200°C (392°F). These settings are not interchangeable, as documented in technical guidance on Italian keratin glue. Check the exact stick instructions, confirm the applicator reaches the required range accurately, and avoid relying on a generic temperature setting.
Heat control also protects the client and stylist. Keep the work area ventilated, prevent the heated tool from contacting skin or furniture, and place it on a stable heat-resistant surface between applications. Excessive heat can make the polymer run, increase scalp exposure, and produce fumes or burns. Lower heat may leave the bond under-softened and difficult to shape.
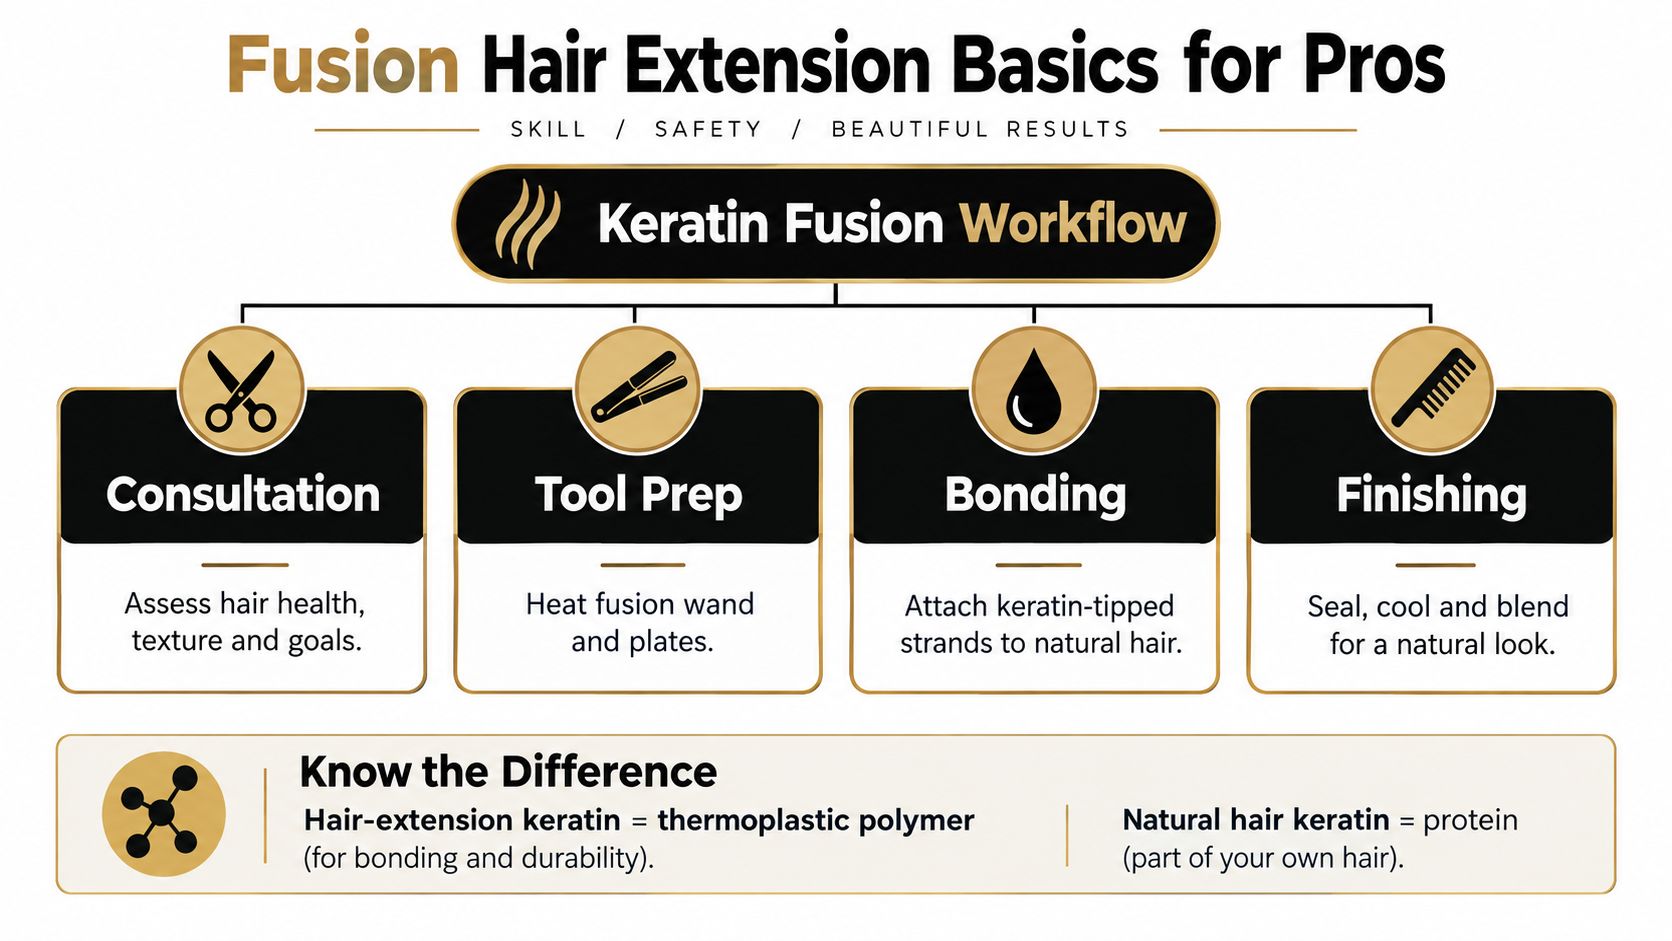
A controlled install follows this sequence:
Hair-extension keratin is not the same as the natural keratin protein in the client's hair. The practical question is whether the adhesive behaves as a predictable thermoplastic polymer under the specified conditions.
Practical rule: A stick that melts at one setting is not automatically suitable for an applicator that reaches that setting. Confirm compatibility before preparing the client.
A clean, compatible setup prevents most correction work later. Oil, moisture, residue, oversized sections, and an applicator that runs too hot can compromise a fusion bond before application begins. Keratin sticks are not interchangeable, so prepare around the specific polymer, tool, and extension system rather than using one setting for every product.
Clarify the natural hair according to salon protocol, then dry it completely. The attachment area must be free from oils, conditioner, silicone residue, leave-in products, and styling film. Clean hair allows the softened polymer to contact the extension tip and selected natural-hair section directly.
Inspect each extension tip before loading it. Remove dust, loose fibers, and excess material that could prevent full encapsulation. Cuticle-intact, Remy, double-drawn, hand-tied, and bulk hair still require the same clean technical preparation. Hair quality affects the result, but it cannot compensate for contamination or an unsuitable bond.
Separate the working area with a heat-resistant template or shield. Keep subsections small and consistent so weight stays controlled and adjacent strands do not become trapped. Each subsection must support the extension without excessive load. An oversized section can pull surrounding hair, while an undersized section may carry too much tension.
Check the stick's intended softening range, the applicator's operating range, and the manufacturer's maximum temperature. Some fusion applicators operate across approximately 100–220°C (212–428°F), which is broad enough to exceed the safe working range of a particular polymer. Review the professional keratin-glue safety guidance and the product's own instructions before powering on.
Refer to the keratin polymer safety data sheet for ventilation requirements, maximum temperature limits, and handling precautions. Technical hot-melt application guidance can help clarify general equipment handling, but the adhesive manufacturer's instructions control the salon setup.
Where the applicator design permits, load the stick before switching on. Place the tool on its stand, allow roughly 5–10 minutes for warm-up, and wait for smooth adhesive flow instead of forcing the trigger. Smoking, bubbling, discoloration, watery flow, or unusual brittleness indicates that the temperature or product compatibility needs reassessment.
Set up the following before the client is positioned:
A preliminary patch test may be appropriate 24–48 hours before application when the formulation or client history raises a sensitivity concern. Review the product safety information rather than assuming every keratin polymer has the same exposure profile.
A bond can look neat at the chair and still fail under normal wear if the bead is overloaded, the tip is misplaced, or the polymer sets before it is shaped. Work toward a uniformly softened, moldable bead, then control placement and geometry. The hottest setting is not the goal. Underheating leaves unmelted particles and incomplete encapsulation. Overheating can degrade the polymer, make it migrate, increase burn risk, and expose nearby hair fibers to unnecessary heat.
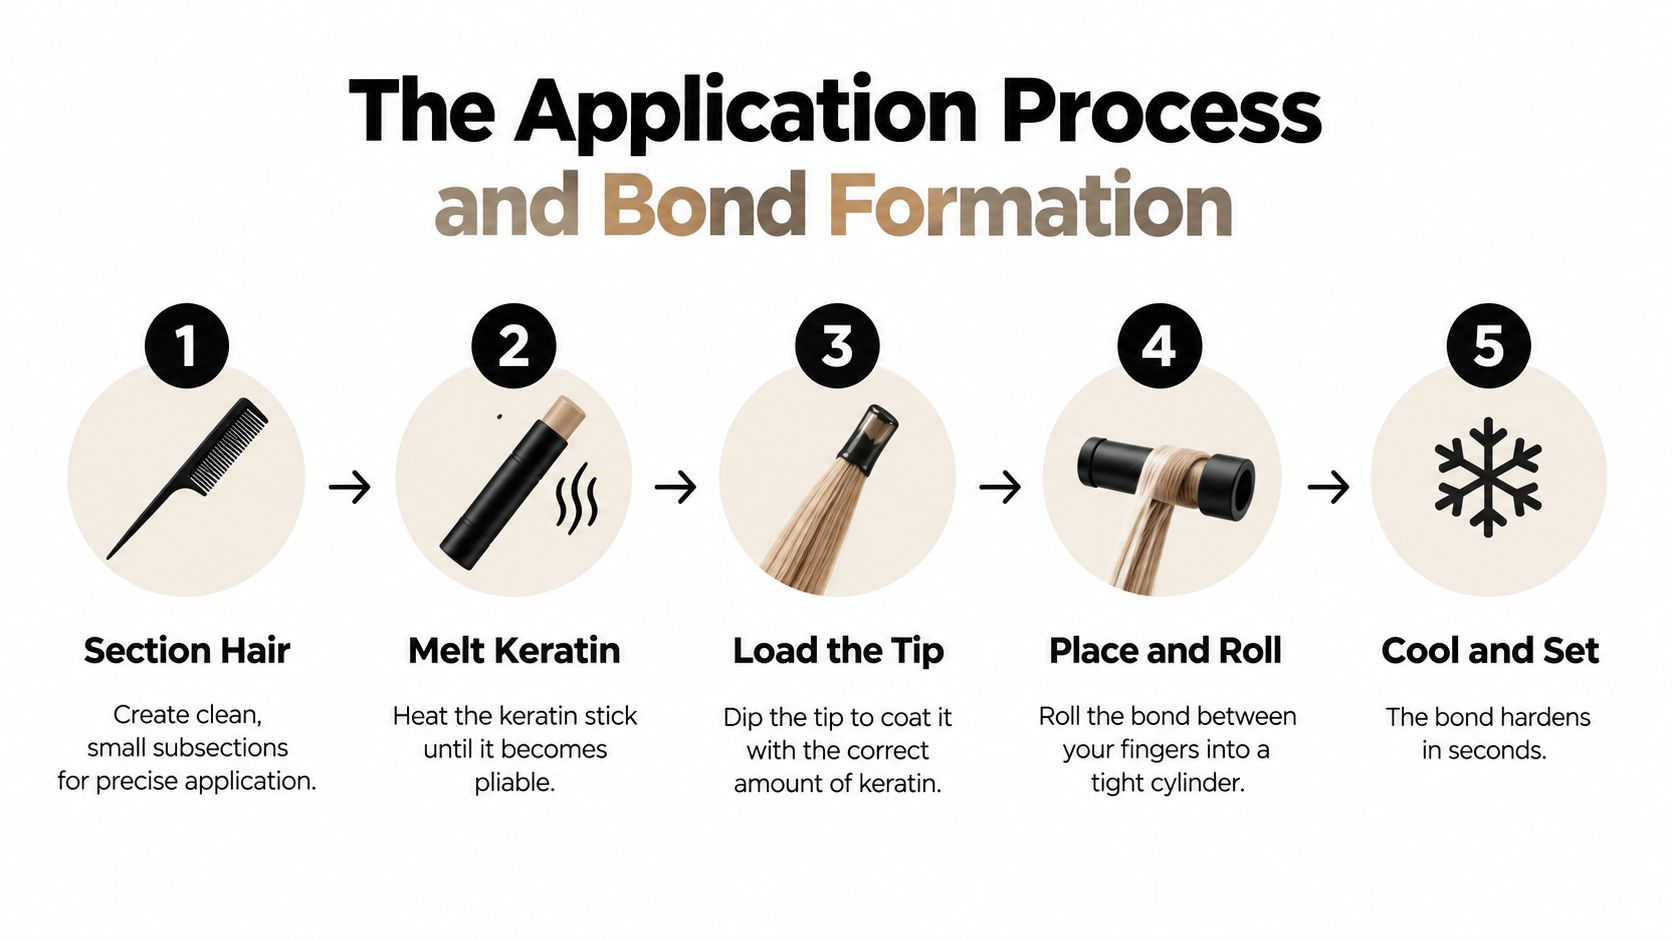
Load the extension tip with only enough polymer to encapsulate the tip and the prepared natural-hair section. Depending on the system, apply a small bead with the fusion applicator or dip the tip into softened keratin. The loading method changes by product. The control principle does not: the adhesive belongs on the designated bond area, not flooded across the natural hair.
Prepare and isolate the subsection before bringing the loaded extension into position. Place the tip close to the scalp while preserving a safe gap. Adhesive must not touch the scalp, and the heated applicator should contact the glue or designated bond area, never the client's skin. Keep the working angle controlled so softened polymer does not run toward the scalp.
Bead size affects comfort, durability, and maintenance. Excess material adds weight, creates hard edges, encourages snagging, and increases mechanical pull. A larger bond is not automatically stronger. Bulky geometry can cause discomfort and gives tension more surface area to act against.
Position the extension tip, then compress and shape the softened polymer with extension pliers while it remains moldable. The bond should surround the tip and the selected hair in a compact form. Depending on the system, roll it between protected fingers or use pliers to form a smooth cylinder. Follow the product instructions for that technique, and keep hot adhesive away from direct skin contact.
Open time is short and depends on the keratin formulation and tool behavior. Close and shape the bond within about 15 seconds when the product instructions require it. Handling set may occur within approximately 15–60 seconds, but a bond that feels firm is not necessarily ready for tension. Some keratin systems specify stabilizing the bond for roughly 10–15 seconds, while others limit direct heating or clamping to about 5 seconds. Those differences make a strand test more useful than a memorized timing rule.
The correct endpoint is a bond that has cooled firm and clean, not one that has been repeatedly reheated into submission.
Hold the bond steady until it has cooled completely. Do not brush through it, pull the extension, or reshape it after the polymer begins to set. Reheating can soften the thermoplastic and compromise the original geometry. Use the K-Tip installation guide for method-specific handling context, while the selected adhesive instructions control temperature and timing.
Once cool, inspect the attachment from several angles. It should be compact, smooth enough not to catch, separate from adjacent bonds, and free of visible adhesive migration. The strand should move naturally from the attachment point without direct tension on the scalp.
A bond that slips after installation often points to a system mismatch, not just too little adhesive. Troubleshooting starts with preparation, temperature, and bond geometry. Each keratin formulation behaves differently, so use the selected manufacturer's guidance and confirm the working temperature with a strand test rather than treating all sticks as interchangeable.
Contamination is the first check. Oil, silicone, conditioner, moisture, and styling residue prevent close contact between the polymer and the hair. The natural hair must be clarified and fully dry, with no oil beneath the attachment. Inspect the extension tip as well. Dust and loose fibers can weaken the bond before it is formed.
Temperature creates a different failure pattern. A low setting may leave unmelted material and incomplete encapsulation. A high setting can make the polymer too fluid, encourage migration toward the scalp, or damage the adhesive. The hot-melt adhesive technical sheet emphasizes clean, dry substrates and indicates that full hot-melt strength may require approximately 1–2 hours at 20°C. Follow the keratin manufacturer's cure guidance for the installed system, and keep the client away from immediate tension, brushing, washing, or styling.
Work with ventilation when heating polymer, and control the tool to prevent burns to the scalp, fingers, and surrounding hair. If the adhesive becomes unusually runny or gives off an unexpected odor, stop and reassess the product, temperature, and workspace.
Geometry is the third check. Too much natural hair in one bond concentrates load. Too much polymer creates a bulky attachment that catches and stresses the strand. Uneven sections produce inconsistent results across the head. Review proper sectioning and weight distribution in the extension placement guide.
Use this sequence before changing the entire method:
Do not repeatedly reheat a partially formed bond. Follow the approved removal and reinstallation process for that specific polymer instead of trying to rescue its original shape with more heat.
Record slippage, breakage, discomfort, and removal damage at 2, 4, and 6 weeks. This gives the salon a useful pattern to review without applying craft-adhesive performance figures to professional keratin bonds, for which no universal failure rate is established by independent sources.
A client arrives with a bond that will not release, and the instinct is to add heat or squeeze harder. Stop there. Fusion removal depends on the installed polymer, the remover, and the condition of the attachment. Excess force, unsuitable solvent, or repeated reheating can pull through natural hair and increase breakage.
Isolate the bond first and protect the surrounding hair. Apply the approved remover for that polymer, allow the stated processing time, then use compatible removal pliers with controlled pressure. The bond should soften enough to release without aggressive prying. If it remains firm, check compatibility, saturation, and processing time before applying more pressure.
Use this keratin bond remover guide to structure the service, but confirm that its method suits the polymer installed. Different keratin formulations can respond differently, particularly when the original stick or application temperature was not recorded. Do not repeatedly reheat a partially formed bond. Follow the approved removal and reinstallation process for that specific polymer instead of trying to restore its shape.
Release attachments one at a time and detangle the natural hair progressively. Do not drag a brush or comb through several unresolved bonds. After each removal, inspect for tension, matting, breakage, and residue. Treat remaining residue with the approved system, not a scraper or excessive pulling. Record the finding for the next consultation.
At the chair, use the pattern of the problem to guide the review:
Aftercare depends on the installation, the client's hair behavior, regrowth, bond position, tangling, and hair integrity. Schedule follow-ups and move-ups from that assessment. Clients should contact the salon before severe matting or discomfort develops.
Keep oil and conditioner away from attachment points, avoid direct high heat over bonds, and apply heat protection to the lengths. Brush from the ends upward while stabilizing the bonds. Gold Coast extension maintenance advice provides a client-facing reference, but adapt it to the installed method and manufacturer requirements.
Record slippage, breakage, discomfort, and removal damage at 2, 4, and 6 weeks. Maintain ventilation during services, control heat to reduce burn risk, and document the product and temperature used. Conde Professional supplies licensed professionals with K-Tip, Tape-In, Volume Weft, Thin Weft, Tape Weft, Clip-In, and Bulk methods, plus accessories and education. Review the professional collection at Conde Professional.


