Your cart is empty
Tax included and shipping calculated at checkout

Drawer menu
Tax included and shipping calculated at checkout
A professional account gives you stylist pricing, priority support, early access to new releases, and education developed by working stylists.


A client arrives with a high ponytail, a strong side part, and a sleep habit that puts pressure on one temple. A generic extension placement diagram won't protect that install. The row, anchor, clearance, and method have to follow what the client does with the hair every day.
Start with the head map before opening a weft, bead, or bond. Match the install to density, chemical history, styling habits, and maintenance tolerance. Then test the finished placement in motion, because an install that looks invisible while the client sits still can reveal tracks, pull at the perimeter, or feel uncomfortable as soon as she moves.
The consultation and head map determine everything that follows, so they happen before the hair is prepared for installation. Pull the client's hair completely back into the position she wears, not the position that makes the salon sectioning easiest. A client who lives in a high ponytail needs a different perimeter strategy from one who wears hair down with a low side part.
Ask direct questions before drawing a single row:
Use a rattail comb to create a clean horseshoe from temple to temple. Mark the occipital ridge, mastoid points, nape density, temple density, cowlicks, and crown growth pattern with sectioning clips. The mastoid areas deserve particular attention because they often become pressure points when a row is carried too far forward or too low.
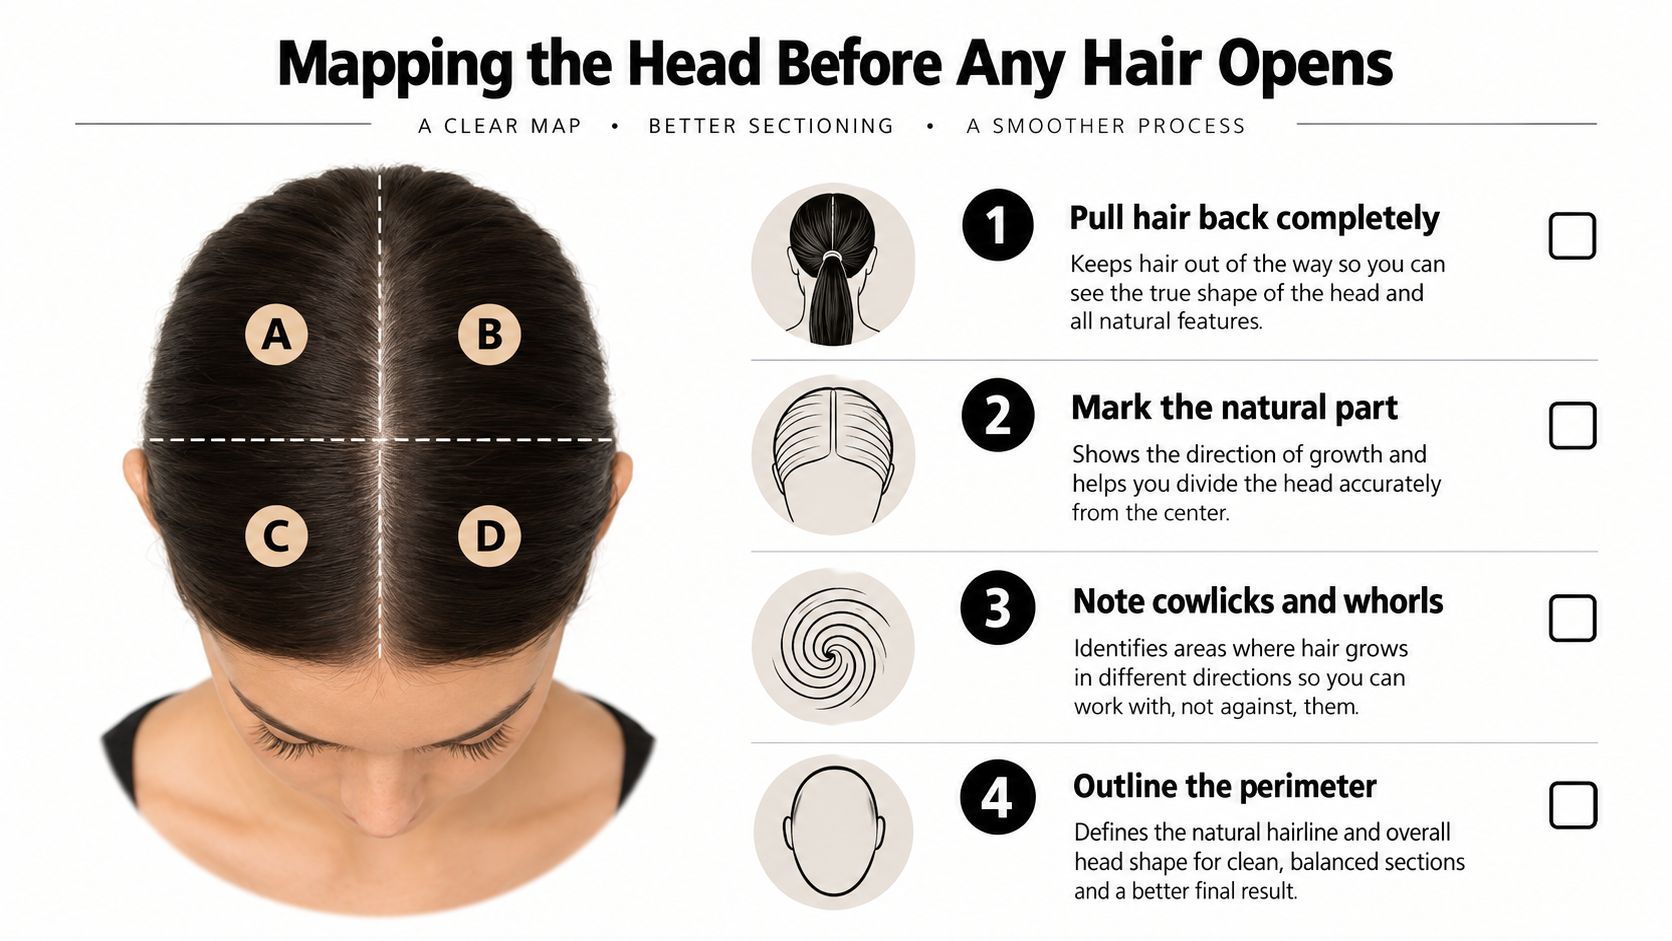
Photograph the map from three angles and save it to the client chart. Record density per square inch as a professional observation, along with the growth direction at the crown and any visible changes in the perimeter. Chemical history matters too. Confirm whether the client has had a color or other chemical service in the last eight weeks, because the attachment zone may not have the same resilience as untreated hair.
The map should show where the natural hair can safely support an attachment and where it can't. Thin temple sections, fragile nape hair, strong cowlicks, and active areas of movement are not interchangeable. A row that sits comfortably on the occipital area may tent at the crown or pull at the side of the head.
Practical rule: The client's everyday styling position is the real installation position.
Use the hair-extension measuring guide to keep the consultation organized, then translate those measurements into a placement plan rather than treating them as a template. The map should identify the first possible row, the last safe row, the anchor zones, and the areas that require extra clearance.
Sectioning must follow the method and the client's daily styling, not a standard head diagram. A client who wears a high ponytail, parts heavily to one side, sleeps on one side, or trains frequently needs different row positions, anchor zones, and per-strand clearance. Mark those demands before opening any hair. The client's everyday styling position determines the installation position.
For Tape-In systems, leave a half-inch perimeter of natural hair around every row. This margin helps conceal the attachment as the hair moves and keeps adhesive away from the most mobile edge hair. Increase the clearance where a ponytail, strong side part, or frequent hair manipulation will expose the perimeter.
Place the first row at least one finger-width below the occipital ridge. A row directly on the ridge can tent when the client lifts the hair, especially during a ponytail test. The natural hair must be completely clean, dry, and free from oils, conditioner, and styling residue before placement. A professional installation guide describes sandwich placement approximately half a centimeter away from the scalp, with light pressure used to secure the bond. Treat that measurement as a starting point. Adjust it to the client's density, growth direction, and movement pattern.
Use the Tape-In extension placement board to support consistent sectioning, then verify every section against the head map. Keep the first and last attachment zones conservative near the temples and nape. Clients who sleep on one side may need additional clearance on that side, while frequent gym clients need rows that remain stable through repeated sweat and movement.
For K-Tip extensions, place micro-bonds in a staggered brick pattern. Never stack bonds directly above one another. Staggering spreads visual weight and prevents several attachment points from forming one rigid pressure zone.
Keep each bond fully within its selected section, with enough natural hair to support the attachment without forcing an oversized strand. Fine hair may require smaller, more carefully spaced sections. Stronger density can support fuller distribution, but the row still needs to follow the client's part and ponytail path. A client expecting a completely maintenance-free service is not a suitable match, because K-Tips require planned professional removal and inspection.
For Hand-Tied Wefts, anchor beads at the mastoid points and keep the row from crossing the natural part line by more than a quarter inch. Set the row to follow the hair's fall. If it lifts when the client changes her part or ties the hair back, reposition it before adding density.
For Microlinks, alternate the sides of each parted subsection so the row loads evenly. Concentrating every bead on one side places unnecessary stress on one scalp zone. The Conde Hair Plier Loop Clip Microlink Mini Kit includes a professional-grade loop plier, loop, and clips for standard microlink and I-tip systems, including silicon-lined aluminum and copper bead systems.
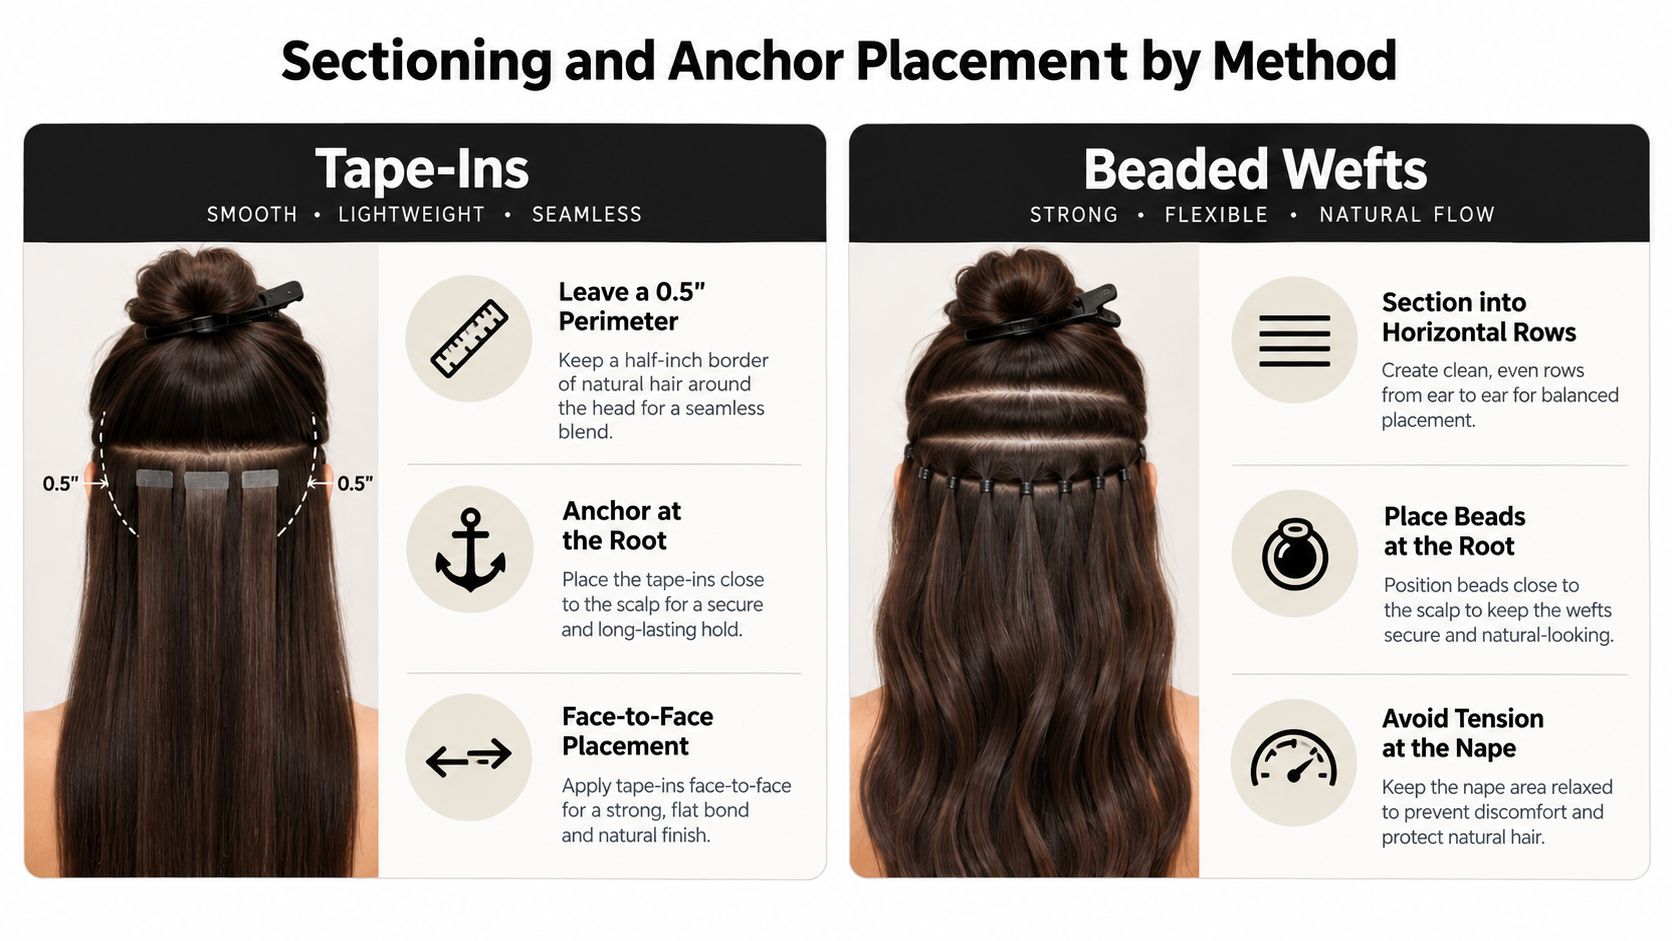
The attachment should feel secure without excessive compression or tension. Sustained tension can loosen the hair shaft from the follicle, cause chronic follicular inflammation, and progress from a reversible stage to permanent scarring alopecia if the load persists. Perimeter clearance, balanced anchors, and timely removal therefore belong in the placement plan, particularly for clients who wear tight ponytails, sleep against one side, or train often. Clinical literature on traction alopecia identifies excessive tension and extension-related methods as placement risks.
The method should follow the client profile, not the stylist's last successful install. Fine hair with a high ponytail requirement needs concealment and low-profile distribution. Dense hair worn down can support a different row strategy, especially if the client doesn't demand frequent updos.
| Client Factor | Tape-Ins | K-Tips | Hand-Tied Wefts | Microlinks |
|---|---|---|---|---|
| High ponytail | Requires careful perimeter clearance and paired placement | Strong option for discreet, distributed placement | Can show if rows sit too low or too close to the perimeter | Works only when bead placement stays clear of the ponytail path |
| Extreme side part | Pairs should travel with the natural fall | Stagger bonds away from the forced part line | Set the row slightly off the natural part | Alternate subsection loading to avoid a visible bead line |
| Fine density | Lightweight, clean sections are critical | Useful when bonds are small and well distributed | May create bulk if the row is too concentrated | Requires conservative strand selection |
| Frequent sweating | Adhesive may slip when heavy sweat and residue affect the bond | Keratin bonds can suit clients who need a less adhesive-dependent option | Can work with appropriate maintenance and secure anchoring | Requires regular inspection for bead movement |
| Low-maintenance habits | A poor choice if the client delays removal or uses heavy product | Still requires professional maintenance and removal | More forgiving visually, but not maintenance-free | Bead movement becomes visible and can increase tangling |
| Daily heat styling | Needs disciplined product control around the adhesive | Allows detailed distribution, with heat kept away from bonds | Requires careful styling around the row | Needs brushing and heat practices that don't drag the beads |
A client who never wears an updo may tolerate full Volume Weft rows better than someone who lifts the hair daily. A high-ponytail client with fine density may be better suited to K-Tips or a carefully distributed bond system that can hide a center part without forcing hair over a visible row.
Side-part wearers usually need the row set slightly off the natural part so the attachment doesn't sit directly under the part line. Center-part loyalists often need paired placements that travel with the fall on both sides rather than one broad row placed across the back.
Frequent gym sessions, heavy sweating, and swimming change the recommendation. Adhesive-dependent methods may slip when sweat, oil, or product residue compromises the bond, while keratin bonds or a professionally secured sew-in may better fit that routine. The stylist still has to weigh density, growth pattern, budget per move-up, and the client's willingness to attend maintenance appointments.
Use the overview of hair-extension methods as a method reference, then make the final choice from the client's actual styling behavior. A method is wrong if it only looks good in the salon chair.
Blending fails when color is placed where the hair doesn't move naturally. A solid weft can disappear under a dense nape but look abrupt beside a bright face frame. Dimensional hair can support a highlight panel, yet create visual noise if it is stacked directly under a strong part line.
Start with the client's movement map. The part line, ponytail height, and face frame determine which color should sit near the surface and which should remain deeper in the installation.
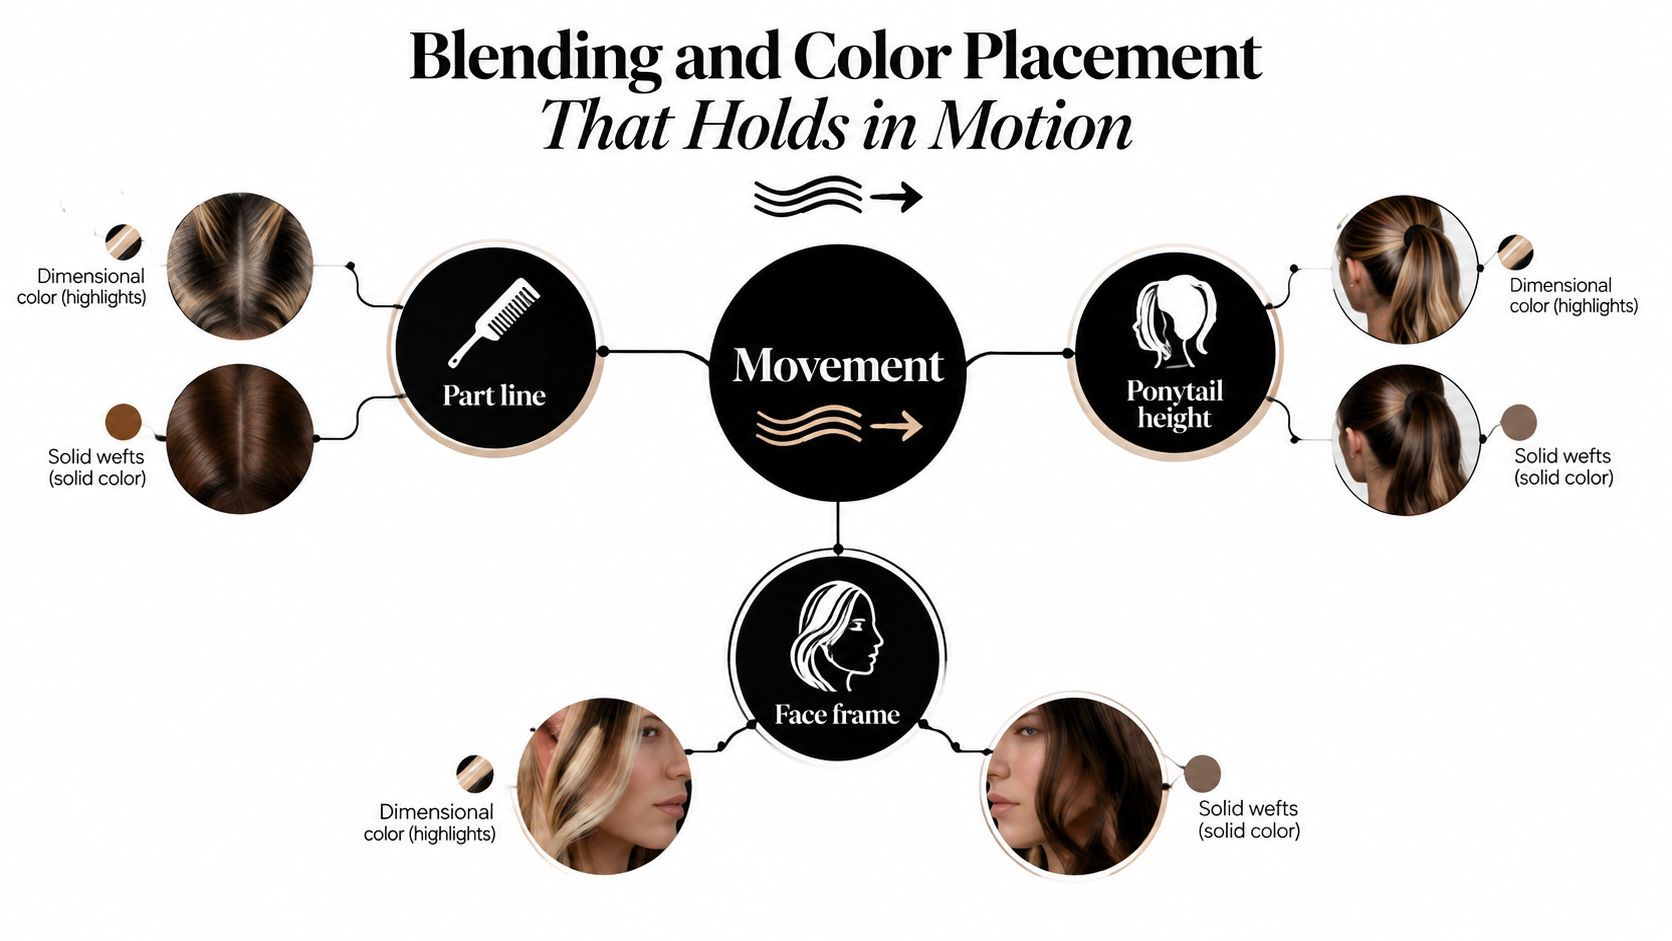
The darkest dimension generally belongs at the nape and temples, where natural shadow falls. Move lighter dimension toward the crown and part only when the client's existing color supports that progression. A bright extension placed too low can make the nape look disconnected, while a dark panel placed beside a light face frame can create a hard vertical block.
Map each extension row to the client's highlight panels. If the horseshoe crosses two distinct color zones, break one row into two blends rather than forcing one shade across the entire section. Professional color matching guidance helps organize that selection, but the final check must happen against the client's hair in the lighting and part she uses outside the salon.
Solid wefts work well as depth layers. Dimensional pieces belong where the natural hair already creates movement, not where there is empty space. The objective is a believable swing, not maximum shade variety.
Three tests expose placement problems quickly:
Keep enough clearance around the ears and hairline for believable movement. A low-profile method can still look obvious if the placement ignores the curve of the head. The stylist should watch the hair swing from several angles before approving the blend.
Comfort starts at the anchor. After every row, the stylist should test the attachment instead of relying on appearance alone. A clean-looking row can still carry too much load on a small section of natural hair.
Run three checks:
| Method | Move-Up Window | Tension Red Flag |
|---|---|---|
| Microlinks | Use the salon's planned inspection schedule | Beads creeping down the strand or loading one scalp zone |
| Tape-Ins | Follow the professional maintenance plan and inspect early if slipping occurs | Adhesive slip, tenting, or pressure at the perimeter |
| K-Tips | Schedule professional review before visible growth compromises the bond | Bond shadows, clustered attachments, or scalp warmth in one area |
| Hand-Tied Wefts | Professional move-up commonly occurs every 6–8 weeks to prevent matting, breakage, and visible track growth, with the row repositioned closer to the scalp during maintenance (weft maintenance guidance) | Pitting, row lift, matting, or pressure at the occipital ridge |
Traction risk rises when tension remains continuous. Evidence reports the highest odds of marginal traction alopecia when traction was added to relaxed hair, with an odds ratio of 3.47, a 95% confidence interval of 1.94–6.20, and P<.001, compared with natural hair (clinical evidence on marginal traction alopecia). The practical response is conservative placement, not tighter attachment.
Same-day comfort also depends on styling instructions. A high ponytail can drag on attachment points, side sleeping can press the temples, and too many bonds in one zone can make the scalp feel warm or tender. The take-home card should be plain: sleep on a silk pillowcase, clip the hair up rather than back, and brush from the ends first.
For method-specific maintenance language, use the Tape-In extension longevity guide, then document the client's personalized timing rather than giving every head the same calendar.
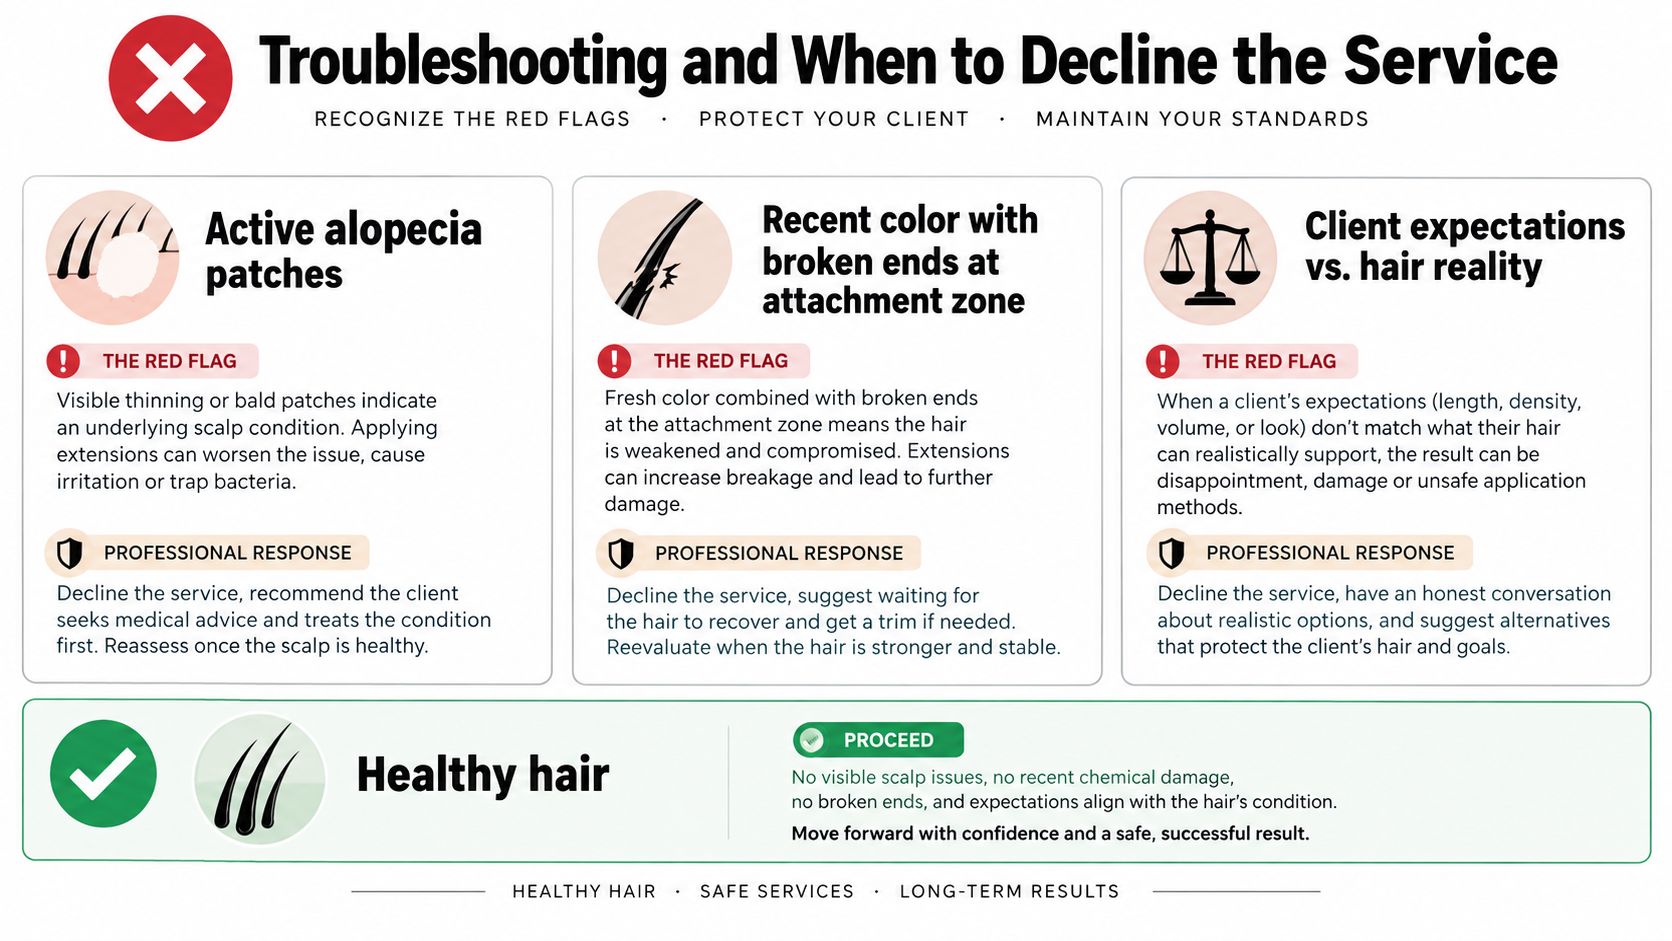
Decline or postpone the install when the planned attachment zone cannot safely support the method. Active alopecia patches, broken ends after recent color, density that cannot conceal the attachment, and a documented pattern of poor aftercare all warrant a clear conversation before any hair is opened. The client's routine matters too. A frequent gym schedule, daily high ponytails, a fixed side part, or side sleeping can make an otherwise workable placement unsuitable.
Traction alopecia requires conservative judgment. Sustained tension can progress from reversible damage to permanent scarring alopecia. Excessive tension has also been associated with severe scalp ulceration and alopecia within 11 days of synthetic braid placement, so pain during or after installation is a stop signal, not an acceptable adjustment period (reported traction-related complications). If a client reports tenderness, burning, numbness, or a pulling headache, remove or correct the source of tension promptly and reassess whether the service should continue.
Slipping Tape-Ins: Check cleansing, oils, conditioner, styling residue, and heat exposure around the adhesive. Remove compromised pieces and reinstall only after the natural hair is clean, dry, and correctly prepared. More adhesive will not correct contamination.
Microlink beads creeping down: Review subsection size, bead compression, strand selection, and attachment height. Reposition the bead instead of repeatedly clamping weakened hair. If one area carries more weight, revise the row balance and anchor placement.
K-Tip shadows showing through fine hair: Reduce visible density near the top, stagger bonds, and place them where the client's natural coverage can conceal them. An exposed part and fine hair may require a different method, fewer bonds, or a declined install.
Weft bulk at the occipital ridge: Move the row below the ridge, reduce concentration, or select a thinner construction such as Thin Weft. Account for how the client sleeps and wears a ponytail before finalizing the row.
Broken ends at the attachment zone: Do not anchor into compromised hair. Reschedule after assessing integrity, then explain that density and strength set the limit for the result.
Supplier labels such as 8A, 10A, and similar numbering systems aren't regulated by a governing body. Since these grades lack an industry-wide standard, evaluate cuticle integrity, alignment, shedding, combability, and durability after washing instead (hair-grade labeling guidance).
Use this extension guidance for thin hair when method selection depends on limited density, but keep the consultation specific. Explain cleansing, brushing from the ends, controlled ponytail tension, and professional removal or move-up. Record the client's lifestyle constraints and book the next maintenance appointment before the first bond slips.
Conde Professional supplies licensed salon professionals with Volume Weft, Thin Weft, Tape Weft, Tape-In, K-Tip, Clip-In, and Bulk collections, along with installation accessories and education. For placement support, shade selection, and method planning, visit Conde Professional and open a professional account before the next consultation.


