Your cart is empty
Tax included and shipping calculated at checkout

Drawer menu
Tax included and shipping calculated at checkout
A professional account gives you stylist pricing, priority support, early access to new releases, and education developed by working stylists.


A tape tab lifts at the crown, a bead feels too tight at the nape, and the stylist reaches for the nearest plier. That reaction usually creates a second problem. Hair extension installation tools are method-specific systems, so the correct comb, connector, needle, plier, heat control, and removal instrument must match the attachment being installed.
For licensed professionals, the useful question isn't which kit looks most complete. It's which tools control sectioning, anchoring, bonding, tension, blending, move-up, and removal for the service in front of the chair. The references below map those decisions across tape-in, weft and sew-in, microbead, nano, K-Tip, Clip-In, and Bulk work, with practical checks for compatibility, maintenance, ergonomics, and failure diagnosis.
A tape tab lifts at the crown, a bead feels tight at the nape, or a K-Tip bond spreads beyond the intended section. The tool chosen in that moment affects whether the correction solves the fault or creates another one. Hair extension installation tools are method-specific systems. A tail comb controls the part, a bead threader loads the connector, aligned pliers close it evenly, and a removal tool releases the attachment with less unnecessary manipulation.
Each system also imposes different compatibility and ergonomic demands. Tape work requires clean isolation and adhesive-safe handling. Weft and sew-in services depend on stable sectioning, needle control, and organized thread management. Microbead and nano installs require jaws that meet accurately around small connectors, while K-Tip work adds controlled heat and bond removal. Bulk and Clip-In services shift more of the work toward customization, finishing, and reuse.
A professional station should follow the service sequence, not brand grouping or visual appeal. Keep prep tools together, place attachment tools within the dominant hand's reach, and separate removal instruments from clean install hardware. Before starting, verify that each connector, adhesive, bond, needle, or clip matches the method and that the tool closes, heats, or releases as intended. This reduces improvisation when a failure appears during the appointment.
A clean install begins before any bead, tape, or bond reaches the hair. Section size, direction, tension, and visibility determine whether method-specific hardware can work correctly. Expensive attachment supplies cannot compensate for inaccurate parting or uncontrolled handling.
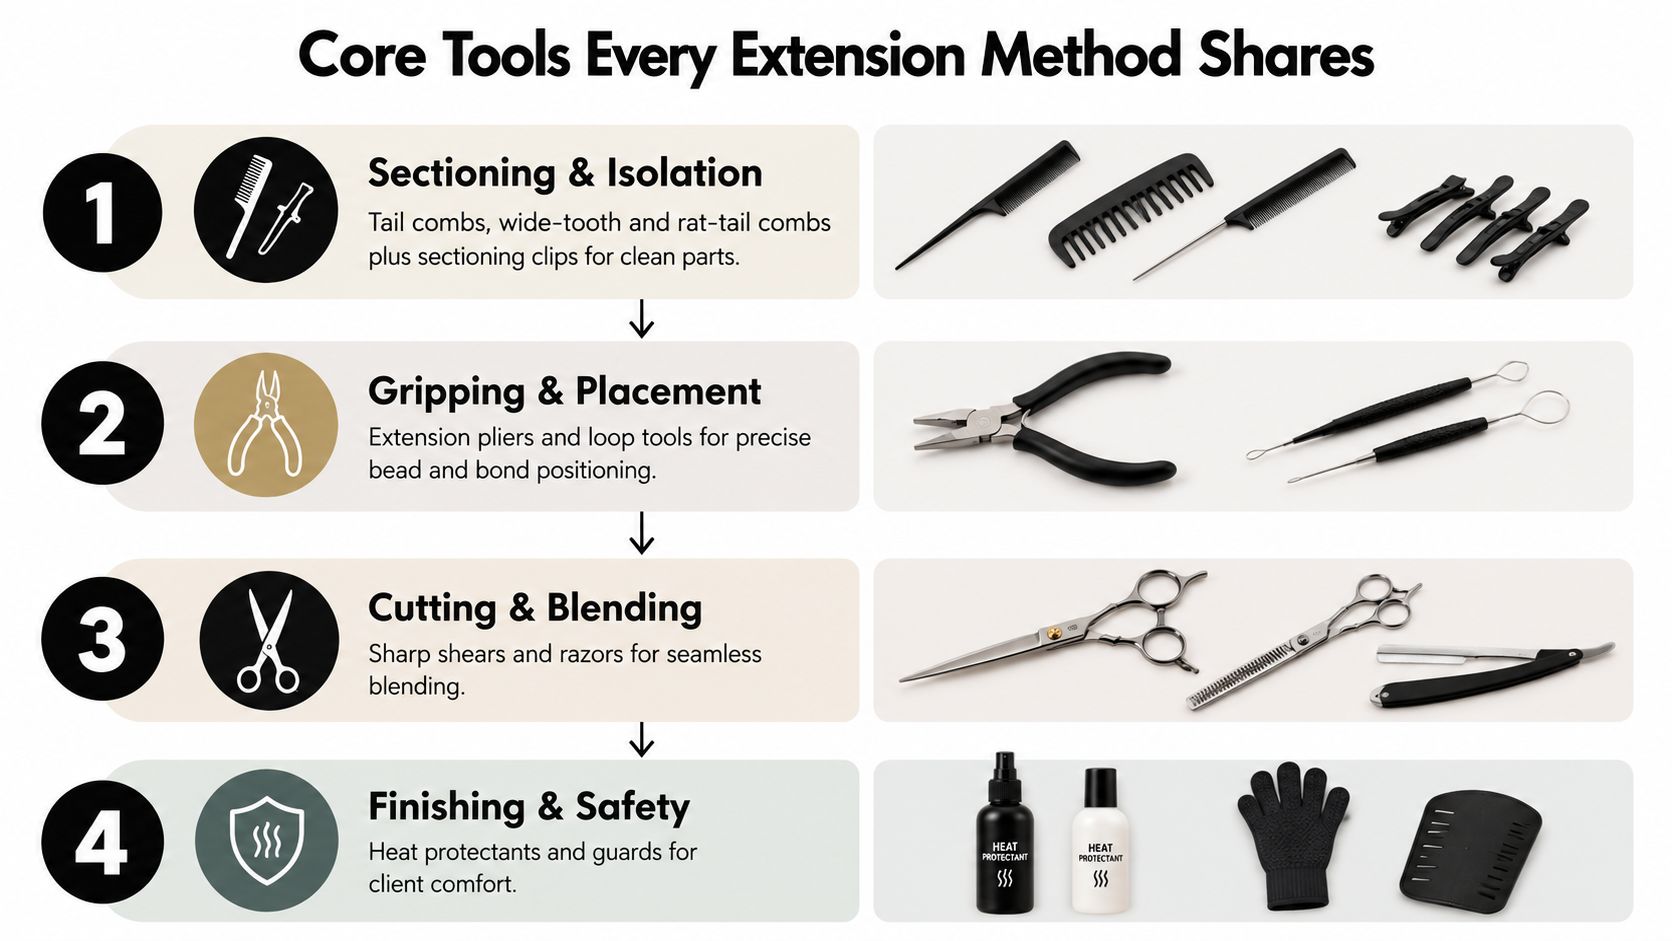
Use a tail comb for precise horizontal and vertical partings. A rat-tail comb gives better control for narrow subsections, while a wide-tooth comb detangles without pulling through an attachment. Clips should hold the upper hair securely and stay out of the working section.
For bead-based methods, the section controls the attachment's load and placement. Create a horizontal part above the nape, then work in approximately 1-inch sections or boxes before threading hair through the bead and clamping it. Adjust that size for the client's density, the attachment type, and the amount of natural hair supporting the extension. Smaller sections improve control but can increase installation time and concentrated tension. Larger sections work faster but may overload the attachment.
Extension pliers should close with evenly meeting jaws. Poor alignment produces an inconsistent clamp, damages a connector, or forces excessive hand pressure. Loop and crochet-latch tools guide hair through beads, connectors, and prepared attachment points. Match the tool to the opening. A hook that is too large disturbs the section, while one that is too small slows placement.
Cutting and finishing tools complete the shared station. Sharp shears, thinning shears, and razors support blending. A dryer and thermally controlled straightener help prepare and finish the hair, with heat kept away from adhesive, exposed scalp, and heat-sensitive bonds. Tint brushes may support controlled preparation or color work.
A practical universal station includes:
Set up this base first, then add the hardware required by the selected method. That sequence keeps the station adaptable without mixing clean install tools with removal equipment.
Tape-In installation depends on three controlled conditions: clean contact between adhesive and hair, a safe offset from the scalp, and even compression across the completed sandwich. The station needs a fine-tooth or rat-tail comb, sectioning clips, and extension bonding pliers with jaws that meet evenly.
Begin with hair that is completely clean, dry, and free of conditioner or oils. Residue weakens bond formation, while dampness can interfere with contact. Create a precise horizontal part and clip away the hair above it. Stray strands trapped between the tabs create gaps and early lifting.
The attachment format determines the pressing approach. Conde Professional Tape-In and Tape Weft should be placed according to their construction, rather than treated as interchangeable individual tabs.
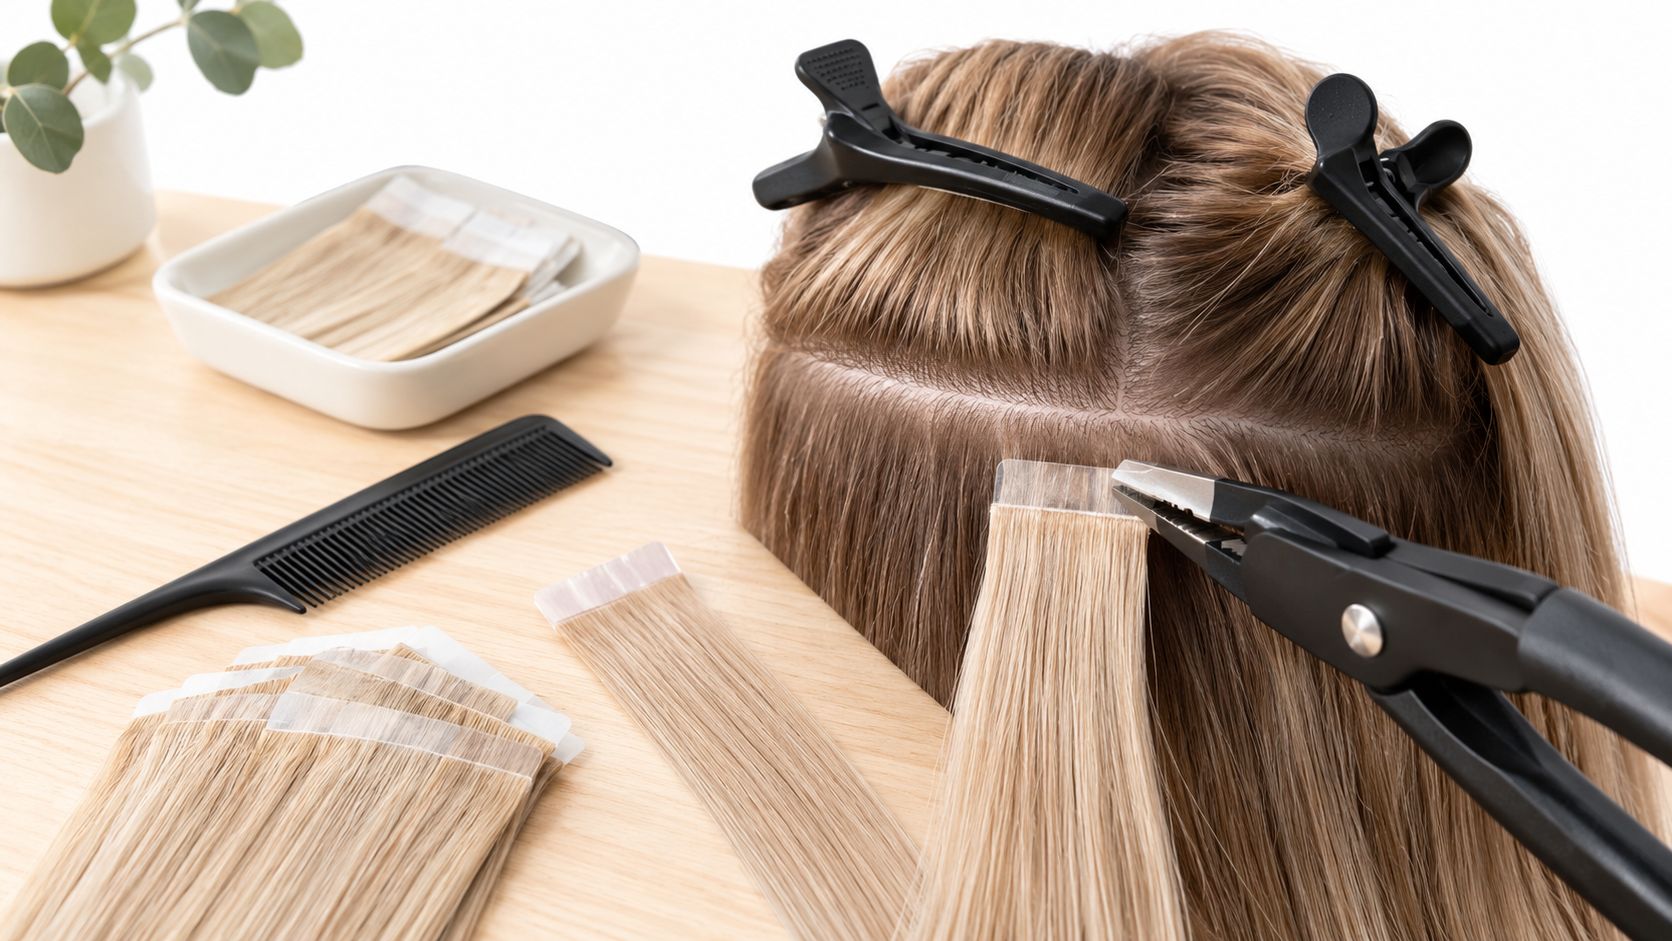
Before pressing, confirm:
Edge lifting usually indicates residue, incomplete contact, or uneven pressure. Slippage can result from residue or poor isolation. Once adhesive is visibly contaminated, repeated pressing will not restore the original bond. Remove and replace the compromised tab instead.
Map placement before the first application with this Tape-In extension placement board. A clear map supports consistent spacing and helps identify whether later movement comes from placement, sectioning, or bond contact.
Weft and sew-in services depend on three controlled actions: create the row, anchor the row, and sew with consistent tension. The tool set therefore includes sectioning combs and clips, weaving thread, straight or curved needles, and extension pliers. Beads may provide the anchor, while the needle and thread secure the weft to the prepared row.
A horizontal part above the nape establishes the first working line. Repeating controlled sections, often around 1-inch boxes in a professional beaded procedure, keeps the row predictable and helps distribute the attachment rather than concentrating it in irregular patches. The section must still be adapted to the client's density and the weft's construction.
Silicone-lined aluminum beads provide grip with cushioning against the natural hair. Aluminum is workable and can be clamped with controlled pressure. Copper may offer a different feel and deformation profile, so the stylist should assess jaw alignment and the bead's response rather than choosing solely by appearance.
Thread tension deserves the same attention as bead pressure. Too little tension allows movement and rippling. Too much tension can pull the row tight against the natural hair and make the service uncomfortable. Straight needles suit direct paths, while curved needles can help the stylist follow a row without forcing the wrist into an awkward angle.
The Conde Volume Weft and Thin Weft collections can be evaluated against the client's density, desired fullness, and ability to support a row. A weft method isn't the right choice for every fine or fragile head of hair. A lighter, more targeted method may provide better control when a continuous row would require excessive anchoring tension.
The Conde Hair Professional Hair Extensions Stand is designed to organize up to 24 bundles of strand-by-strand extensions or 60 Tape-In singles, according to the publisher's product information. That kind of stand keeps the working weft, thread, and attachment points visible rather than piled on the station.
Reusable metal hardware should be cleaned and disinfected according to salon infection-control procedures. Dry tools fully, inspect plier jaws and needle points, and store beads separately from sharp instruments. The needle selection guide is useful when a stylist needs to match needle shape to the row and sewing path rather than defaulting to one needle for every install.
A client with fine hair and low tolerance for tension needs a different tool setup from a client requesting dense, long-wear fusion. Microbead, nano, and K-Tip systems solve different control problems, so match the hardware to the section size, attachment visibility, and removal plan.
Beaded methods use mechanical compression and avoid heat. Common professional beads are often 4 mm to 5 mm. Compact nano profiles suit lower-visibility attachment points, but the smaller hardware gives the stylist less room for correcting a misplaced section. Silicone-lined beads improve grip and cushion the natural hair. The working sequence is straightforward: thread the natural hair through the bead, insert the extension strand, then clamp the bead flat with professional pliers.
A practical fit target leaves about 1/8 inch from the scalp. That spacing reduces over-tension and limits breakage risk. If the bead sits too close, discomfort can develop even when the bead size is correct. Check that each bead lies flat, the section is clean, and the plier jaws close evenly. Uneven compression can crush one side of the bead and weaken its hold.
Micro-link work benefits from a loop tool that loads the bead without dragging or compressing the natural hair prematurely. The Conde Hair Plier Loop Clip Microlink Mini Kit groups the small hardware used for looping, clipping, and clamping. Choose the bead and plier profile together. A narrow bead requires controlled hand pressure and accurate sectioning, while a larger bead may offer easier handling at the cost of greater visibility.
K-Tip requires a thermally controlled fusion tool, heat protection, and bond-removal tools suited to the system. Heat can shorten installation time, but poor temperature control, prolonged contact, or misplaced bonds can cause cracking and complicate removal. Beaded systems remove the heat variable, yet they demand consistent section geometry, spacing, and clamp pressure. The nano-tip education guide can support method selection, while the final choice should follow the client's density, scalp spacing, desired visibility, and maintenance capacity.
| Tool System | Key Hardware | Best For | Trade-off |
|---|---|---|---|
| Microbead | Silicone-lined beads, loop tool, extension pliers | Controlled strand-by-strand placement | Poor spacing or color matching makes hardware more visible |
| Nano | Compact nano beads, loop tool, aligned pliers | Lower-visibility attachment points | Smaller hardware demands more precise placement and hand control |
| K-Tip | Fusion tool, heat protection, bond-removal tools | Fusion work with controlled heat | Heat adds safety and removal variables |
| Bulk preparation | Sectioning tools, tip-forming and finishing tools | Custom strand preparation and targeted placement | Preparation takes more time before installation |
Final inspection should include bead alignment, bond placement, scalp clearance, and tool pressure marks. These checks expose control problems before the client leaves the chair.
Clip-In and Bulk work rewards organization more than speed. The tools support customization, trial styling, temporary wear, and strand-by-strand preparation rather than a single standardized install.
A Clip-In station needs clip hardware, a color ring, sectioning combs, clips, thread, scissors, and a stand that keeps the hair aligned during sewing or adjustment. Seam releasers help with controlled removal of stitches. Crochet-latch tools can assist with threading and small attachment preparation, but they shouldn't be dragged through aligned hair or used aggressively near the cuticle.
Bulk hair may be prepared for K-Tip or I-Tip creation, depending on the stylist's system. The working bundle should remain supported, with the cuticle direction preserved and the hair separated in manageable portions. Rough handling, open storage, and repeated combing from the wrong direction can increase tangling and shedding during preparation.
A bridal trial offers a practical example. The stylist can color-match with a ring, secure Bulk hair on an extension stand, pre-section only the amount needed for the trial, and keep each prepared portion clipped in cuticle alignment. That approach limits unnecessary handling and makes removal, adjustment, and later reuse more orderly.
Conde Professional's Clip-In collection fits clients who value flexibility over a fixed attachment. Bulk is better suited to a stylist who needs to customize the attachment rather than accept a preconfigured base. Neither method should be positioned as a universal substitute for a secure, longer-term system.
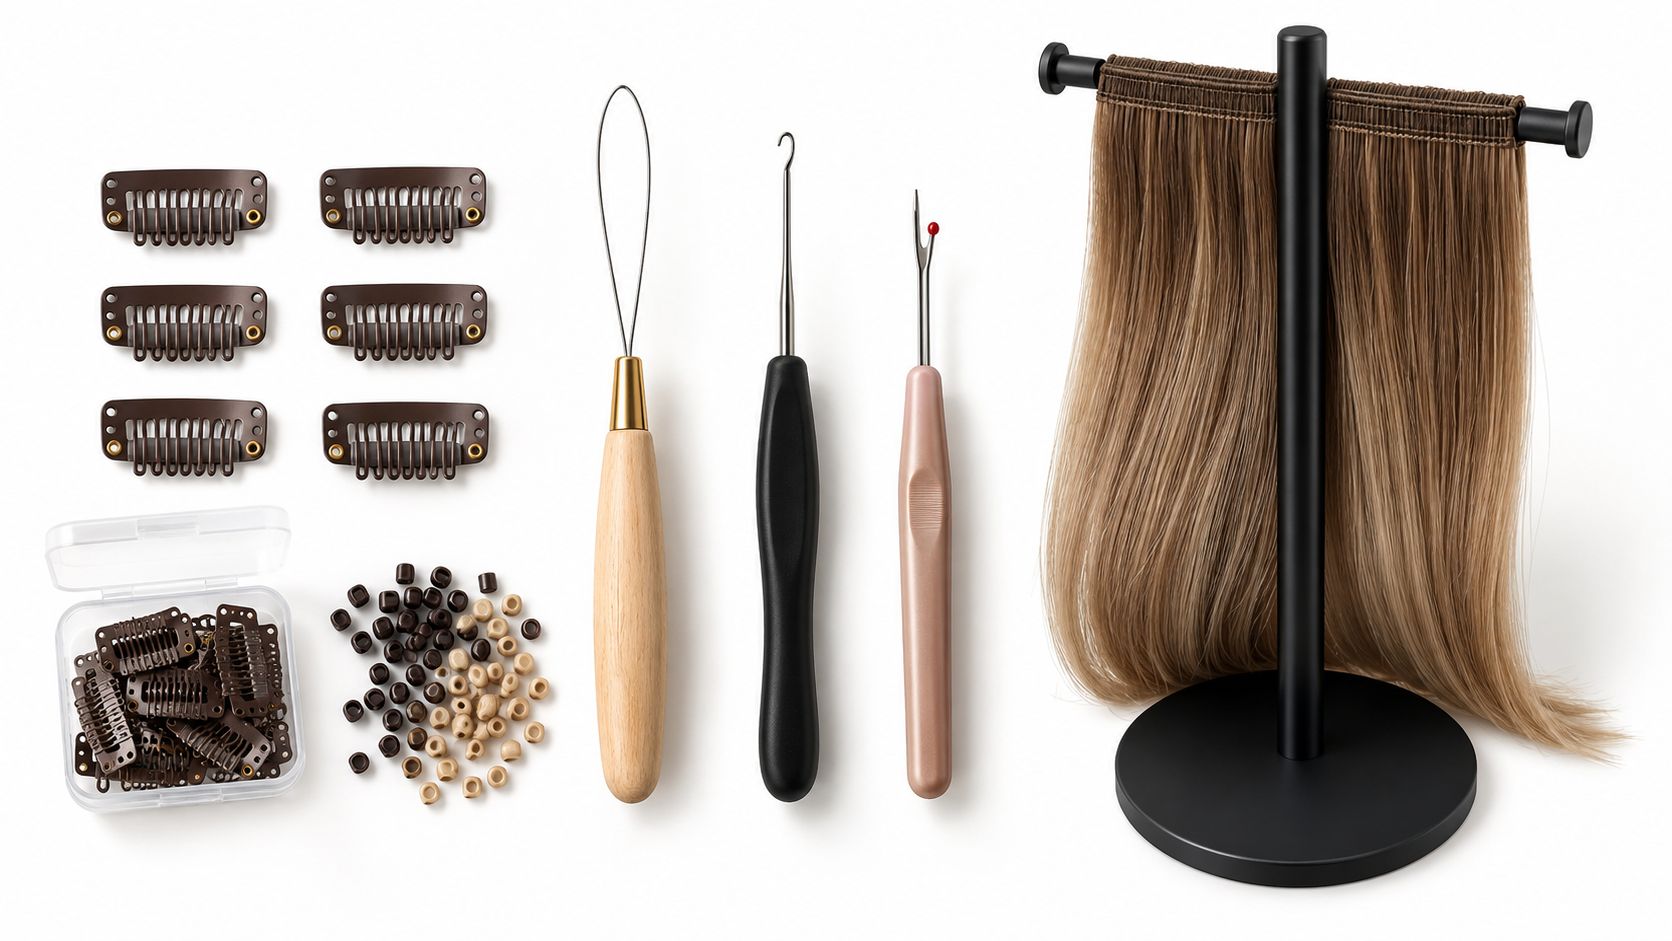
For removal and reuse, separate clean hair from used hardware immediately. Label prepared pieces by client, shade, texture, and attachment type, then store them dry and supported rather than compressed in a drawer. The Clip-In clip guide helps keep clip placement tied to the base construction instead of relying on improvised spacing.
Tool buying should start with the failure the instrument must prevent. A plier that looks polished but closes unevenly is a poor choice for beads. A heat tool that doesn't maintain controlled temperature creates risk during fusion. A stand that bends or crowds the hair undermines the organization it was meant to provide.
Supplier questions should focus on measurable hair performance, not decorative grading. “6A,” “7A,” “8A,” “9A,” and “10A” are supplier marketing labels with no governing body. A serious evaluation asks about cuticle integrity, alignment, shedding, combability, and wash durability, then checks samples through handling rather than accepting a grade as proof.
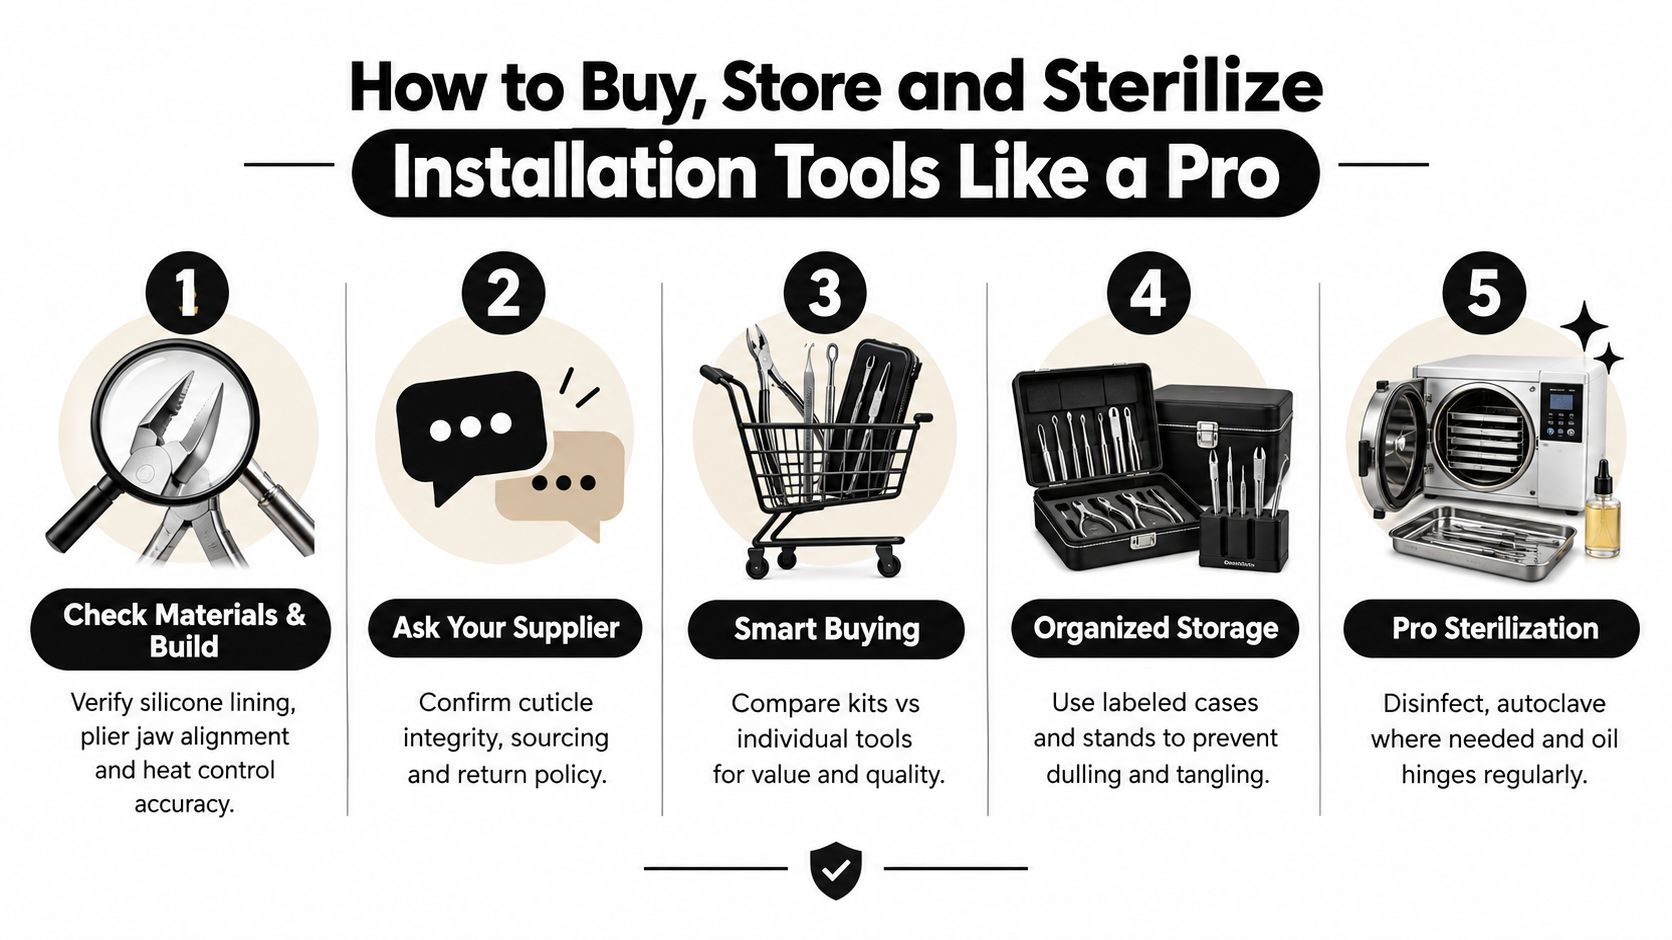
Store metal tools dry, separated, and protected from impact. Compartmentalized cases prevent plier jaws from striking scissors, while a heat-safe acrylic stand keeps extensions supported during preparation. Rotate tape and bead inventory so older stock is used appropriately, and keep adhesive surfaces sealed from dust and station residue.
Sterilization isn't a single universal action. Metal tools should be cleaned and disinfected under the salon's established procedures, with autoclave use where the tool and local protocol require it. Hinges need to remain clean and may require suitable maintenance oil after processing, while tapes and hair products must be kept out of chemical contact.
For wholesale purchasing, salon owners can open a professional account with Conde Professional and ask its team about method compatibility, shade selection, and education support. The decision matrix is simple: choose the method that matches density and lifestyle, select hardware that controls its specific failure points, and reject any product whose construction can't be inspected.
A station audit should answer one question quickly: can the stylist complete the install, correct a predictable problem, and remove the system without borrowing tools? Inventory should be planned by service volume and hair density, not by a fixed universal count.
For a light service, the station needs a controlled set of Tape-In pieces, a fine-tooth or rat-tail comb, clips, bonding pliers, and removal supplies. A medium service requires additional prepared tabs and more clips for separated working zones. Full-volume work needs a larger organized stock of tape pieces, replacement adhesive, cleaning supplies, and a stand or board that prevents tabs from collecting dust.
Pack weaving thread, straight and curved needles, beads appropriate to the system, extension pliers, a loop tool, clips, combs, and a stand. Keep spare needles and thread available because a damaged needle or contaminated thread shouldn't interrupt a row. The stylist also needs shears, thinning shears, and a razor for the final blend.
A microbead kit should contain beads, loop tools, connectors or disconnectors, aligned pliers, sectioning tools, and removal hardware. A K-Tip kit adds the controlled fusion tool, heat protection, and bond-removal equipment. Bulk preparation requires extra organization because the attachment is created before the final install.
A practical restock matrix looks like this:
| Service | Install essentials | Move-up and removal essentials |
|---|---|---|
| Tape-In | Tabs, comb, clips, bonding pliers | Tape remover, replacement tabs, cleaning tools |
| Weft | Thread, needles, beads, pliers, stand | Seam releaser, scissors, replacement thread |
| Microbead | Beads, loop, pliers, connector tools | Disconnector, replacement beads, comb |
| K-Tip | Fusion tool, heat protection, sectioning tools | Bond remover, controlled heat support, comb |
| Clip-In or Bulk | Clips, thread, stand, customization tools | Seam releaser, storage labels, alignment comb |
A professional stylist tool bag checklist can help salon owners audit each station without turning every method into one oversized kit.
A discreet attachment can still create substantial strain. During a long service, nano rings, micro-links, Tape-Ins, and fusion systems demand accurate sectioning, controlled placement, and repeated fine-motor work. Smaller connectors reduce visible bulk, yet they can increase the number of precise plier actions and the pressure placed on the stylist's hands.
The client and stylist experience different risks. A client may prefer a low-profile result, while the stylist manages repeated compression and fixed wrist positions. Poor bead spacing, undersized sections, excessive thread tension, or a missed scalp offset concentrate traction instead of distributing it through the row or attachment.
The method should be chosen with both hair tolerance and operator load in mind. A lightweight system is useful only when its tool demands, maintenance requirements, and removal process suit the service.
Heat-free methods remove heat exposure, but placement risk remains. Tape systems reduce repeated bead clamping, while clean hair, even compression, and correct positioning still determine bond performance. K-Tip services create a compact attachment, but controlled heat, hand stability, and disciplined removal remain necessary.
Practical rule: lighter hardware requires more precise assessment, not tighter placement.
A client's density, lifestyle, or maintenance commitment may make a small attachment unsuitable. Choose the system that gives the stylist secure control while keeping traction within the hair's tolerance and repetitive hand stress within a manageable range. This approach reflects professional extension techniques without treating low visibility as the only measure of a successful install.
Chair-side troubleshooting works best as symptom, cause, correction rather than as a defense of one method.
Salon owners should audit each station against the method checklists, then contact Conde Professional for education, shade, and method guidance. A practical next step is to visit Conde Professional and open the professional workflow that matches the salon's current install mix.


