Your cart is empty
Tax included and shipping calculated at checkout

Drawer menu
Tax included and shipping calculated at checkout
A professional account gives you stylist pricing, priority support, early access to new releases, and education developed by working stylists.


“Clip-ins are harmless because they come out at night” is one of the most persistent salon myths. A professional install is a tension-management service: the stylist assesses the scalp and density, selects a workable weight, distributes that weight across stable sections, conceals the attachment, and removes every weft without pulling against the follicle. That is how to put clip in extensions safely and make the result look intentional rather than just attached.
The method suits temporary volume, event styling, and adjustable length, but it isn't suitable for every client or every density. The workflow below treats clip-ins as removable styling tools, not as a low-skill shortcut.
Clip-ins are removable, but removal does not erase mechanical stress. Repeated clipping, excessive weight, poor sectioning, and upward pulling during removal can break fragile hair or concentrate tension over vulnerable areas. A 2023 dermatology review describes clips as a quick, temporary attachment method and notes that repeated removal may break fragile hair, particularly where traction alopecia or acquired trichorrhexis nodosa is present (dermatology review of hair extensions).
The consultation must account for stress that a client may not feel. Trichoscopic examination found broken hairs and signs associated with traction alopecia in all 12 women examined who wore extensions despite reporting no hair-loss complaints. A comfortable client can still have stressed hair shafts or follicles.
Professional rule: A clip-in should feel secure, never painful, and never rely on excessive pressure from a tightened clip.
Assess the scalp, usable density, strand strength, and the requested result before choosing a weft. Weight must be distributed across stable sections, with enough concealment to prevent exposed clips from encouraging tighter placement. If a section is thinning, fragile, tender, or chemically compromised, exclude it from the install rather than compensating with stronger attachment.
Existing traction alopecia generally requires evaluation of the underlying condition before extensions. Clip-ins may be the wrong method when the client cannot support their weight comfortably or needs frequent, prolonged wear. For practical guidance on adapting clip-ins to finer density, see clip-in extensions for fine hair.
Clip-ins are not automatically a low-risk service. Before the weft leaves its packaging, assess the scalp, usable density, strand condition, length, texture, and expected wear. A request for maximum fullness may call for fewer pieces placed more carefully, or for a different method altogether.
Check for tenderness, active thinning, fragile edges, breakage, chemical compromise, and sparse crown areas. Keep clips off visibly weakened hair, and do not use the front hairline to compensate for poor internal support. Existing traction alopecia warrants evaluation before an extension service, not a creative placement workaround.
As field purchasing benchmarks, fine or thin hair commonly falls around 80–120 g, medium-density hair around 120–160 g, and thick hair around 160–220 g or more. These ranges are working guides rather than clinical thresholds or guaranteed results. Choose the lightest set that achieves the requested finish while staying stable without pain or sustained scalp pressure.
Fine hair usually needs fewer or lighter wefts, staggered rows, and a controlled root cushion. Leave sparse crown zones free. Tightening clips or stacking heavy wefts at the nape does not solve low density. It concentrates load and can make the attachment easier to see.
Give care instructions before the client leaves. Extensions should come out before washing the natural hair, and removal technique matters as much as placement. The professional washing guidance for clip-in extensions can support the salon's own care instructions.
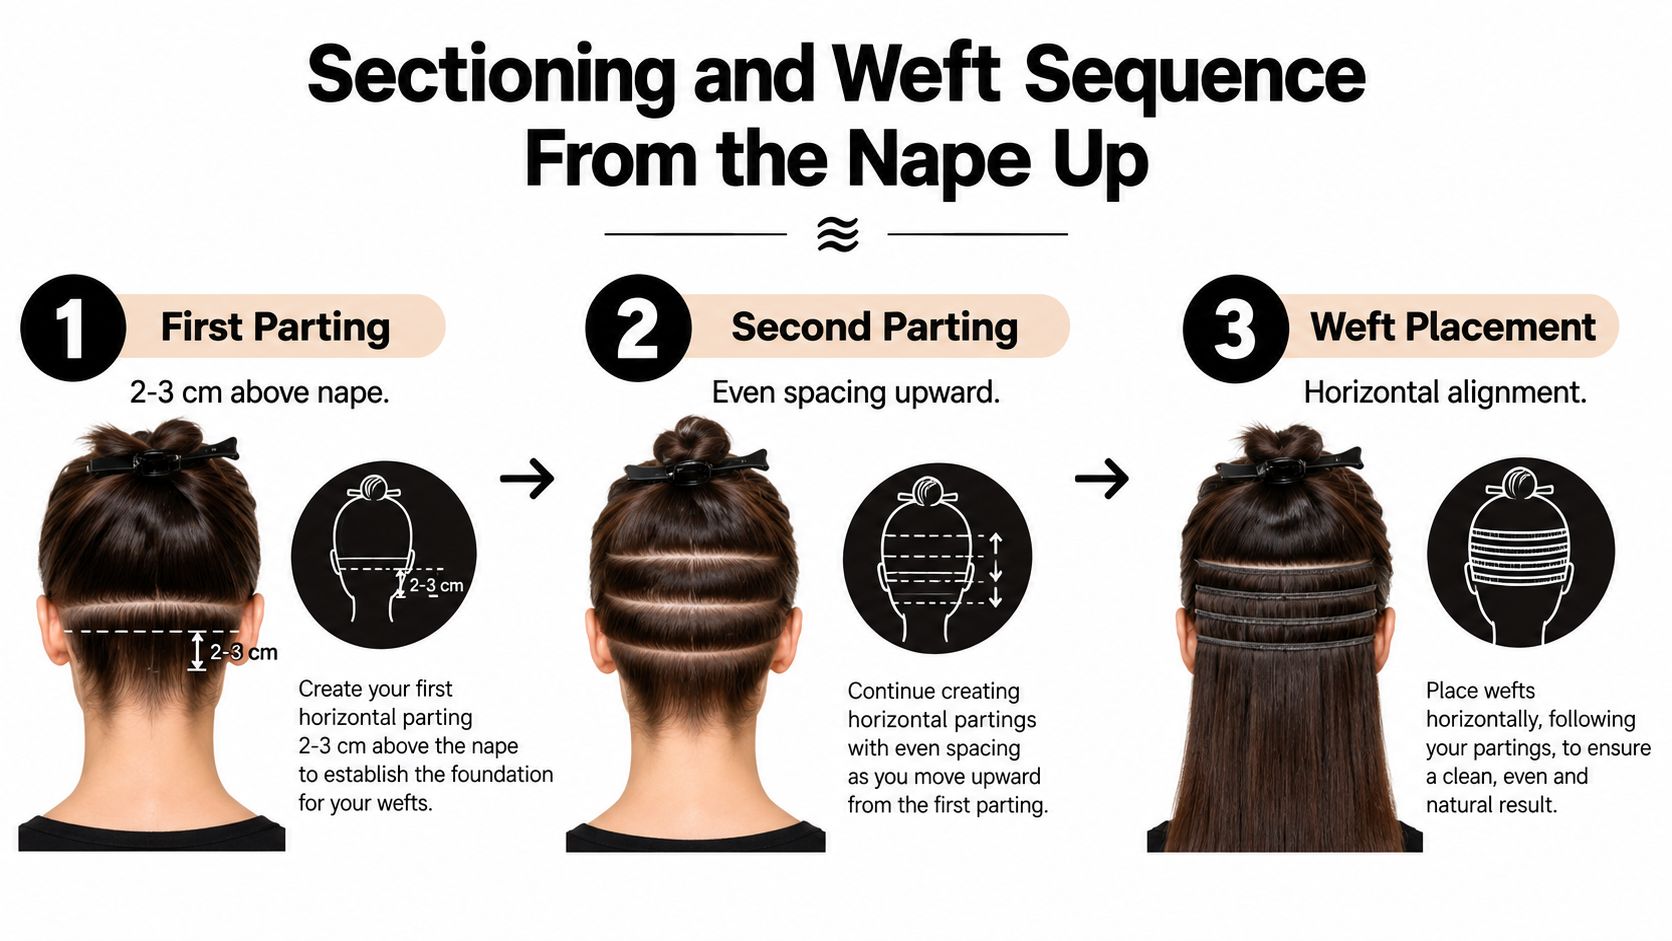
Random placement creates random load. A professional sequence follows the head's geography, beginning low at the nape and building upward so the widest wefts sit across the broadest back sections while the upper hair remains available for concealment.
Begin with clean, dry, detangled hair. Create the first horizontal parting approximately 2–3 cm above the nape, secure the hair above it, and prepare only the root area that needs additional grip. The lowest row should sit flat and below the natural hair's visible fall, not directly on the scalp.
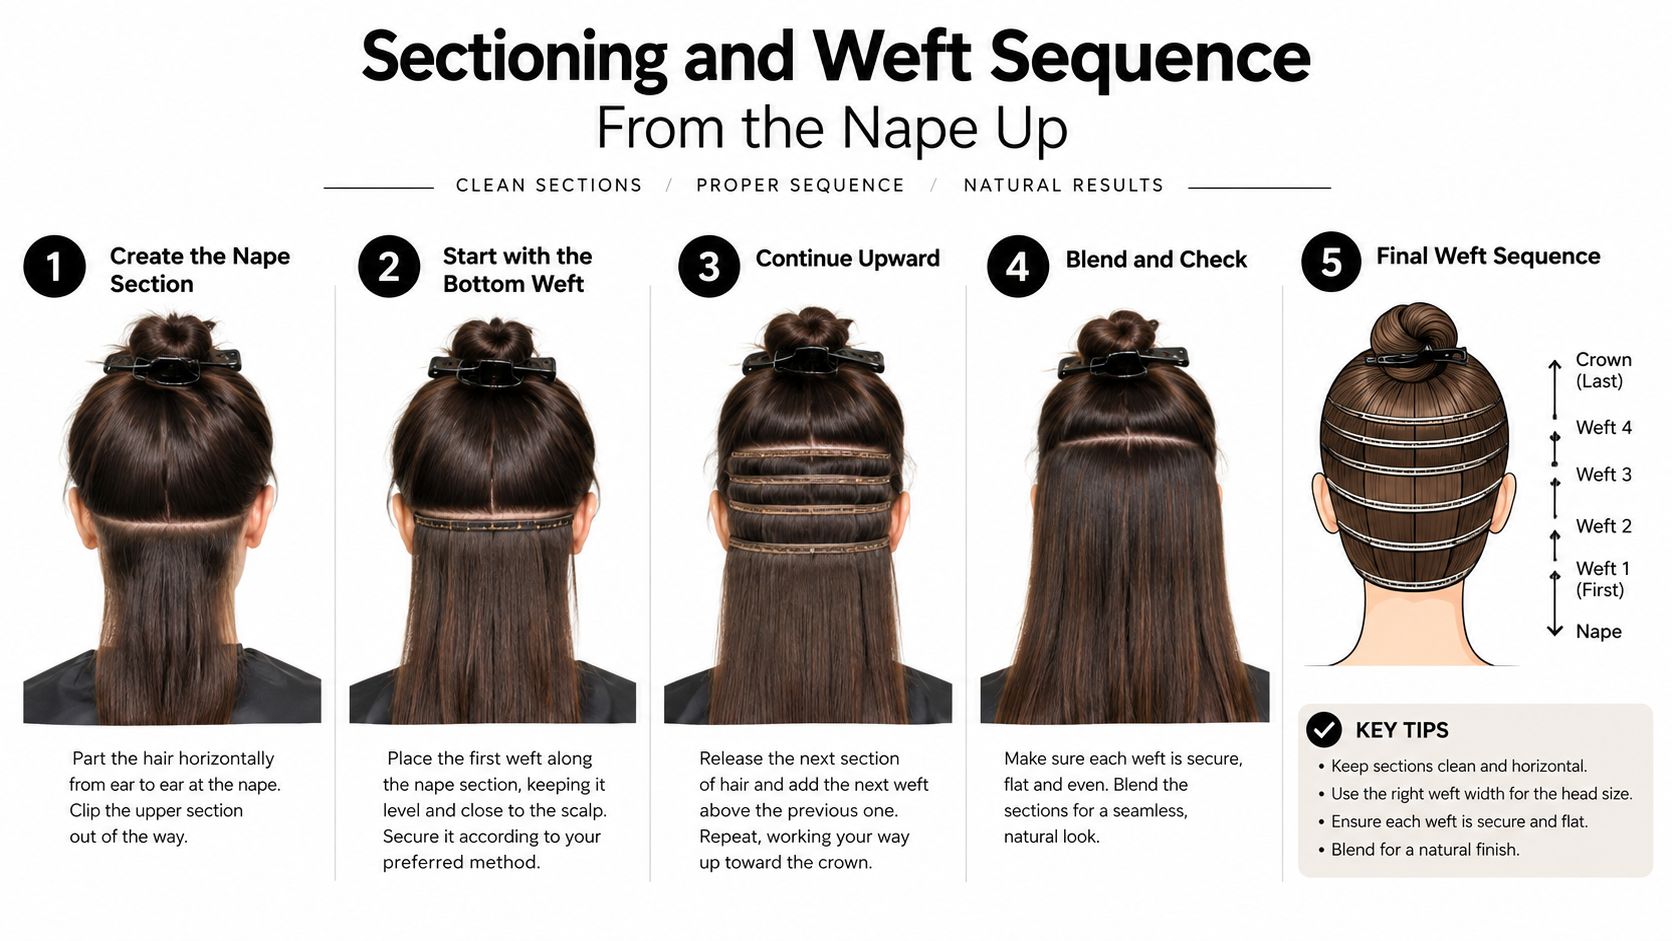
The extension placement guide reinforces the practical reason for this sequence: controlled spacing keeps attachment points aligned with the head shape instead of stacking excessive weight in one area.
The nape is a starting point, not a dumping ground for every heavy weft.
The central back usually offers the most usable horizontal surface, while the sides need smaller pieces that can disappear under sufficient overlying hair. The stylist should leave the crown free when density is low, because visible clips and localized tension become harder to disguise there. A clean parting also makes the removal service safer, since each clip can be located and released individually.
Sectioning determines where the weight goes. Root preparation determines whether the clip can stay there without being cranked tight. These are separate decisions, and confusing them is a common source of discomfort and breakage.
Prepare only the root area that lacks grip. Controlled backcombing, a suitable texturizing product, or another light anchoring approach can create a small cushion beneath the clip. Fine hair doesn't need aggressive teasing across the entire section. Overworking the root weakens the support and can make removal more traumatic.
Place the clip close to the prepared root area without scraping the scalp. Press the clip into stable natural hair, then close it from the center outward. This reduces inward pulling and helps the weft lie flat rather than folding or twisting at the ends.
After each weft, perform a gentle traction check. The attachment should remain immobile during a light tug, but the test shouldn't become a forceful pull. If the weft moves, the correction sequence is simple:
A lifted or twisted weft creates a bump, exposes the attachment, and distributes tension unevenly. Cranking the clip tighter may stop movement temporarily, but it turns a placement problem into a pressure problem.
The Conde Hair Professional Hair Extensions Stand can keep pieces organized during application and removal, particularly when multiple widths or textures are being assessed at the chair. Organization matters because the stylist should know which weft is being placed, where it belongs, and how it will be removed.
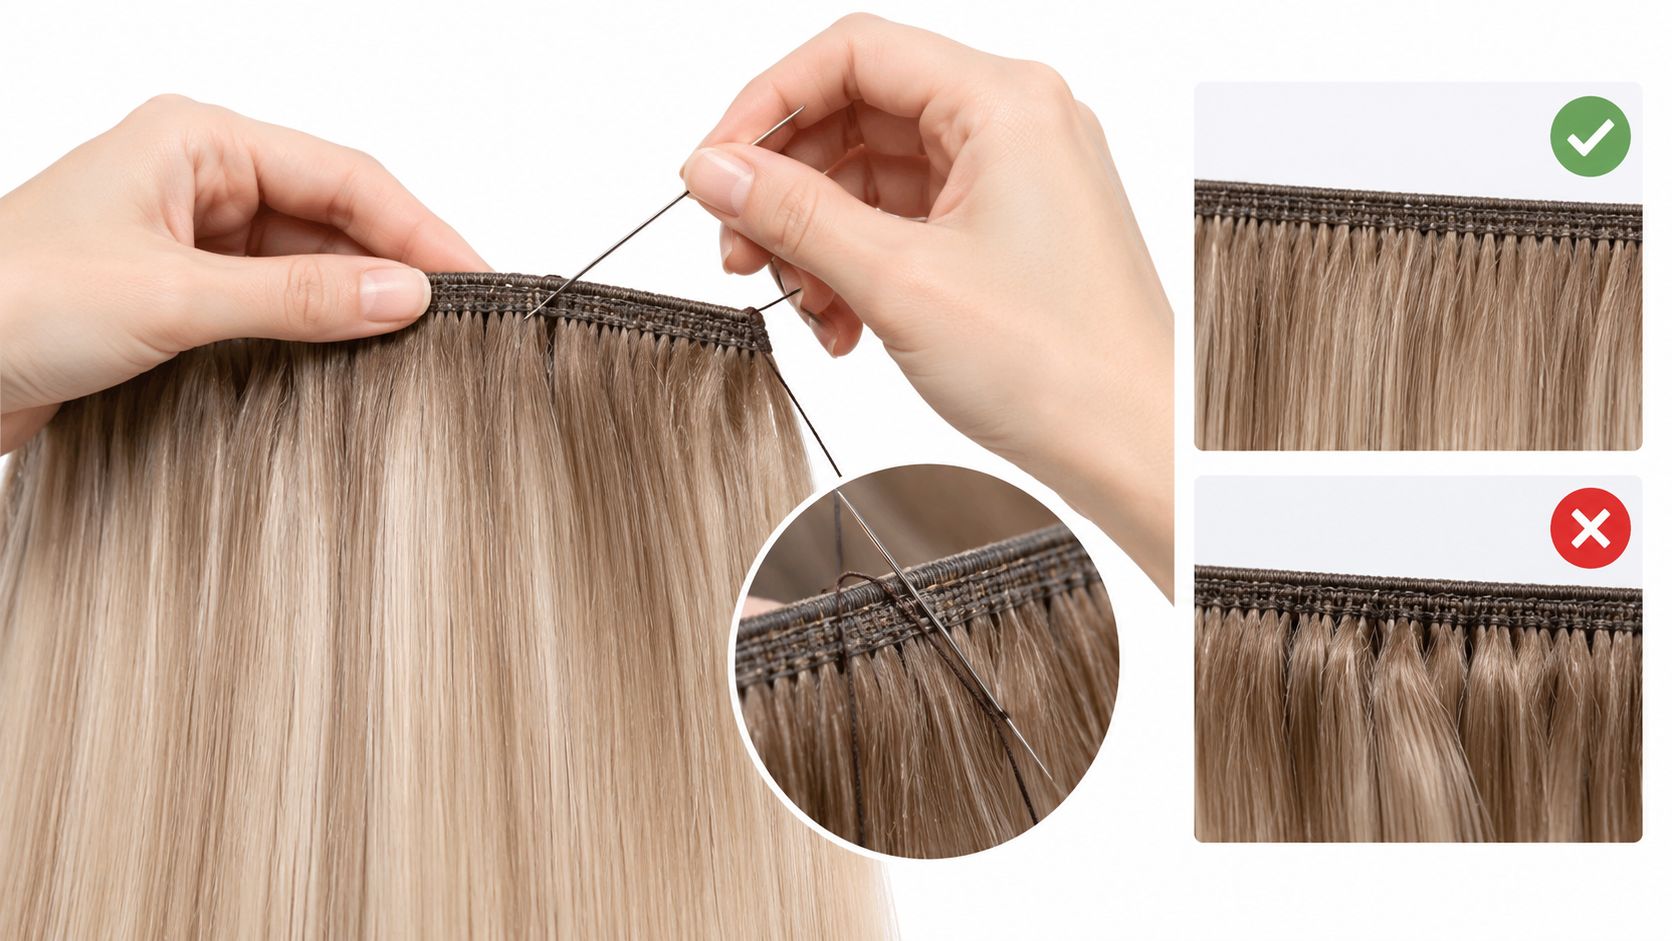
Clip construction and root contact deserve inspection before the first section is made. The hair clips for clip-in extensions guide can support a consistent salon protocol, but the stylist still needs to evaluate the client's actual hair rather than applying the same pressure to every head.
A salon result isn't defined by the number of clips installed. It is defined by whether the attachment disappears while the natural hair remains comfortable and visually balanced. Density, texture, and length determine the blend more than the clip count does.
Fine hair usually benefits from fewer or narrower wefts, staggered upward placement, and a deliberately preserved concealment layer. Sparse crown areas should remain free. A small amount of controlled root preparation may provide grip, but aggressive backcombing isn't a substitute for appropriate weight.
Wavy and curly textures need a matching movement strategy. A straight extension against a naturally irregular pattern can reveal the seam even when the clips are perfectly placed. Heat-style the natural hair and extensions together when the hair type and service plan allow it, then assess the transition while the client moves.
Extensions should not exceed twice the wearer's natural-hair length, a practical limit discussed in academic dermatology literature (extension length and traction guidance). Substantially shorter natural hair may need a shorter or lighter enhancement, a different placement plan, or a different Conde method rather than a full-length clip-in set.
The blend needs testing under real conditions:
The guide to blending hair extensions supports the central principle: less hair, better placement often produces a more natural result than maximum volume. Bridal clients especially need a durability check that considers photography, movement, and the hairstyle's concealment demands, not just a still mirror view.
A client whose density cannot conceal the attachment may be better served by a lighter design or another method. Volume Weft, Thin Weft, Tape Weft, K-Tip, Tape-In, and Bulk each create different installation decisions. A clip-in isn't automatically the most discreet option just because it is removable.
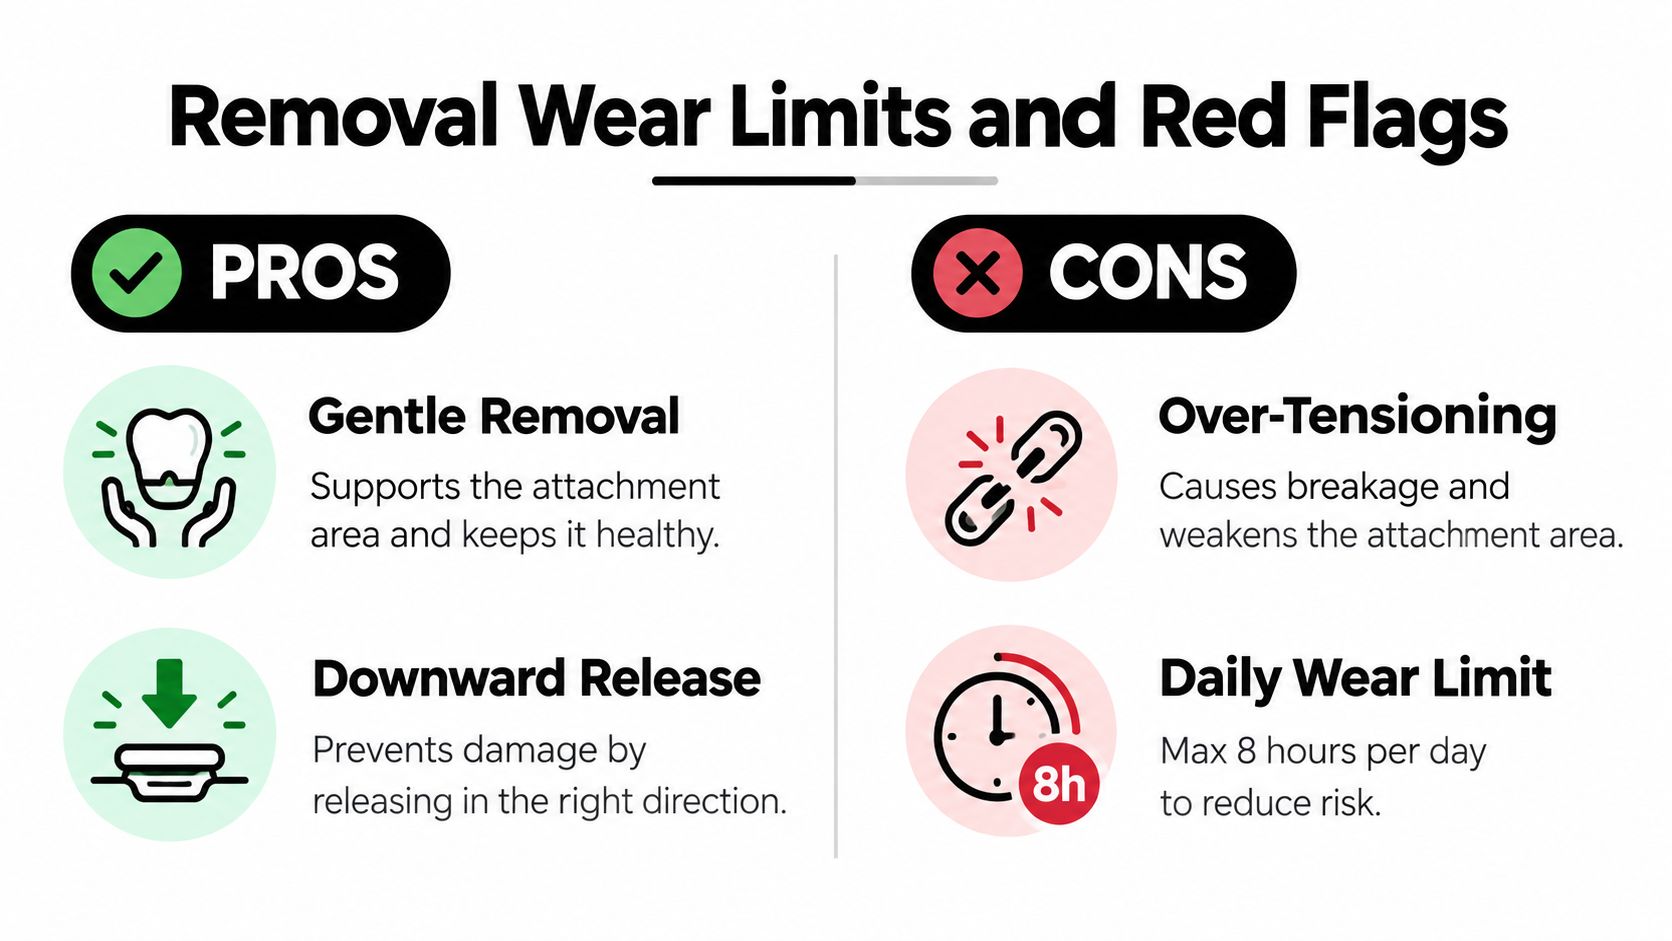
Removal is a tension-management step, not a quick pull. Support the natural hair close to the attachment, release each clip gently, and guide the weft downward while keeping the root stable. The attachment should leave the section in a controlled motion, without dragging across the follicle.
Take clip-ins out before sleep and before washing the natural hair. Overnight movement can maintain pressure at the attachment, while wet handling with the pieces installed adds weight and friction. Removability lowers exposure time, but it does not make excessive weight or poor placement safe.
Pain, headaches, persistent scalp pressure, and tightness signal a problem with the installation. Adjust or remove the attachment promptly. Clients should not be told to tolerate discomfort while the style “settles.”
Give every client clear removal instructions:
Clip-ins suit occasional, adjustable enhancement. They are not a permanent installation system, and repeated daily wear can expose the natural hair to cumulative mechanical stress. Clients with existing traction alopecia or concerning changes need appropriate evaluation before extensions are considered again. If the client cannot tolerate the selected set comfortably, changing the method is more responsible than dismissing the warning signs.
Document the client's density map, selected weight, placement zones, and wear plan. That record gives the next consultation a practical starting point and shows which areas tolerated the attachment. Release the attachment; never drag it against the follicle.
Before the next weft leaves its bag, run the consultation against five decisions: density, scalp condition, exclusion criteria, weight band, and wear plan. Record which zones can support an attachment, which areas must remain free, how the client will style the hair, and how the pieces will be removed.
Stock Conde Professional Clip-Ins through a professional wholesale account, then use the available color ring and text, phone, or email guidance for real-time shade matching. A supplier conversation should also cover the client's texture, density, desired concealment, and whether another method is more appropriate.
The chair-side recommendation should be honest. If the client's density or scalp condition fails the assessment, recommend a different Conde method or a treatment plan instead. That decision protects the natural hair and keeps the client install-ready for years.
Conde Professional supplies Clip-Ins alongside Volume Weft, Thin Weft, Tape Weft, K-Tip, Tape-In, and Bulk options for licensed professionals, with education and shade-matching support for salon work. Visit Conde Professional to review the professional collection and choose a method that matches the client's density, texture, and wear plan.


