Your cart is empty
Tax included and shipping calculated at checkout

Drawer menu
Tax included and shipping calculated at checkout
A professional account gives you stylist pricing, priority support, early access to new releases, and education developed by working stylists.


Bead tips are a heat-free, strand-by-strand extension attachment that uses a small bead, microbead, nano bead, or micro ring clamped around natural hair and an extension strand. The install only works well when the bead fit, material, and clamping pressure are right, because the fastener is purely mechanical, not adhesive or fused.
A stylist can be standing at the chair right now with a client who wants length without heat, but the key question is whether bead tips are the right operational choice for that head of hair. The answer lives in the bead, the section, and the move-up plan, not in the extension strand alone.
Bead tips are a mechanical attachment system. A small section of natural hair is threaded through a tiny metal or lined ring, the extension strand is inserted, and the bead is crimped shut so the connection holds by clamp force and fit rather than glue, heat, or fusion.
That is why the naming gets muddy in salons. Microbeads, micro rings, and nano beads all sit under the bead-tip umbrella, while I-tips and tip-end variants refer to the extension end itself, not the fastener. In practice, the bead is the working part that creates retention, concealment, and comfort.
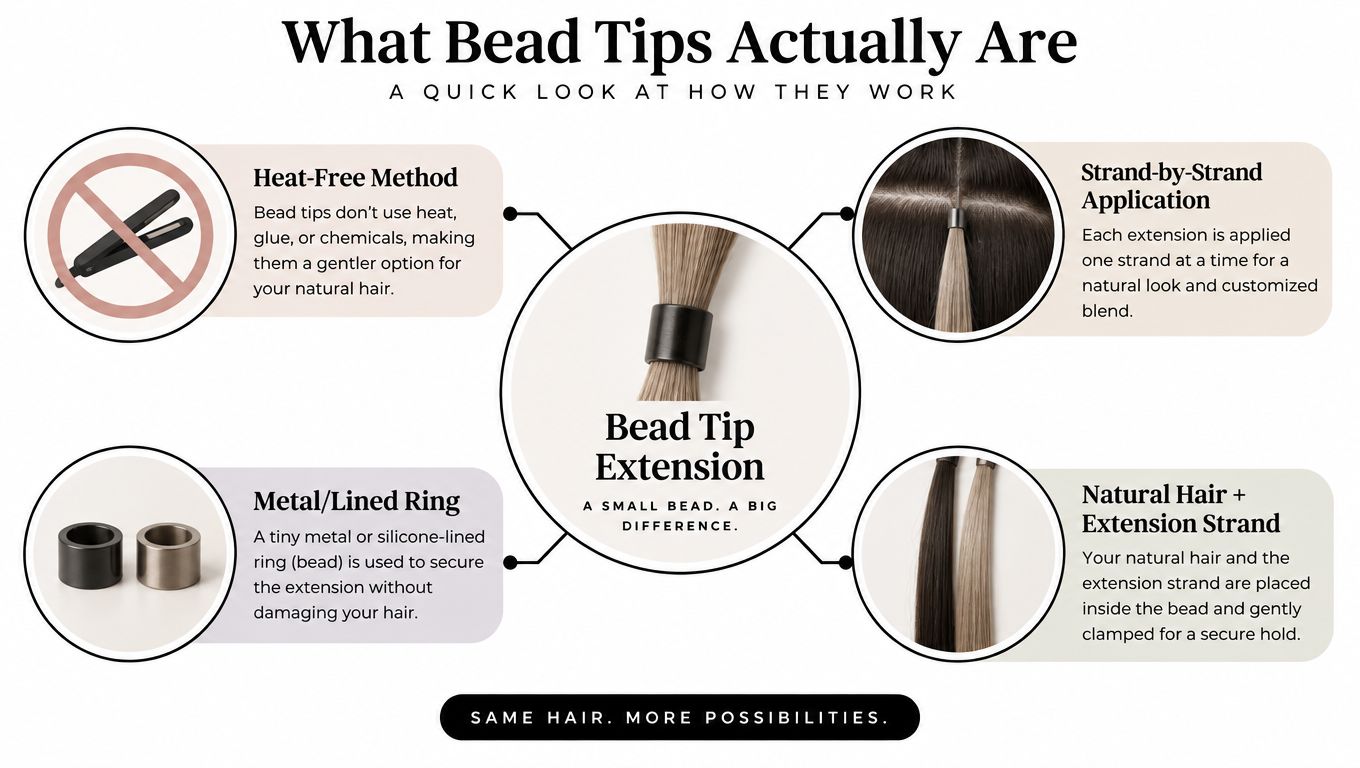
The extension strand can be excellent and still fail in the wrong bead. If the bead diameter is too large for the section, the install needs too much natural hair to fill the cavity, and slip becomes more likely. If it's too small, the clamp can pinch, distort, or leave a visible bump at the root.
Practical rule: the bead is not a passive accessory. It is the part that decides whether the install sits cleanly or starts moving before the first move-up.
The useful working range for standard microbead systems is roughly 3.0 mm to 3.5 mm in the bead hardware used for many installs, with smaller nano-style beads chosen when root visibility has to stay minimal. In hair terms, fine, medium, and coarser sections don't tolerate the same bead profile, so a one-size bead plan usually turns into a service problem later.
The operational truth is simple. Slip risk, visible bumps, and breakage all trace back to bead fit, material choice, and clamping technique, not to the extension method being “good” or “bad.”
Every bead-tip install comes down to four choices: copper or aluminum, silicone-lined or unlined, taller micro rings or shorter microbeads, and standard or nano profiles. Those choices change grip, concealment, and comfort more than most stylists expect on a first pass.
| Bead Type | Grip Level | Concealment | Best For |
|---|---|---|---|
| Copper, unlined | High mechanical retention | Moderate | Denser, more resistant hair |
| Copper, silicone-lined | High, with added cushioning | Moderate | Clients who need stronger hold with less abrasion |
| Aluminum, unlined | Moderate | Good | Fine hair where weight and visibility matter |
| Aluminum, silicone-lined | Moderate, with better friction control | Better | Fine or color-treated hair that needs softer contact |
| Nano profile | Depends on lining and crimp | Best | Fine hair and low-visibility installs |
| Taller micro ring | Strong hold, more surface area | Less discreet | Specific row work where profile can be hidden |
Copper microbeads are commonly described as holding shape well after crimping, which makes them useful on hair that pushes back against the install. Aluminum is lighter and easier to conceal, but it deforms more readily under pressure, so it asks for cleaner placement and more careful move-ups.
Silicone lining changes the feel of the service. It adds friction and cushioning, so the bead presses less harshly on the hair interface and tends to behave better on finer or color-treated hair. Unlined beads give a more direct mechanical bite, which can be useful on denser hair, but they also demand better sectioning because snagging becomes easier.
Sizing is the part that gets stylists into trouble. The bead's internal diameter should roughly match the natural hair section plus the extension strand, not just the extension tip. That is why a bead that looks “close enough” on the bench can still be wrong at the scalp.
Conde Professional's beads for hair extensions fit into this same sizing conversation, but the choice still has to be made against the client's density and the planned placement, not a generic bead preference.
A good bead choice is about balance, not force. If concealment improves but grip collapses, the install loses the whole point.
The install starts with the section, not the bead. Clean, detangled hair makes the threading precise, and the strand choice matters because the natural hair should be cleanly isolated before any bead is opened.
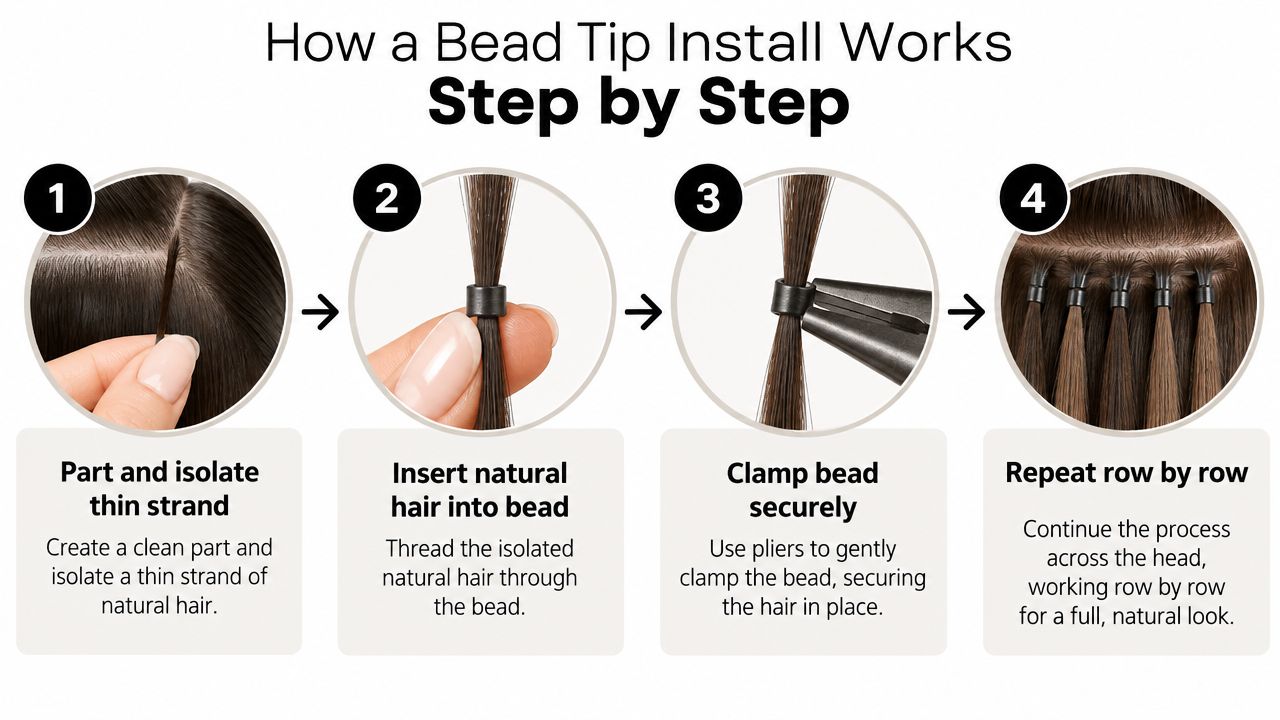
The strand angle matters too. A 0-degree angle keeps the section controlled while the bead is being sealed, and the amount of natural hair in the bead should match the extension section so the clamp isn't compressing empty space. One professional demonstration also emphasizes crimping in the middle and again on each side so the inner grooves interlock fully, which helps prevent slipping (YouTube guide).
A well-set bead rotates a little, but it does not slide. If it's over-crimped, the bead can cut into the strand or feel sharp at the root. If it's under-crimped, the first brush-through can start movement immediately.
Conde Professional's invisible bead hair extensions fit best in this kind of disciplined install environment, where section size and clamp accuracy matter more than speed.
A client with a strong crown, visible cowlick, or fine temples can expose a bead row before the service is finished. Map the head shape first, then decide where the row can sit without fighting the natural fall. The first row commonly begins two fingers above the ear tip. At the back, a 45-degree direction helps the row follow the curve instead of cutting straight across it (YouTube guide).
Straight-back rows concentrate weight vertically and can create a harder line through the hair. Diagonal rows distribute that load and usually conceal more effectively around the crown, part, and occipital curve. Set the direction according to the client's styling pattern, not just the fastest path across the head.
Placement also depends on bead size and the amount of hair supporting it. A large bead on a small section creates visible bulk and concentrates tension. A small bead overloaded with hair may not close evenly. Keep the section controlled, match the bead to the client's density, and leave enough spacing for each attachment to move without pressing into its neighbor.
Placement rule: never stack beads in one follicle zone to finish a row faster. Repeated pressure in the same area can leave the client sore and make the row harder to conceal.
Around a part or cowlick, shift the row away from the lift and check it from the client's usual parting. Fine temple hair needs a lighter visual load and more conservative placement. The back row often works best on a balanced diagonal that follows the occipital curve.
Before releasing the section, check three things: the bead is hidden at the chosen part, the extension falls in the same direction as the natural hair, and no attachment catches during a gentle comb-through. A clean map makes the result look intentional. Poor mapping remains visible even after styling.
Bead tips are a strong choice when the client wants a heat-free install, wants the hair reusable, and needs flexibility in length and color placement. They are much less forgiving when the hair is very fine, sparse, or delicate at the root, because the method depends on the hair's ability to support a mechanical clamp.
The maintenance reality is the part that gets glossed over too often. Many salon-facing guides place upkeep somewhere in the 6 to 8 week range or the 3 to 4 month range depending on the method and growth pattern, and that tells you bead tips should be sold as a serviced method, not a set-and-forget choice. If the client can't return for repositioning, the install becomes visibly less polished as the bead migrates.
A strand-by-strand service also takes more chair time than row-based methods, so it is not always the right booking choice when the calendar is tight. That is a business decision as much as a technical one.
For stylists who already work with I-tip systems, Conde Professional's what are I-tip extensions sits in the same decision lane, but the method still has to match the client's density, styling habits, and maintenance commitment.
If the client needs something flatter than a bead can realistically give, the better answer is often to decline the service than to force the install and hope for the best.
The move-up clock starts the day the beads go in. For bead-based service, professional guidance commonly lands in the 8 to 12 weeks range, and sooner if the bead has crept more than a centimeter off the scalp or starts to slip with brushing, as noted in the Perfect Locks installation guide.
A loose bead is not just a cosmetic problem. It usually means the section has shifted, the tension has changed, or the clamp has fatigued. Matting that will not release with a loop brush is another sign the client stayed in too long.
The salon side of the service needs the same discipline. Move-ups should be handled carefully, with the bead opened without cutting into the natural hair, the strand re-stranded cleanly, and any tired bead replaced instead of crimped again.
Wear time is also a behavior issue. If a client cannot keep a move-up schedule, the install gets harder to maintain and starts to look less controlled. For that reason, many stylists build reminders into the same rebooking workflow they use elsewhere in the salon, including systems discussed in the best nail salon loyalty app article.
Conde Professional's how long do extensions last fits the same service logic, because bead-tip wear depends on maintenance discipline as much as it depends on the hair itself.
Before opening a bead pack, the supplier conversation should already be clean. Ask about bead grade, lining, color-matched rings, and lot consistency, because those details affect fit and concealment more than a glossy product description ever will. If the install will use supporting tools, Conde Professional's hair extension installation tools is the kind of pro-level reference a stylist can keep in the back room for planning.
If the answer is yes to any of those routing flags, the better move is a consultation appointment, not a production install. That protects the client, the stylus, and the service result.
Before the first bead is closed, three questions should already have answers, how the hair will support the row, how the client will maintain it, and what the move-up plan is.
Bead sourcing, adhesive interactions, and move-up protocols belong with a licensed stylist, not a consumer-facing guess. At-home removal attempts should go back to the salon, because that is where the hair can be opened, re-sectioned, and protected properly.
Conde Professional supports licensed stylists with salon-grade extension options, including bead-based methods, wefts, K-Tips, Tape-Ins, Clip-Ins, and Bulk hair, plus the tools that go with a clean install. If bead tips are part of your service menu, visit Conde Professional to review professional options and open the right account path for your business.


