Your cart is empty
Tax included and shipping calculated at checkout

Drawer menu
Tax included and shipping calculated at checkout
A professional account gives you stylist pricing, priority support, early access to new releases, and education developed by working stylists.


Nano tip hair extensions are not automatically the gentlest extension choice. Their small attachment point can reduce visible bulk, but it also concentrates the extension load on small sections of natural hair, so sourcing, strand calibration, placement, and maintenance matter as much as bead size.
For a licensed stylist, that makes nano tips a precision tool with a narrow best-fit window, not a universal default. The method can suit fine to medium-density hair that needs discreet, strand-by-strand fullness, yet become a poor choice when the client's hair is fragile, the requested density is excessive, or the appointment economics can't support careful placement and regular refits.
Nano tip hair extensions are individual strands secured to small sections of natural hair with an ultra-small bead. The defining feature is not the bead alone. Each strand carries its own attachment load, unlike a weft, which distributes weight across a continuous base.
The tip may be made from keratin or another polymer, depending on the product line. Some tips are pre-formed, while others are created through heat fusion. The stylist threads the client's hair and the extension tip through the bead, then compresses it with controlled pressure. The attachment is mechanical, rather than a tape panel or fusion bond, so there is no adhesive surface spreading force across a wider area.
Supplier catalogs can blur the terminology. Nano tip refers to the extension strand and its small tip, while nano bead describes the ring or tube used to attach it. The complete service includes the hair, bead, section size, placement angle, compression, blending, and move-up plan. A strand can be installed correctly and still be unsuitable if the natural-hair section is too small, the tip is too heavy, or the bead remains under constant tension.
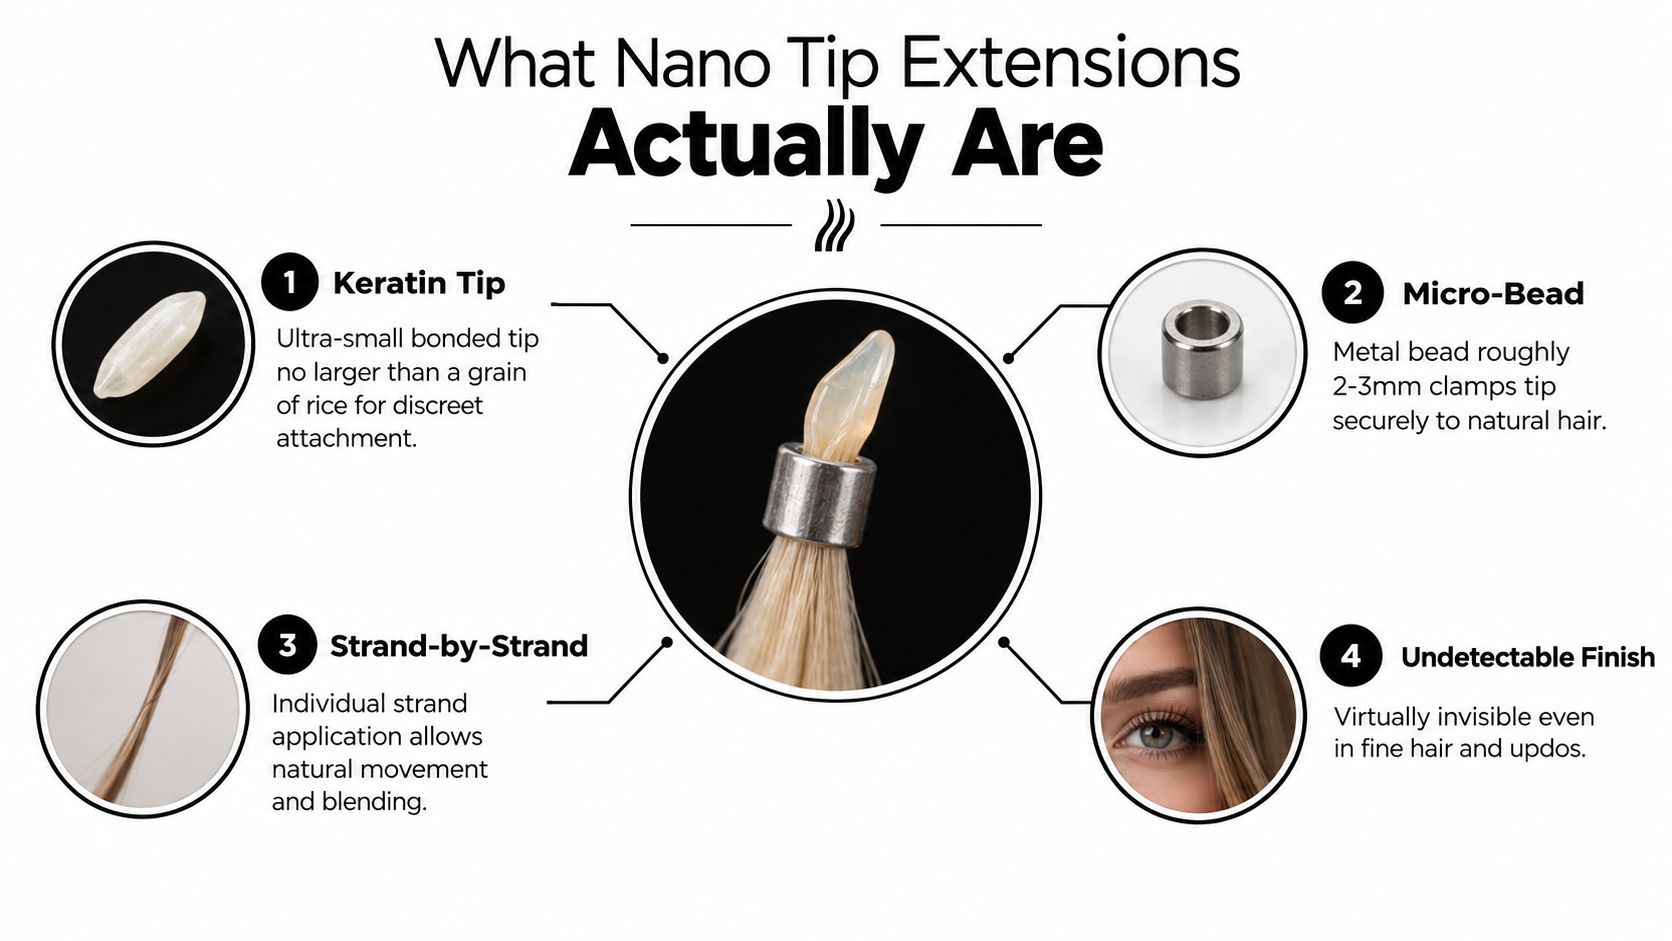
The compact format lets a stylist place individual strands with considerable control. That helps around shifts in density, parting patterns, and areas where a weft would show. A discreet bead does not give the method unlimited carrying capacity.
Clinical literature on extension-related scalp disorders warns that sustained tension can loosen the hair shaft from the follicular opening. Longer or heavier extensions increase scalp stress, while microring-style placement may reduce tension when the hair and extension weight are appropriately matched. The review also advises avoiding very long extensions on fragile hair. The clinical review on hair extensions and scalp disorders supports the practical rule that a smaller attachment must be matched with an appropriate amount of natural hair and extension weight.
A separate dermatology report describes the mechanical concern directly. Strand-by-strand extensions concentrate force at discrete attachment points, and excessive weight, extended wear, or tight placement can increase traction risk. Continued tension may progress from reversible traction alopecia to scarring. The dermatology discussion of traction from hair extensions is a useful reminder that “nearly invisible” describes appearance, not biological risk.
Hair additions have a long history. Archaeological evidence from ancient Egypt indicates that wigs and hair additions were worn as early as around 3400 BCE. Modern salon methods developed through later technical milestones, including keratin bonding pioneered by hairdresser Simon Forbes in 1991, tape-in extensions emerging around 2004, and micro-link technology launching in 2007 with small metal or silicone rings. This history of hair extensions places nano tips within the continuing effort to reduce visibility and improve comfort while retaining length and fullness.
That history also explains why nano tips belong to a broad commercial category rather than being treated as a novelty. Market demand does not remove the need for disciplined consultations, reliable sourcing, and technically consistent hair. For a stylist, batch consistency matters as much as the attachment format. Strand diameter, tip construction, color, and weight need to remain uniform across the head. A small bead cannot correct a poorly matched or inconsistent hair batch.
For method education, the technical explanation of I-tip extensions helps place nano tips within the wider ring-based attachment family. Nano tips refine that principle into a smaller format, while the professional responsibility stays the same: control the load, protect the section, confirm the hair batch, and plan the next service before installing the first strand.
A method decision should start with the client's density, styling habits, desired coverage, tolerance for maintenance, and the salon's available chair time. Nano tips offer a small visual footprint and individualized placement, but that benefit comes with slower installation and less room for error.
Tape-In creates a broader attachment surface and can cover more area efficiently. It's often practical for clients who want a fast transformation or broad density through the mids, but very fine hair may not provide enough concealment for a visible panel. Tape also requires careful consideration for clients who expose the attachment area to repeated heat, oil, friction, or aggressive brushing.
K-Tip uses a pre-bonded keratin tip and can install more quickly than strand-by-strand beaded work once the sectioning plan is established. It can't be repositioned like a bead-based method, so the initial placement, bond direction, and supplier consistency carry more weight. A visually beautiful K-Tip result still depends on a reliable hair batch, especially when color, strand diameter, and bond construction need to remain uniform throughout a head.
Microlinks use a larger bead format and may provide a sturdier option for coarser or denser hair. Their larger attachment can also become more apparent in fine hair, especially around partings, temples, or high ponytail placement. Nano tips reduce visible bulk, but they don't automatically outperform microlinks on every head.
| Criterion | Nano Tip | Tape-In | K-Tip | Microlink |
|---|---|---|---|---|
| Attachment footprint | Very small, strand by strand | Broad, flat panel | Individual pre-bonded strand | Individual strand with a larger bead |
| Placement control | Highest precision | Strong coverage, less isolated placement | Precise, but fixed after bonding | Precise, with a more visible attachment |
| Heat required | No heat for bead clamping | No installation heat, but heat exposure near tape needs control | Heat-based fusion service | No heat for bead clamping |
| Repositioning | Bead can be released during a refit | Panel is removed and replaced or repositioned according to the system | Not repositioned after bonding | Bead can be released during a refit |
| Best-fit density | Fine to medium, if load is conservative | Fine to medium when the panel can be concealed | Varies with strand and bond calibration | Medium to coarse hair often offers better concealment |
| Main trade-off | Discreet result, slower install and precise load management | Faster coverage, less discreet on very fine hair | Efficient install, no repositioning and strong dependence on bond consistency | More robust visual structure, more detectable on fine hair |
Decision rule: Choose nano tips because the client's density and parting pattern reward a small footprint, not because the smallest bead sounds universally superior.
A stylist should also compare the service model, not only the attachment. The overview of professional hair extension methods helps frame nano tips alongside weft, tape, and fusion options. Conde Professional's catalog includes Volume Weft, Thin Weft, Tape Weft, Tape-In, K-Tip, Clip-In, and Bulk, so the appropriate recommendation may be a different method entirely when coverage, installation speed, or removability outranks discreet strand placement.
Nano tips are the wrong choice when a client wants substantial density in a compressed appointment, won't commit to refits, or has hair that can't safely support concentrated attachment points. In those cases, a broader or temporary method may deliver a more responsible result.
The install is usually won or lost before the first extension enters the bead. Clean, dry, tangle-free hair gives the bead a more predictable grip, while inconsistent sections force the stylist to compensate later with pressure, repositioning, or uneven distribution.
A trained stylist should have a loop tool, micro-beads matched to the client's hair diameter, cushioned pliers with silicone tips, sectioning clips, a rattail comb, and a dedicated clamping station. The pliers need to compress the bead without crushing or distorting it. A distorted bead can create an uneven load path, sharp edges, or a weak hold.
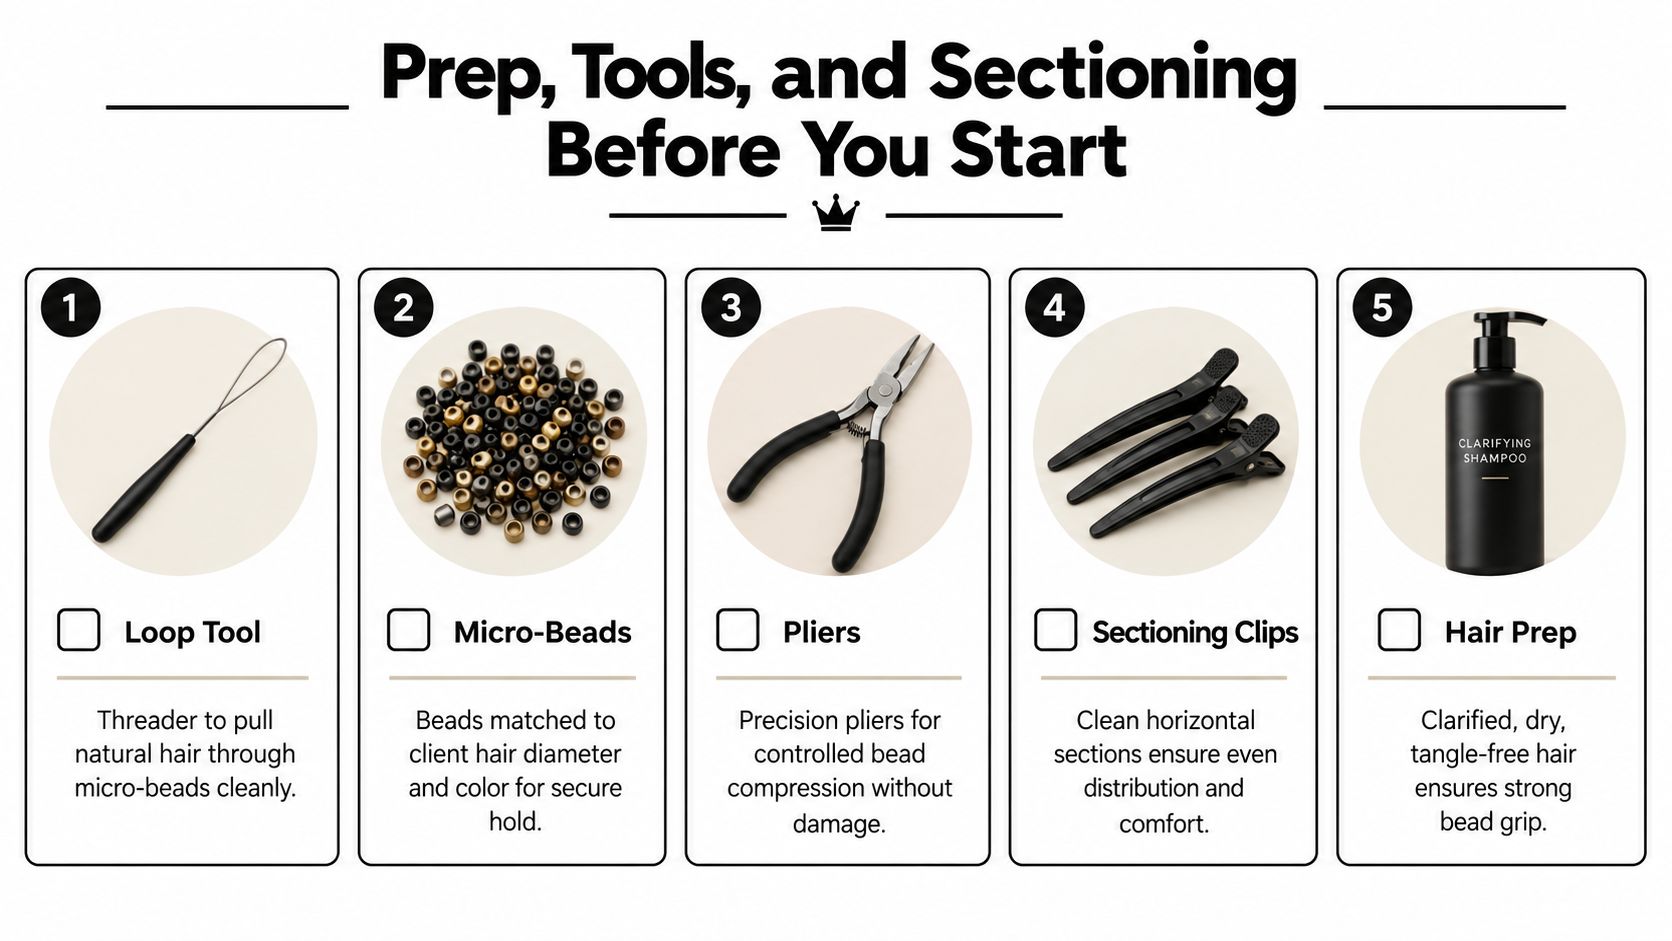
Start with a curved baseline that follows the occipital ridge. Horizontal rows should remain controlled and consistent, with enough separation between rows to prevent one attachment from resting directly on another. The hairline strands should be left until later, since placing them too early makes it easy to overload delicate perimeter sections.
The standard professional sequence begins on clean, dry hair, with neat sections at the nape. A small natural-hair section passes through the bead with a loop tool, the nano tip enters, and the bead closes with pliers. This professional nano tip installation guide reflects that sequence and emphasizes clean sectioning as the foundation of the service.
Bead sizing is a common failure point. A bead that's too small can crack or pinch under tension, while a bead that's too large may allow the attachment to slip. The correct size depends on the diameter and behavior of the client's natural hair, not on a universal setting.
Pull-test two or three strands at the temple and nape before using one bead size across the entire head. Check that the extension follows the natural direction of fall and that the tip lies flush against the client's hair. If the tip lifts away, the strand direction or section angle needs correction before more hair is added.
A useful same-day checklist includes:
For a broader professional kit reference, the professional hair stylist tool bag guide can help organize the equipment required for controlled sectioning and attachment work.
A nano tip install follows a simple sequence, but the service isn't simple in execution. The stylist sections the hair, threads a controlled amount of natural hair through the bead, inserts the extension tip, and compresses the bead in the correct order. Placement should sit near the scalp without sitting directly on it, with the strand directed away from the root so the extension lays flat rather than pulling upward.
The wet-versus-dry debate should be resolved by the product system and the condition of the client's hair, but the practical standard remains consistent: the hair must be clean, controlled, and free from residue that interferes with grip. Working on damp or poorly detangled hair makes section tension harder to judge and can hide the way the finished attachment will behave once dry.
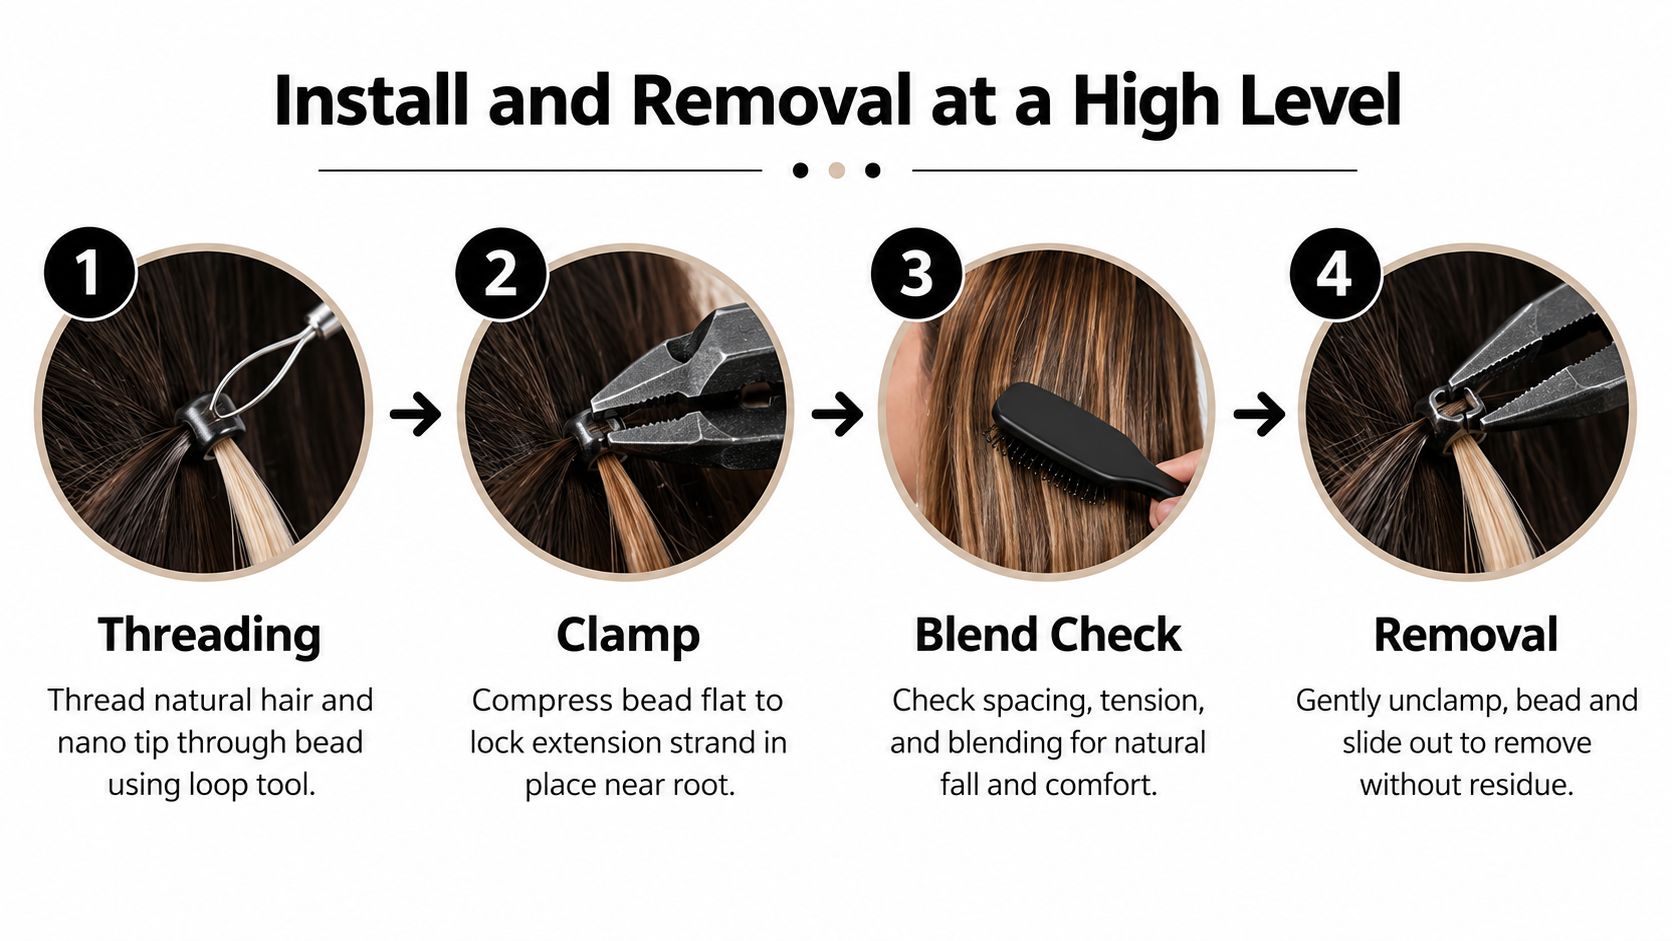
Over-tightened beads can create immediate discomfort, directional pulling, and visible tension at the root. A bead that looks secure but causes pain isn't a successful attachment. The second common issue is visible spacing near the part, usually caused by placing the row too low, leaving an inconsistent gap, or failing to account for how the hair separates when styled.
The blend check should assess spacing, tension, fall, and the way the client parts the hair. The stylist shouldn't rely only on a center part. Check the client's normal side, perimeter movement, and the upstyle positions they wear.
For removal, reverse the attachment sequence. Soften or open the bead according to the system, release the clamp gently, slide out the extension, remove residual material, and inspect the natural strand before any chemical service. A strand test can identify compromised hair before color, lightener, or another chemical process adds stress.
The professional guide to attaching hair extensions is the appropriate place for a detailed procedural walkthrough. High-level understanding matters because it lets the stylist quote the service accurately, prepare the correct tools, and recognize when a head requires more time or a different method.
Nano tips need a planned maintenance cycle, not an open-ended wear period. A common move-up window is 6 to 8 weeks, but that interval should be treated as a starting framework rather than a promise. Finer hair, repeated high-heat styling, heavy exercise, friction, and clients who brush aggressively can create slip or tangling sooner. Professional maintenance guidance for extensions supports treating aftercare and scheduled refits as part of the service, not an optional add-on.
Slip can look different from shedding. A loosened bead may migrate down the strand while the extension remains intact. Shedding may leave less natural hair inside the attachment, while outright product failure may show as a bead that no longer holds the tip securely. During a reset, the stylist should examine the bead, the extension tip, the natural-hair section, and the surrounding hair separately.
| Client Profile | Recommended Move-Up Interval | Common Slip Trigger | Rebond Decision Cue |
|---|---|---|---|
| Fine or fragile hair | Use the earlier end of the planned service window and assess tension closely | Small sections carrying too much load, brushing force, or delayed maintenance | Replace the bead if it's distorted, cracked, or no longer compresses evenly |
| High-heat styling routine | Shorten the interval when heat reaches the attachment area repeatedly | Heat exposure, friction, and repeated manipulation | Keep a reusable bead only if its shape and grip remain intact |
| Active lifestyle | Schedule according to sweat, washing, friction, and styling frequency | Moisture, movement, tight styling, and root tangling | Remove compromised attachments rather than forcing another clamp |
| Dense or coarse hair | Assess root movement and concealment during the consultation | Uneven distribution or insufficient section control | Reuse only when the attachment remains structurally sound |
| Low-maintenance client | Set expectations before installation and avoid overpromising longevity | Skipped brushing, delayed refit, or sleeping with loose hair | A fresh bead is safer than repeated compression of a weakened one |
Reusable beads can reduce waste and simplify a refit, but reuse isn't automatic. A bead that has been repeatedly opened and compressed may lose its original shape. Over-rebonding can compromise the extension tip or squeeze the natural-hair section unevenly, creating a service that looks tidy at the appointment but fails under normal movement.
Photograph red flags before correcting them. Useful documentation includes visible root tension, broken or thinned natural-hair sections, matted areas near the bead, cracked tubes, inconsistent spacing, and extensions that have migrated substantially from their original placement. Those images give the stylist a clear consultation record and make it easier to explain why a fresh bead, reduced load, or method change is necessary.
Reset standard: A successful move-up restores clean spacing and comfortable tension. It shouldn't simply put every old attachment back in the same place.
A client who reports pain, persistent pulling, or scalp tenderness shouldn't be sent home with tighter beads. The stylist should remove or adjust the problematic attachments and reassess whether nano tips remain appropriate for the hair's condition.
Color matching starts before the order, and screen-based shade selection isn't enough for a dimensional head. The stylist should pull a strand under the salon's matched lighting, compare it against the midlengths and ends, and document the root-to-end gradient rather than selecting one shade from the root alone.
The supplier's marketing grade shouldn't be used as a substitute for inspection. Some extension suppliers use A-grade numbering systems, but those labels have no recognized international standard or governing-body certification. The explanation of extension quality grading makes the practical point that measurable criteria, including cuticle alignment, shedding, combability, and wash durability, provide a more defensible basis for professional evaluation than a grade label.
For nano tips, the strand diameter must work with the bead selected during the pull test. Hair that's too fine for the attachment may not hold securely, while hair that's too coarse can force the stylist to overload or distort the bead. Cuticle-intact Remy hair with consistent alignment generally gives the stylist a more predictable surface to comb, blend, and maintain, but the supplier still needs to demonstrate batch consistency rather than relying on a label.
Sourcing can matter more than the attachment method itself. Hair that tangles, sheds, changes color between batches, or varies in strand strength can undermine a technically perfect install. Human hair remains the dominant category in the broader hair extensions and wigs market, with one 2026 market report projecting a 63.4% share for human hair. The market discussion of human hair and extension demand reinforces why salon buyers need specification-driven checks.
A practical supplier conversation should ask:
Conde Professional's catalog can be evaluated through these criteria across Volume Weft, Thin Weft, Tape Weft, Tape-In, K-Tip, Clip-In, and Bulk options. A shade such as K-Tip Amber Glow #7/10 Superblend can be considered when the client needs a complex multi-tone blend from Level 7 through Level 10, but the final decision still belongs to the physical match, the client's density, and the selected method.
Nano tip pricing needs to reflect labor, not just the hair invoice. The service requires detailed sectioning, strand-by-strand placement, blending, documentation, and a future maintenance plan. A quote that ignores installation time can turn a technically strong service into a low-margin appointment.
Appointment length varies with density and the planned result. A full install may take roughly 1.5 to 3 hours, but that figure should be treated as a planning range, not a promise. The stylist should also account for consultation, color matching, finishing, and any removal or correction work. Blocking 15 minutes per strand can help protect the schedule when the service is being priced or timed, but the salon should validate that workflow against its own sectioning and installation speed.
Maintenance should have its own rate. The move-up includes removal or release, inspection, bead decisions, repositioning, blending, and sometimes replacement hair. Planning removal and rebonding within a 6 to 10 week service framework can protect chair revenue, provided the stylist adjusts the timing for hair condition and lifestyle rather than presenting it as a fixed guarantee.
A professional quote should separate:
A nano tip service shouldn't be sold as a commodity upsell. It rewards trained hands, reliable sourcing, controlled batch consistency, and a client who can follow the maintenance plan. If the salon can't protect those conditions, Tape-In, a weft method, K-Tip, or Clip-In may be the more responsible recommendation.
The practical next step is to open a Conde Professional trade account, request a swatch deck for in-salon color matching, and book hands-on nano tip certification before adding the service to the menu. That route gives the stylist a way to evaluate professional hair, method fit, and installation technique together rather than buying retail product and improvising behind the chair.
Conde Professional supplies professional extension methods including Volume Weft, Thin Weft, Tape Weft, Tape-In, K-Tip, Clip-In, and Bulk, alongside tools and education for salon use. Visit Conde Professional to open a professional account, request color-matching support, and explore training for a controlled nano tip service.


