Your cart is empty
Tax included and shipping calculated at checkout

Drawer menu
Tax included and shipping calculated at checkout
A professional account gives you stylist pricing, priority support, early access to new releases, and education developed by working stylists.


A client arrives asking for “loop for hair” because the attachment should be discreet, comfortable, and easy to maintain. The correct answer isn't a single loop technique. It depends on hair density, retention expectations, maintenance discipline, and the bead or tip the natural hair can safely support.
Loop methods sit within a much older extension tradition. Archaeological evidence places some of the earliest known hair extensions in ancient Egypt around 3400 BCE, with examples found at Hierakonpolis, making hair additions more than 5,000 years old (historical overview of hair extensions). Modern tools are more refined, but the professional responsibility is unchanged: match the attachment to the client rather than forcing every head into the same install.
A client with fine hair, low tolerance for tension, and irregular salon visits should not leave with the same loop plan as a dense-haired client who accepts frequent maintenance. Choose the method after triaging four variables: density, retention target, maintenance cadence, and attachment size. The loop install is a decision tree, not a default service.
Start with density. Fine hair calls for smaller, lighter sections and careful bead placement. Medium-density hair gives you more room to choose among microlinks, I-Tips, and selected weft applications. Coarse hair may support a larger attachment or heavier application, but strand strength and section control still set the limit. A dense head does not automatically justify maximum weight.
Then establish a schedule the client will follow. Tape systems are commonly planned around a six-week service rhythm, I-Tips around eight to twelve weeks, and K-Tips can be planned for up to sixteen weeks, depending on the install, natural-hair growth, and manufacturer guidance. Treat these as planning references, not promises. If the client will not return while the attachment remains manageable, redirect them to a method that better matches their routine.
Consultation rule: the best method is the one the client can maintain without compromising the natural hair or the appointment plan.
Set the attachment diameter only after assessing the section. Keep sections clean and small, control the insertion angle, and leave the bead a few millimetres off the scalp. The bead must hold the extension without concentrating tension. Over-tight clamping can contribute to breakage and traction damage, so select the size based on what the natural hair can support, not on habit.
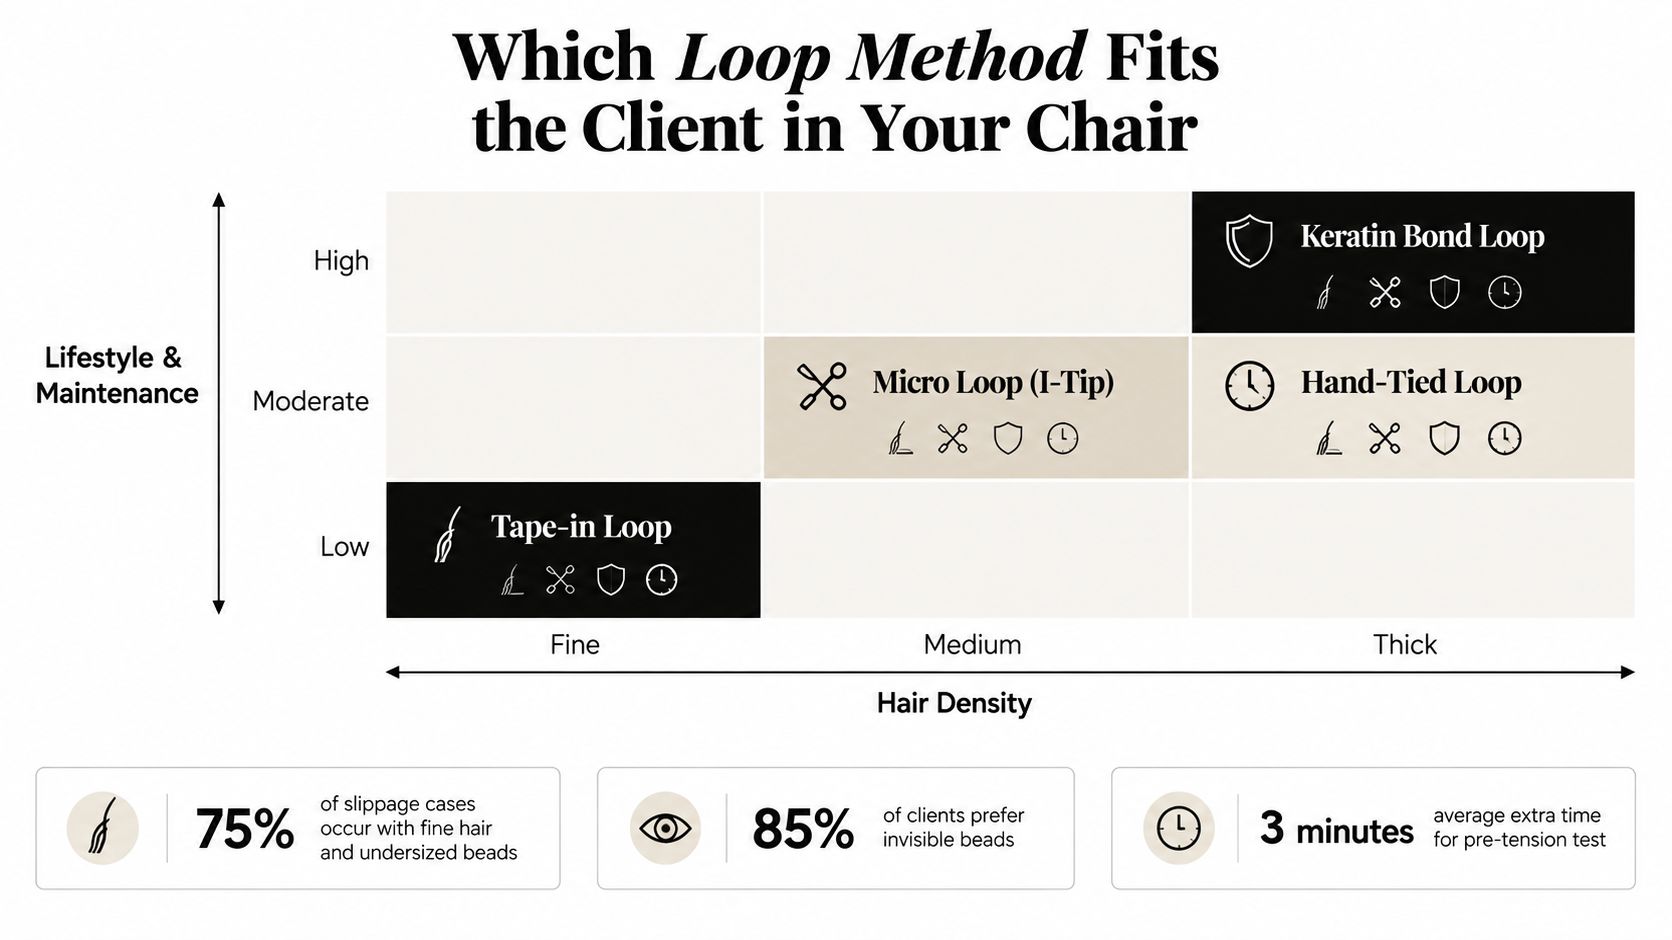
Use the client's answers to choose the branch. Sew-in or beaded-row work may suit broad volume on dense hair. Tape-In may be more practical for a fast, flatter install on suitable density. Fusion is often the stronger choice when a precise, long-wear bond matters more than a bead-based refit. For the strand-based decision, review I-Tips versus K-Tips before finalising the Conde Professional installation plan.
A loop tool creates the passage that brings an extension strand and a controlled section of natural hair together. It does not create retention on its own. Its job is to guide the hair through the bead or attachment path so the load is distributed evenly before the attachment is seated.
Three loop formats are used behind the chair:
Match the loop diameter to the bead, tube, or tip. A gate that is too narrow can fray or deform the extension during threading. A path that is too loose can disturb the section before the attachment reaches the root. For a silicone-lined tube, leave enough internal space for the natural hair and extension to travel together without catching.
Start with bead slide pressure. The bead should move down the loop smoothly. If it meets resistance, reduce the section or reassess the loop and bead pairing instead of forcing it through congested hair.
Clamp orientation controls the next stage. Keep the jaws parallel and close evenly across the bead. Position the seam consistently. An angled clamp can crush one side while leaving the opposite side under-secured.
Root alignment decides how the installed strand feels during wear. Keep the extension in the same directional flow as the natural hair. A loop that pulls diagonally can create uneven tension even when the finished row looks tidy.
A rigid threading path with an ergonomic handle keeps bead loading consistent across a full row. The handle should give enough control for small sections without making repeated loading unnecessarily tiring. Keep the right loop sizes, beads, pliers, and sectioning tools together in a professional stylist tool bag, so the method can be adjusted at the chair when density or attachment choice changes.
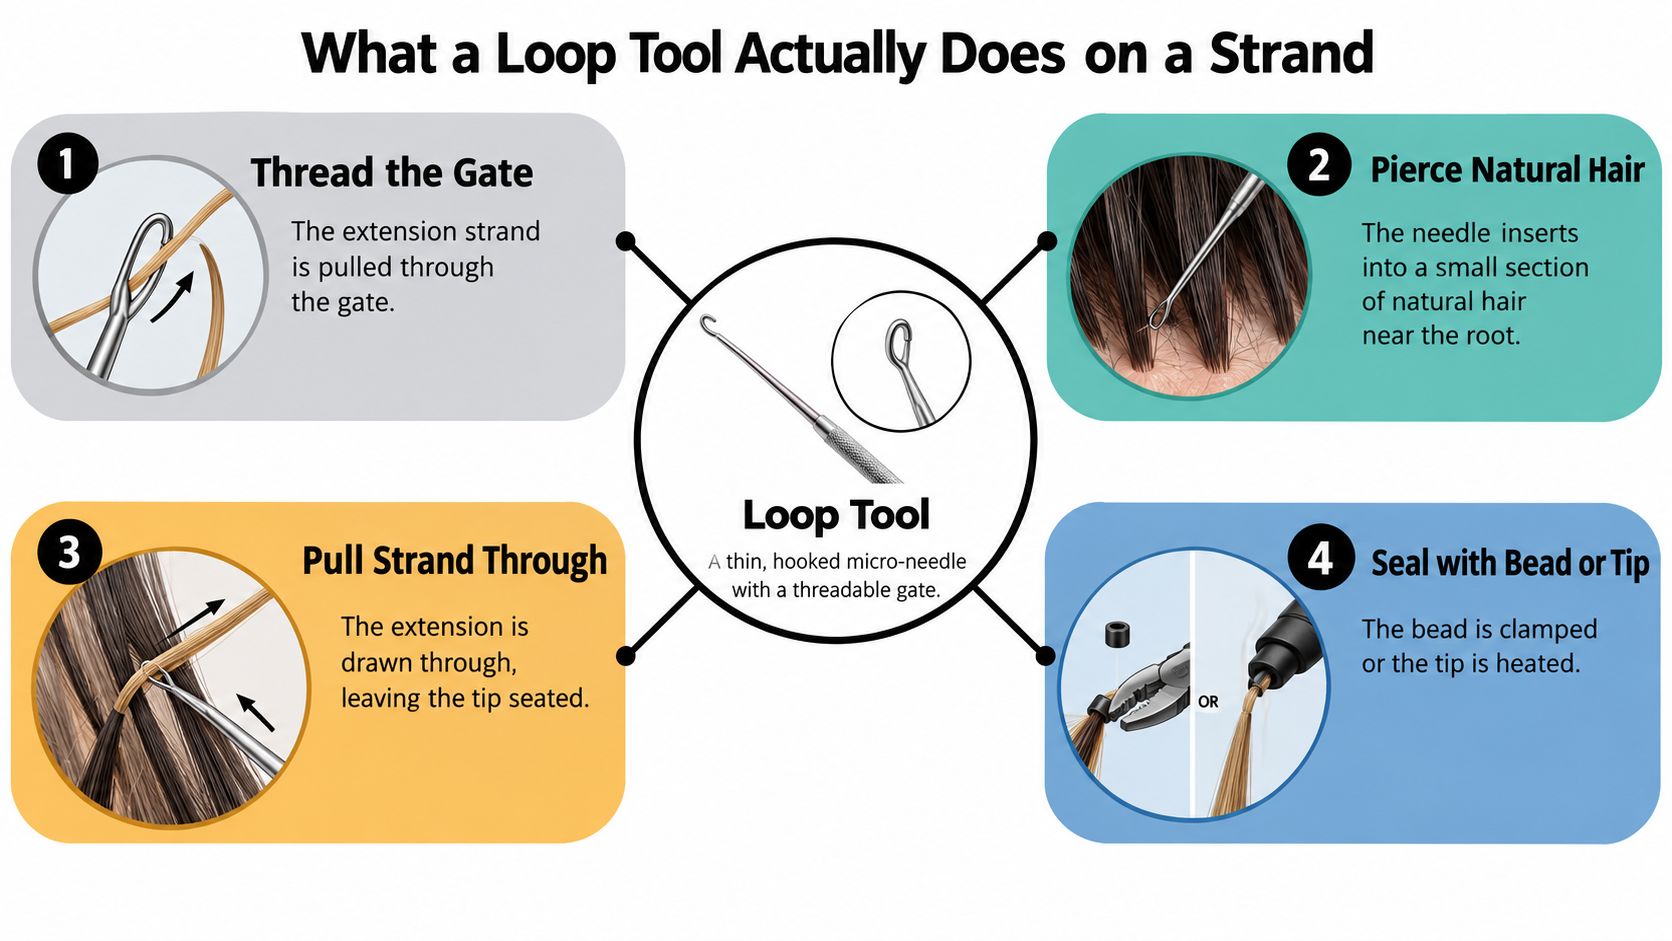
The loop is the attachment's first control point. It determines where the bead lands, how the root aligns, and how tension distributes through the section. A well-selected extension can still perform poorly if the path is too tight, the section is too large, or the strand is pulled off-axis. If the hair cannot pass cleanly, change the section or attachment plan rather than forcing the loop to do a job the client's density cannot support.
A client with fine, slippery hair, infrequent appointments, or a low tolerance for visible attachments needs a different plan from a client with dense hair who wants strand-by-strand control. Choose the method by hair density, retention goals, maintenance cadence, and bead selection, then route the order to the matching Conde Professional line. No single loop-based attachment suits every head.
Microbeads provide a heat-free mechanical attachment, but silky virgin hair may offer limited grip. I-Tips follow a similar bead-based pathway with a pre-tipped strand. Threading and clamping require controlled handling so the tip and natural hair are not stressed. K-Tips use a bonded attachment and may support a longer wear window when installed correctly, while Tape-In panels are often quicker to place and require consistent maintenance.
The comparison below uses planning ranges where the method commonly has an established service rhythm. Install time, bead or tip size, and final density must be confirmed against the specific product and the stylist's technique, so the table avoids unsupported specifications.
| Method | Retention (weeks) | Install time / row | Bead or tip size | Best-fit hair type | Conde Professional line |
|---|---|---|---|---|---|
| Microbead microlink | Variable, based on grip and maintenance | Depends on section count and density | Selected to the section and liner | Medium to coarse hair with enough strand support | Bulk |
| I-Tip | 8 to 12 | Depends on strand count and row layout | Matched to the I-Tip and bead system | Medium density, including clients wanting strand-by-strand control | Match with Bulk strand stock or confirm availability with Conde support |
| K-Tip fusion | Up to 16 | Depends on bond count and sectioning | Matched to the flat keratin tip | Medium to coarse hair that can support a bonded attachment | K-Tip |
| Tape-In | 6 | Typically faster than strand-by-strand installation | Tape panel format | Fine to medium hair when the panel can be concealed and maintained | Tape-In |
Select the bead by the section, not by habit. Microbeads become a poor choice when natural hair cannot distribute the attachment or the client will not return for a timely refit. A lighter Tape-In plan may work better if the client accepts the required maintenance schedule. For coarse hair and a client seeking a durable, highly customized bond, K-Tip or a suitable weft may provide a better match than a small bead row.
Volume-only services need deliberate placement and weight distribution. Strand count, row position, and attachment weight should support the natural hair rather than concentrate tension in one area. Micro-link hair extension education can support the consultation, but the stylist must still test the section, inspect the attachment, and reject any method that creates concentrated tension.
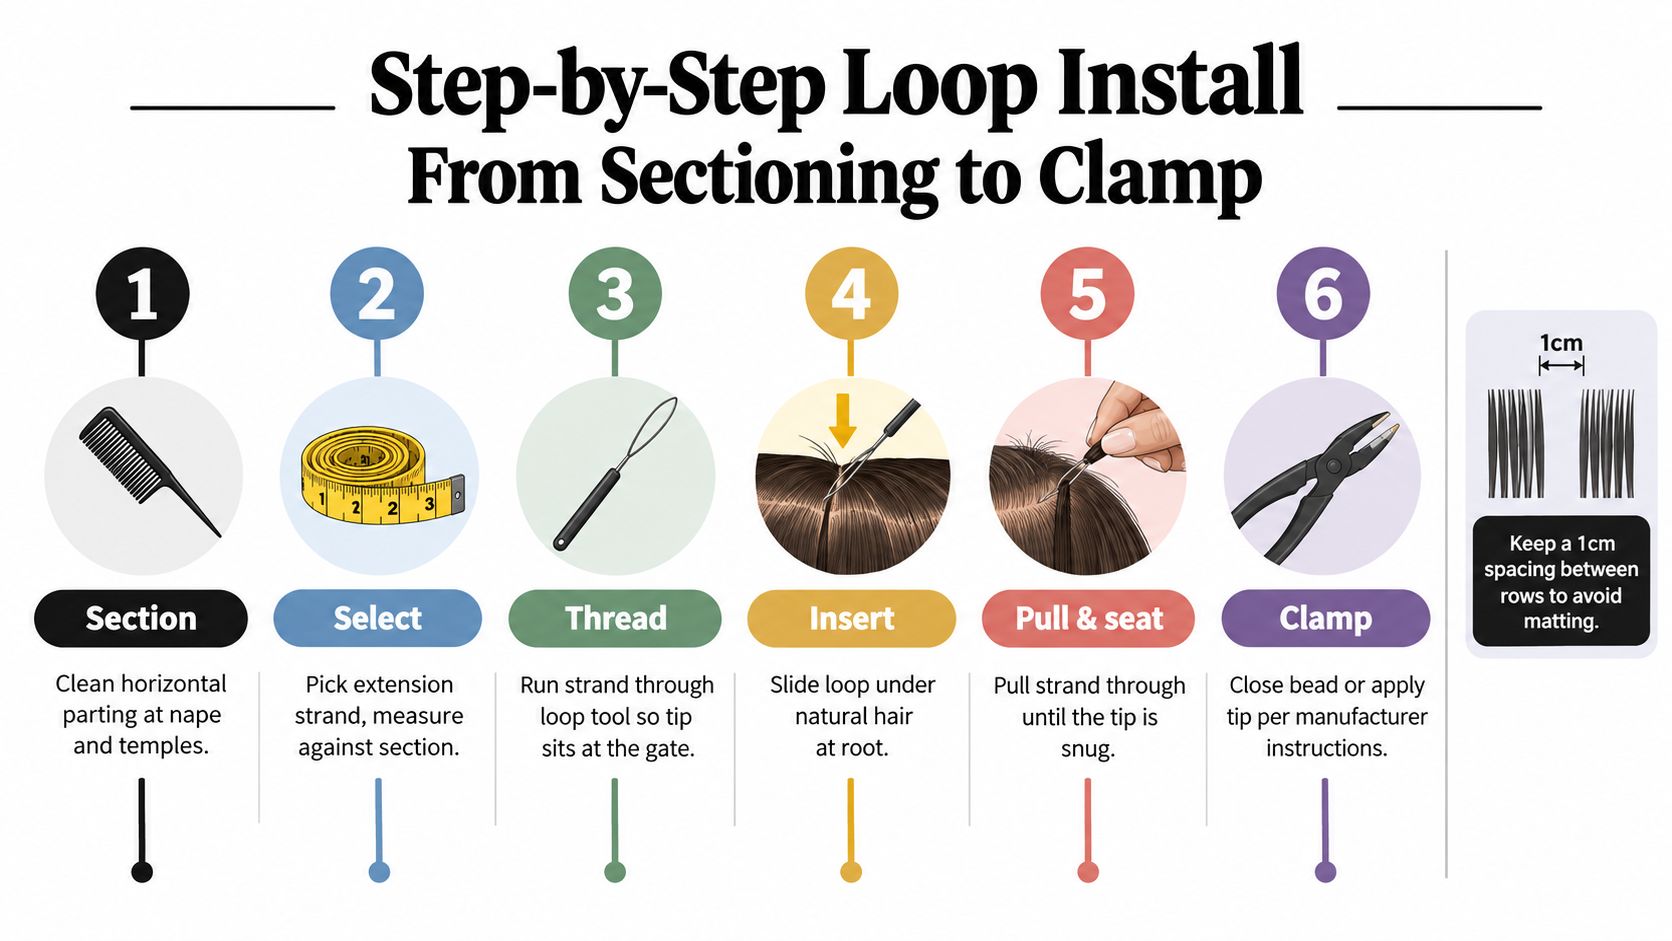
Start with clean, dry hair and controlled horizontal partings. Establish the nape first, then work toward the temples, keeping row spacing consistent. Match each section to the client's density and retention plan. The section must support the attachment without concentrating weight at the root.
Seat the bead a few millimetres from the scalp, with its body lying flat to the head. That clearance gives the natural hair room to move. Stop crimping when the jaws close flush. Forcing the crimp is what transfers tension to the root.
The Bead Pro Plier is made for installing and removing bead-based extensions. Its dual-notch jaws accommodate standard and nano beads, while the tapered tip, textured grip teeth, and coated handles support controlled handling. The plier suits micro-link, nano, I-Tip, and bead-weft installations.
After clamping, tug the extension downward without lifting the bead from the scalp. The attachment should resist movement while the natural hair stays relaxed. Check that no natural hair extends beyond the bead, then record the installed count for that row. A live count helps balance density and gives the salon a practical reference for future refits.
Before standardizing the section map, review extension placement guidance. Placement should follow the client's parting, density, and expected maintenance cadence, not a fixed row pattern.
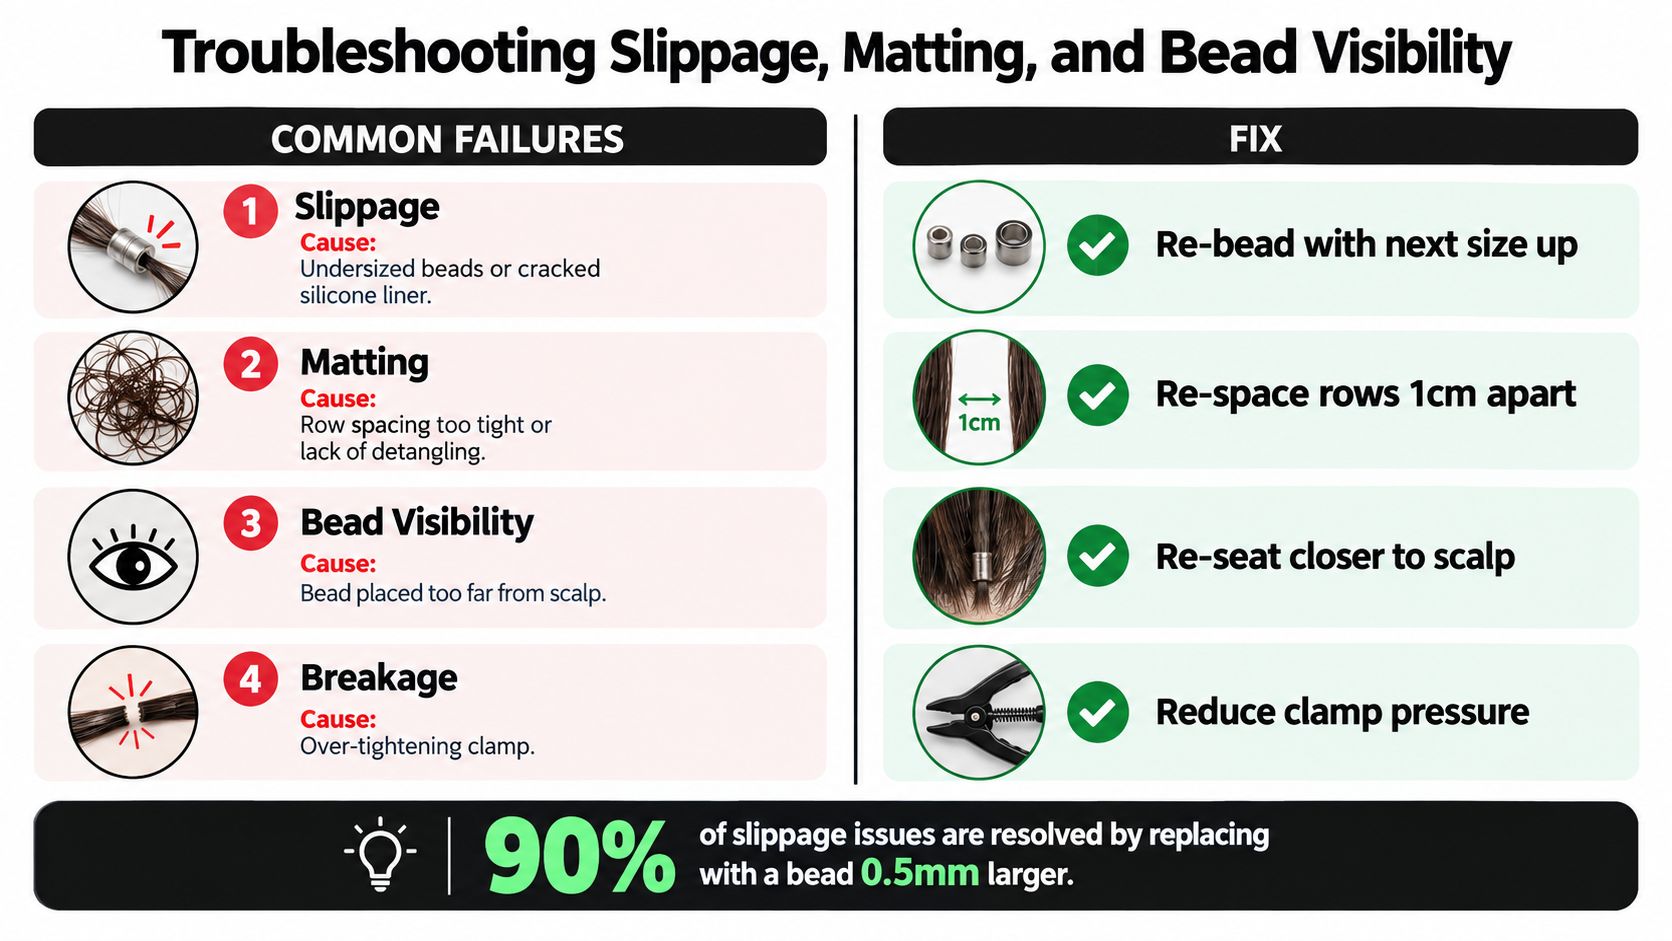
A client returns with a bead that has shifted, hair compacted at the row, or an attachment visible through the part. Diagnose the installation before changing the method. Section control, bead selection, clamp pressure, and maintenance timing usually identify the cause. A silicone liner can improve grip, but it cannot correct an undersized bead, excessive tension, or an uneven section.
Conde's silicone-lined aluminum beads are sized for standard microlink and I-Tip pliers. Confirm that the bead's internal profile suits the client's hair density and the section before installing the row.
Practical diagnosis: If a bead moves, inspect the section and liner before increasing clamp pressure. More force may hide movement temporarily while concentrating stress at the attachment.
For color selection, sizing, and other attachment considerations, review this professional guide to beads for hair extensions. Test the selected bead on a discreet section before completing the row.
Sanitation is part of the install, not a closing task. Loop tools and parallel-jaw pliers should be cleaned and processed between every client according to the salon's infection-control policy and the product's instructions. A Barbicide or hospital-grade cold sterilant cycle is commonly used for appropriate nonporous tools, with the full contact time, dilution, rinsing, drying, and storage procedure followed exactly.
Beads are different. Never reuse beads across heads. A bead that has been handled, crimped, or removed belongs in disposal, even if it appears intact. Reusing it can compromise the liner, the crimp, and the salon's hygiene standard.
| Method | Move-Up interval | Sterilization cycle | Home-care note |
|---|---|---|---|
| Microbead | Every 6 to 8 weeks | Clean, then process tools between clients according to cold-sterilant directions | Use sulfate-free wash, dry shampoo on the scalp, and brush from ends toward the bead |
| I-Tip | Every 8 to 10 weeks | Process loop tools and pliers between clients, never reuse beads | Brush from ends to bead in three passes and keep heat away from the attachment |
| K-Tip | Every 12 to 16 weeks, with rebonding intervals set by the system | Clean and process reusable tools between clients, discard removed bonds | Keep direct heat at least a half inch from the attachment |
| Tape-In | Around 6 weeks | Sanitize reusable tools and surfaces between clients; follow the tape system's handling protocol | Use sulfate-free wash and maintain the booked refit schedule |
The book-out script should be brief and specific: wash with a sulfate-free formula, use dry shampoo on the scalp as needed, brush from the ends to the bead in three controlled passes, and keep heat away from the attachment by at least a half inch. The client should also leave with the next appointment reserved. A maintenance plan fails when the client has to guess whether the attachment has grown too far from the scalp.
Turn the consultation into a written order before the client leaves. Pull a small section at the temple and nape, assess the amount of natural hair that can be safely isolated, and use a sizing tool to select the bead and liner that match the section. The correct choice should hold the extension without requiring excessive clamp pressure.
Product selection should follow the client's branch. Conde Professional's professional collection includes Volume Weft, Thin Weft, Tape Weft, K-Tip, Tape-In, Clip-In, and Bulk families, so the stylist can route a fine-hair volume service differently from a strand-based K-Tip install. The broader extension category remains commercially substantial, with one industry estimate placing the global market at about $4.6 billion in 2023 and projecting $6.8 billion by 2027, alongside a reported 6.2% compound annual growth rate from 2024 to 2031 (market overview and projections). That scale supports disciplined inventory planning, but it doesn't replace strand testing or shade matching.
Licensed-buyer access commonly requires proof such as a professional license, business registration, or resale certificate (licensed-buyer requirements). The salon should register the stylist or business account, upload the required credential, and organize reorder thresholds for beads, I-Tips, K-Tips, loop tools, and replacement pliers. Business intent belongs in a professional account rather than consumer checkout.
Track three numbers after every install: bead count, grams used, and move-up date. Those records reveal which shades and attachment supplies need replenishment and prevent ordering from memory. The follow-up sequence should include a 48-hour retention check, a two-week refit scan, and a six-to-eight-week move-up reminder when that interval suits the selected method.
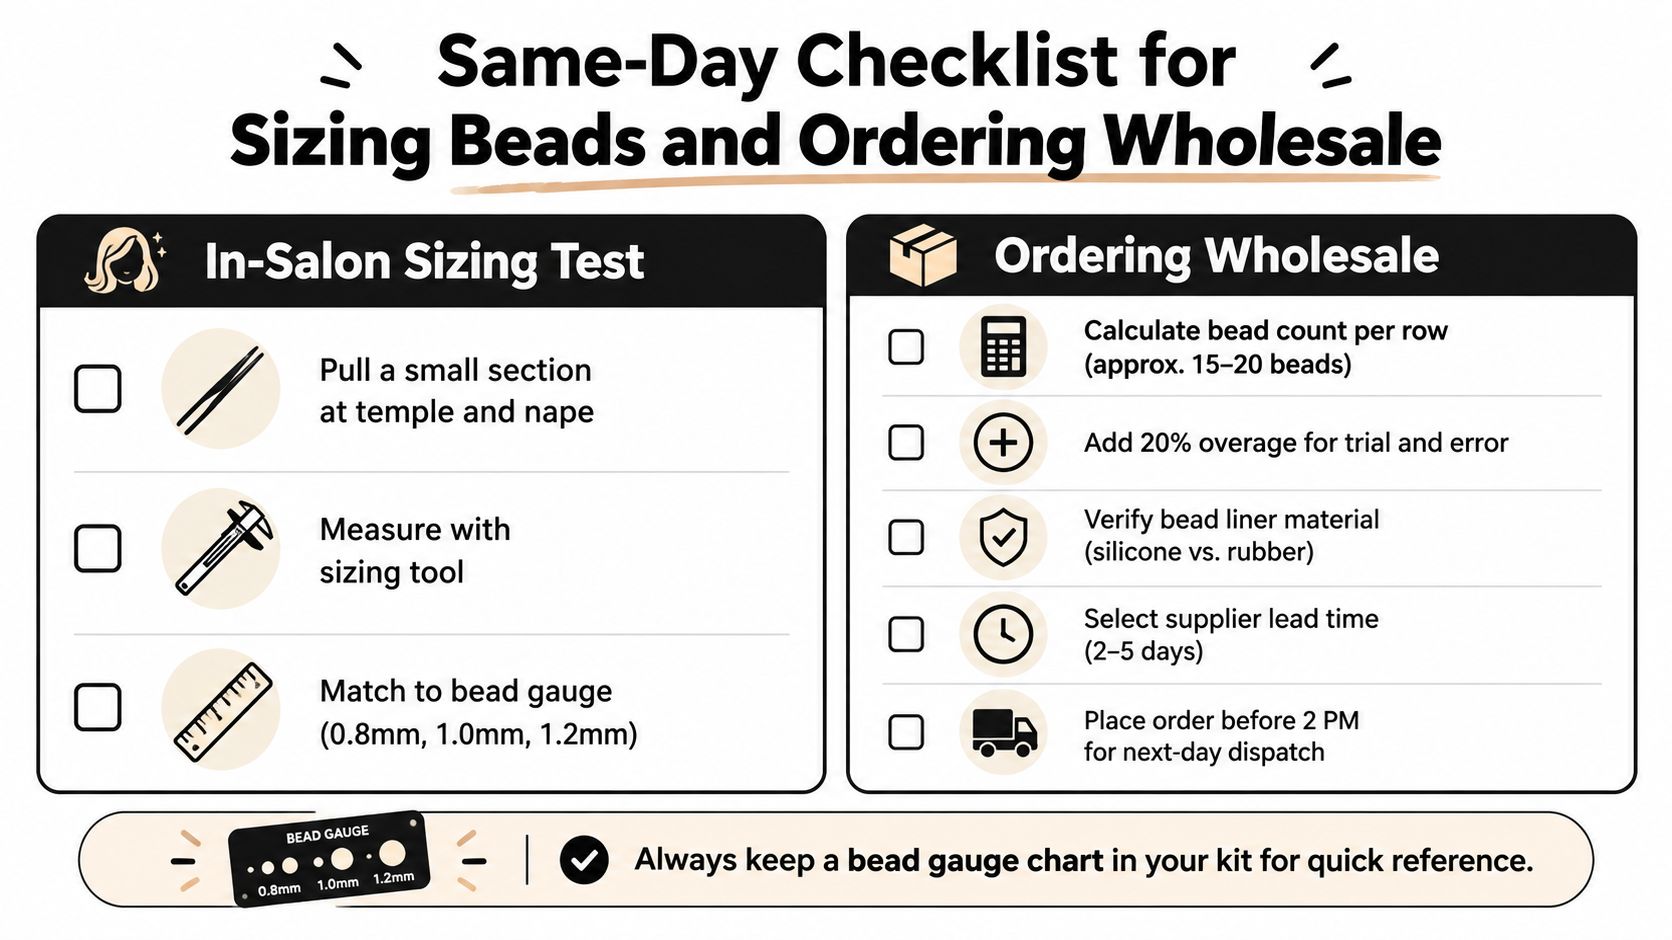
Before the next appointment, review the row map against the client's actual maintenance behavior. If the client repeatedly misses refits, redirect the service toward a method that better matches that schedule rather than repeating an install that will predictably overgrow or create tension.
Conde Professional supplies licensed professionals with extension families including Volume Weft, Thin Weft, Tape Weft, K-Tip, Tape-In, Clip-In, and Bulk, along with tools and installation accessories for structured salon work. Visit Conde Professional to open a professional account, review the method collections, and build the bead, hair, and tool order that matches the next client on the schedule.


