Your cart is empty
Tax included and shipping calculated at checkout

Drawer menu
Tax included and shipping calculated at checkout
A professional account gives you stylist pricing, priority support, early access to new releases, and education developed by working stylists.


The popular advice is to “just peel” tape-ins once the bond feels loose. That's exactly how natural hair gets pulled, adhesive residue gets embedded, and reusable wefts become harder to prepare. Tape-in extension removal is a technical service, and the safe sequence is controlled solvent release, gentle separation, thorough cleansing, and a condition assessment before any new install.
For licensed stylists, the removal appointment also reveals how the client's extension hair has handled color services, swimming, sunscreen, oils, and heat styling. That history should influence the pace, the remover strategy, and the decision to reinstall, retape, or replace the weft.
A tape-in bond can look ready to release while still holding natural hair under tension. Separating the panels too early transfers that force to the hair, increasing the risk of cuticle damage, traction-related breakage, and residue that becomes more difficult to clear. Plan removal and reinstallation around the six-to-eight-week mark, while recognizing that some clients will present with bonds affected by color services, swimming, sunscreen, oils, or heat styling. The service history should guide the pace and remover choice.
Speed is a poor measure of quality. A quick pull can create more work through adhesive-coated hair, a compromised weft, and breakage that becomes visible only after cleansing. The working target is complete adhesive breakdown before mechanical separation.
Practical rule: If the bond resists light pressure, solvent action is not complete.
Pulling, ripping, or prying apart a firm bond can remove shed hair from the attachment area with the extension. It can also spread adhesive fragments along the hair shaft and distort the weft's tape surface. A panel may remain physically intact, yet still require residue removal and cleaning before it is suitable for another installation.
A technical removal service protects three outcomes:
Set removal up as its own procedure, not as a task squeezed between shampooing and a move-up. Guidance on removing tape-in extensions safely supports the same working principle: soften the adhesive before separating the panels.
Clients who combine tape-ins with regular color services, swimming, or intensive flat-ironing often have bonds in uneven condition. Color products, chlorine, sunscreen, oil, and heat can change the adhesive from panel to panel. One attachment may release cleanly, while another remains gummy, brittle, or unusually firm.
That unevenness changes the service plan. Saturate the bond, allow the remover to work, and test the release instead of applying force on a fixed schedule. A “gentler” method is not automatically faster or safer. A slower process can reduce tension, but only when the remover suits the adhesive and the stylist keeps checking both the bond and the natural hair.
For these clients, spending more time on a resistant panel may protect the hair and preserve the weft better than choosing a milder process that requires repeated handling. Removal quality depends on controlled release, not the smallest amount of product or the shortest appointment.
Safe removal depends on sequence, not speed. Sectioning keeps each attachment visible, remover needs direct access to the adhesive, and separation should begin only after the bond has softened. A practical professional workflow is outlined in this guide to tape-in removal.
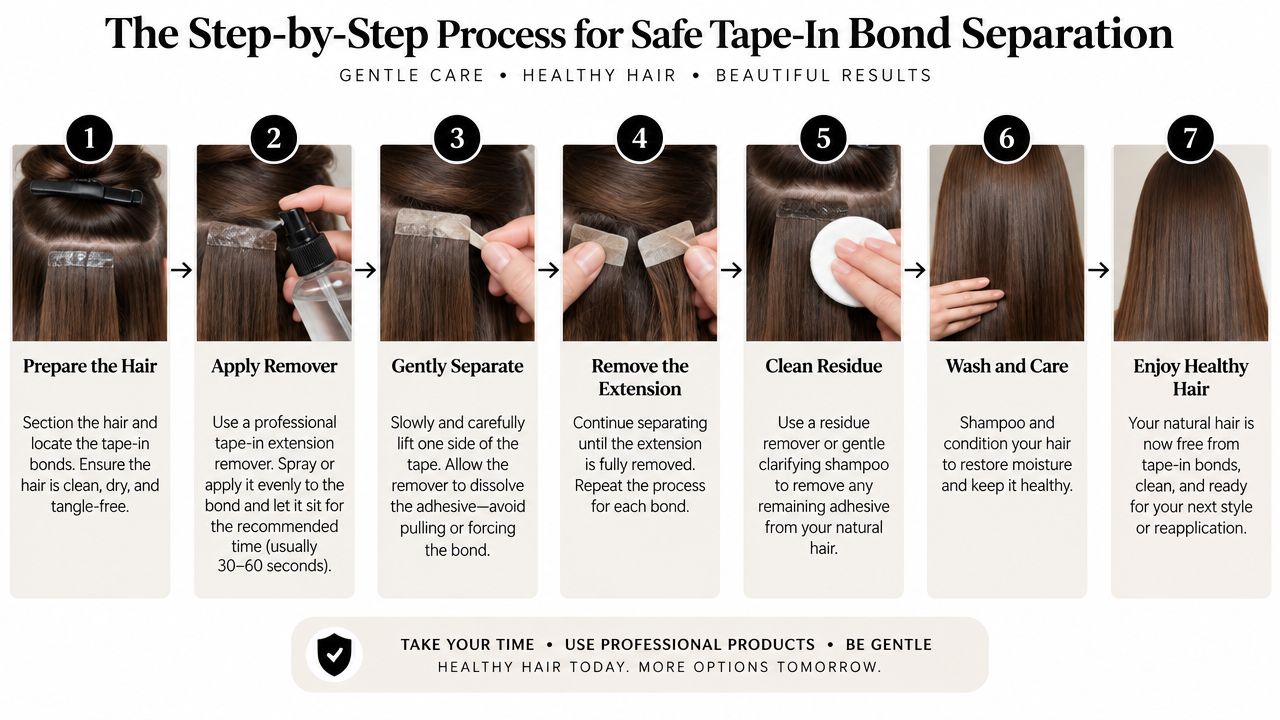
Create clear visual access before applying anything. Section the hair so each tape sandwich can be exposed without disturbing nearby attachments. Finger-detangle the lengths and identify shed hair gathered near the root. Do not pull a comb through an untreated bond.
Mixed-use clients need closer inspection. Color services, swimming, sunscreen, oil, chlorine, and repeated heat can leave attachments in different conditions. One panel may release cleanly while another stays gummy, brittle, or firm. Treat each connection according to its response rather than assuming the whole row will behave the same way.
Support the extension panel as the attachment releases. Keep the natural hair controlled at the root, and work on one connection at a time. Applying remover across an entire row can spread product where it is not needed and makes the release harder to assess.
Set up the workstation with:
Conde Professional's hair extension installation tools can help organize the workstation. The tools support the service, but they do not replace controlled handling.
Expose both sides of the tape connection. Apply remover above and below the bond so it reaches the adhesive sandwich from both directions. Give it approximately 30 to 60 seconds to work before testing the release.
Start at the top edge. Use light pressure to slide the panels apart gradually from top to bottom. Do not peel from the middle or pull the extension away from the root. If the bond still grips, stop and re-saturate the connection. A gentler method is not automatically faster or safer when it requires repeated handling. Controlled dwell and careful testing usually protect the natural hair better than force.
Place the removed weft on a clean surface and inspect the natural hair with your fingers first. Then use a suitable combing motion to remove residue and shed hair. Avoid scraping, particularly when color or heat has already stressed the hair.
Check every connection. A small adhesive patch can form a knot during cleansing or interfere with the next installation. Removal is complete only when both the natural hair and the extension panel are clean enough to assess accurately.
A “gentle” remover does not make removal safe by itself. The result depends on whether the solvent reaches the full adhesive sandwich, softens it sufficiently, and lets the panels separate with minimal tension. Dwell time is part of the technique, not dead time between applications.
A working window of about 30 to 60 seconds can be appropriate when the remover suits the adhesive system and both sides of the bond are fully saturated. Some products require several minutes before the connection releases. Follow the product directions, then judge the bond rather than relying on one timer. A slower release is safer than forcing a bond that is still gripping.
A light coating on the exposed surface may leave adhesive untouched inside the sandwich. If the stylist tests too soon, the panels resist and pulling becomes tempting. That mechanical force places unnecessary stress on the natural hair.
Apply enough remover to both sides of the connection and watch how the adhesive changes. A softened bond should begin to slide apart with light pressure. If it stretches, smears, or remains firm in isolated areas, allow more contact time or apply remover again. Do not keep increasing force.
Mixed-use clients need a closer assessment than a generic “gentle” label provides. Oils and sunscreen can make the surface feel slippery while the adhesive underneath remains firm. Swimming may bring chlorine exposure, dryness, and tangling at the same time. Repeated flat-ironing can leave the extension hair brittle even when the bond releases normally. Previous color services may also reduce the natural hair's tolerance for tension.
Assess three conditions before deciding how to proceed:
A remover designed for the extension system is the sensible starting point. Conde Professional provides a dedicated tape-in glue remover. Any salon product still needs to match the adhesive system and be used according to its directions.
Oil-based options may loosen some adhesives, but they can leave a heavy film that lengthens cleansing and makes retaping harder. Alcohol-based approaches may strip moisture and leave hair brittle or difficult to manage, especially when the hair is curly or textured. A professional remover can release the bond more predictably, but it still needs enough time to penetrate.
The trade-off is practical. Patient solvent work can reduce pulling, while rushed separation can cause preventable breakage. A longer, controlled service is preferable to a quick detachment when the client's hair has already been affected by color, swimming, or heat.
Once the tape panels separate, assess the natural hair and the weft as two different service components. The natural hair needs residue removal and a condition check. The weft needs adhesive cleanup, alignment, and an honest decision about reuse. A panel that looks intact can still be unsuitable if its base is distorted or its hair no longer combs cleanly.
Professional and consumer guidance consistently describes tape-ins as reusable after the old adhesive has been completely removed and fresh tape has been applied. The full service can take 30 to 60 minutes, depending on the number of panels, residue, and cleansing required before reinstallation. Learn more about what stylists do when preparing reused wefts.
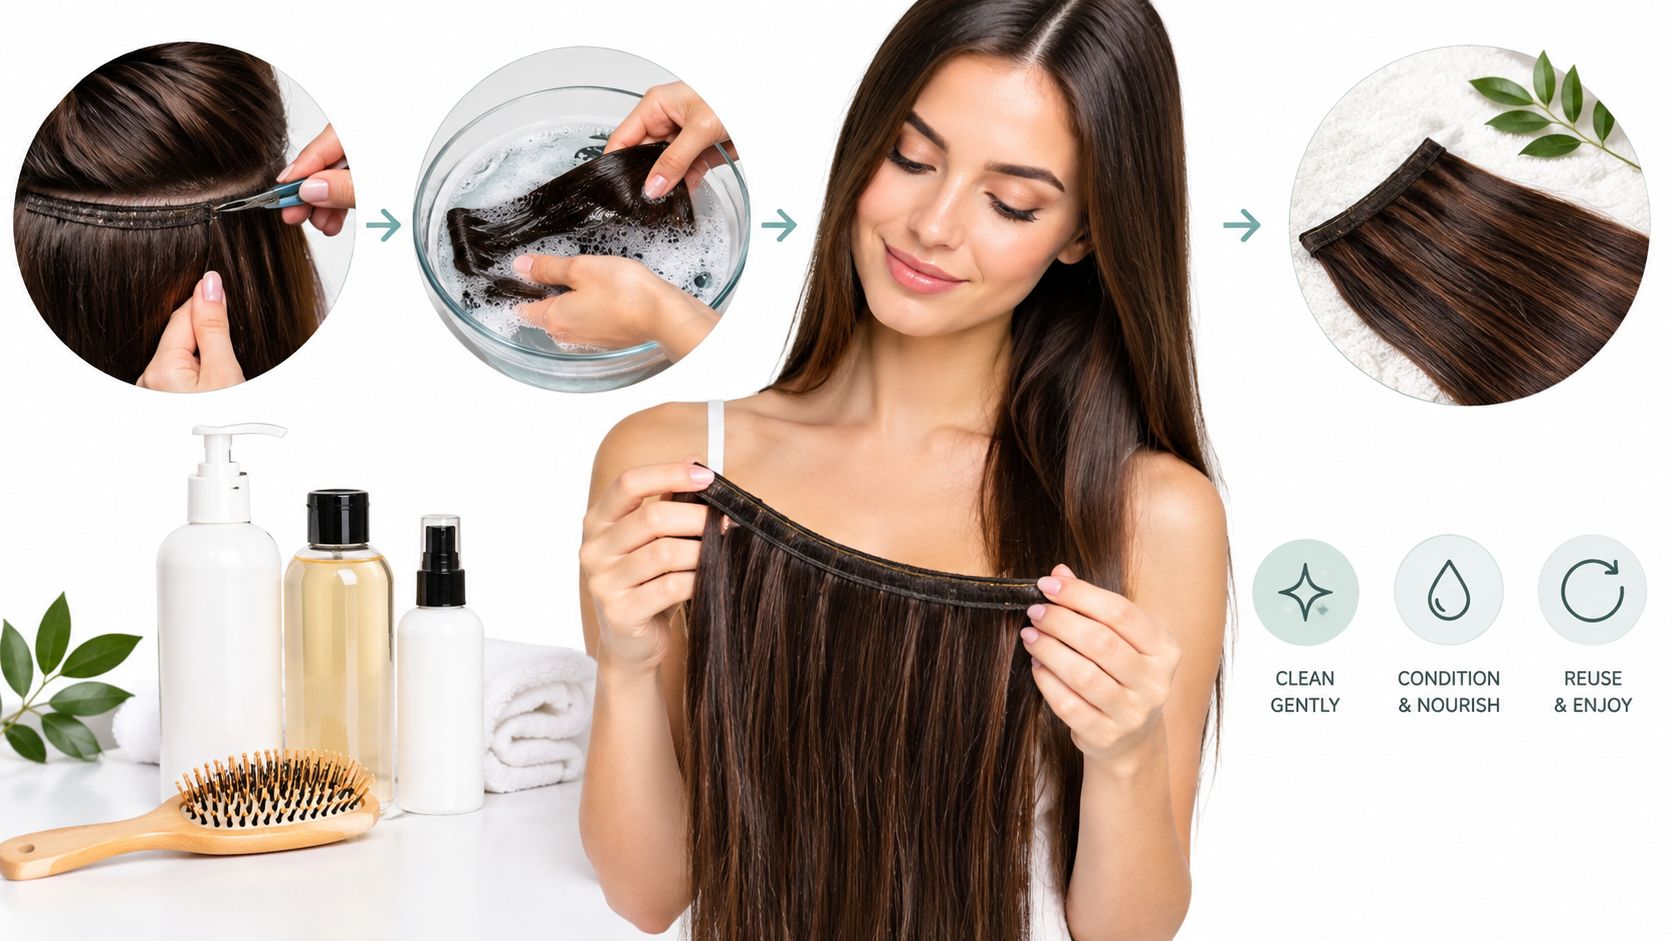
Clarifying shampoo removes adhesive residue, oils, sunscreen, and remover film. Condition the lengths where slip is needed, but keep the root area free from a coating that could interfere with fresh tape. Clients who swim regularly may carry more product, mineral, or chlorine residue, so check the attachment zones rather than assuming one wash is enough.
The cleansing stage also reveals the hair's actual condition. Confirm that it combs smoothly, inspect the former attachment areas, and look for shedding or breakage that should change the next service plan. Reinstallation should follow the hair assessment, not the appearance of the weft alone.
Clear every trace of old adhesive from the weft before applying fresh tape. Residue creates an uneven base and can weaken the new attachment. The panel should be aligned, clean, and combable for the intended installation method.
Use these checks:
Independent discussion of extension quality recommends evaluating cuticle alignment, combability, shedding, and post-wash behavior instead of relying on supplier labels such as 6A through 10A. This quality-grading discussion explains why measurable hair behavior matters more than grade tags.
Mixed-use clients need a stricter review. Color services can leave the extension hair more fragile, while frequent swimming can increase dryness, tangling, and residue around the attachment area. Fresh tape is the functional attachment surface, not a cosmetic finishing detail. If the weft fails inspection, replacing it is safer than forcing another install.
A difficult bond does not always need a stronger remover. It may need better diagnosis, sufficient dwell time, or slower separation. Before changing products, identify whether the adhesive is dry and under-treated, softened and gummy, or contaminated by oil and product film. Random product changes can increase residue without addressing the cause.
A firm, dry bond needs full saturation and time to release. A gummy bond needs controlled separation and residue management. A slippery surface may be contaminated while the adhesive underneath remains attached. Apply remover to the connection itself, then support the section and retest rather than forcing the panels apart.
| Issue | Likely Cause | Solution |
|---|---|---|
| Panels resist light pressure | Insufficient saturation or dwell time | Reapply system-appropriate remover above and below the bond, wait, then retest |
| Adhesive smears through the hair | Bond is softening but separation is rushed | Pause, add controlled remover, and slide the panels apart gradually |
| Root hair pulls during release | Mechanical force is replacing solvent action | Support the hair at the root and stop pulling until the bond releases |
| Weft surface remains tacky | Old adhesive was not fully cleared | Remove residue before applying fresh tape |
| Hair feels coated after removal | Remover, oil, or adhesive film remains | Clarify thoroughly before assessing the next install |
| Extension hair mats after washing | Residue, tangling, or compromised cuticle behavior | Inspect combability and post-wash behavior before deciding to reuse |
A gentler approach is not automatically faster or safer. More solvent, heavier saturation, or aggressive rubbing can spread residue and increase cleanup. Use the minimum controlled action that releases the bond, and stop whenever root hair begins to move.
Color-treated clients and frequent swimmers require closer observation. Color services may leave extension hair more fragile, while chlorine, salt water, sunscreen, and repeated wetting can contribute to dryness, tangling, or residue near the attachment area. Record that history before judging the bond or the weft. Inspect natural hair and extension hair separately.
The effects of tape extensions on hair can support the maintenance discussion, but the in-person assessment determines whether reinstallation is appropriate. Breakage, severe tangling, or persistent residue warrants postponing the next install. A panel that fails inspection should be replaced rather than forced into reuse.
Removal is part of the next installation decision. After cleansing, assess the natural hair in its clean state, inspect the weft, and record anything that could affect reinstallation. A rushed consultation can turn a manageable maintenance issue into a poor method choice.
Check each attachment area for residue, tangling, shedding, and changes in hair condition. Ask about recent color services, swimming, sunscreen, oil-heavy products, and heat habits. Color-treated extension hair may have less tolerance for another service, while chlorine, salt water, sunscreen, and repeated wetting can contribute to dryness, tangling, or residue near the bond. Inspect the natural hair and extension hair separately.
Frequent swimming or intensive heat styling may make some methods less suitable. Tape-In can provide a flatter attachment with removable panels. K-Tip may fit a different maintenance pattern, while Clip-In can suit occasional styling rather than continuous wear. Conde Professional also supplies Volume Weft, Thin Weft, Tape Weft, and Bulk, allowing the choice to follow density, styling goals, and the client's maintenance tolerance.
Do not present reuse as guaranteed. Confirm whether the current weft passes inspection, whether fresh tape is needed, and whether the natural hair is ready for another install. A panel with severe tangling, persistent residue, poor combability, or compromised hair should be replaced rather than forced back into service.
Recommendations should reflect the client's routine. Residue-prone bonds call for a cleansing discussion. Heat-heavy styling calls for guidance on temperature and frequency. Swimmers need a plan for reducing exposure and managing the hair afterward. Generic advice rarely changes behavior because it does not address the cause of the problem.
Gentler methods are not automatically faster or safer. Excess solvent, heavy saturation, or aggressive rubbing can spread residue and create more cleanup. Use the minimum controlled action needed to release the bond, then stop if the root hair begins to move.
Document the method, weft condition, slow-release areas, and maintenance concerns. A salon owner can also use a structured retention approach, including the practical ideas in BonusQR for repeat business growth, while keeping the conversation focused on service quality and education.
Use this same-day checklist:
Conde Professional supplies Tape-In, Tape Weft, K-Tip, Volume Weft, Thin Weft, Clip-In, and Bulk, plus installation accessories for salon workflows. Review the collection and open a professional account through Conde Professional to plan cleaner removals, reliable retaping, and better-matched installs.


