Your cart is empty
Tax included and shipping calculated at checkout

Drawer menu
Tax included and shipping calculated at checkout
A professional account gives you stylist pricing, priority support, early access to new releases, and education developed by working stylists.


Rubber beads for hair are not automatically gentle, and that's the mistake that gets stylists into trouble. Elasticity helps, but safety still depends on diameter, lining, wear condition, and how much force the install puts onto the natural hair.
A rubber bead can be the right choice in the right setup, but it can also become a compression point if it's over-crimped, oversized for the section, or left to carry too much load. The practical standard is simple, the bead has to secure the install without turning the attachment point into a friction-and-traction problem.
The salon myth is easy to understand. Rubber feels softer than metal, so it gets described as safer by default. That shortcut ignores the mechanics of an install, because a compliant material can still create damage if it's forced too hard, moved too often, or used on a section that can't support the weight.
Professional installation has to account for elastic recovery, internal diameter, coating quality, and condition at the chair. Rubber-coated hair beads function as compliant interfaces, meaning the lining can deform around the bundle and increase contact area instead of concentrating contact on a hard edge. That helps, but only when the bead is matched to the section and closed with control. If the bead is repeatedly adjusted or crimped down aggressively, pressure still builds at the attachment point.
Practical rule: A softer bead does not forgive a bad section choice.
Hair-fiber damage is cumulative. Once the cuticle is substantially damaged, it doesn't biologically regenerate in the same way living tissue does, so repeated friction and mechanical stress can add up fast. That's why the professional question is never just “rubber or metal,” it's whether the bead, the hair, and the install geometry work together.
A useful way to think about it is this, material choice sets the starting feel, but installation pressure decides the outcome. If the bead is too small for the section, if the grip has to be forced shut, or if the install is already carrying too much extension weight on a thin base, the gentler-looking option can still be the wrong one.
Pain, itching, redness, or a heavy pull at the root are not acceptable signs of a secure install. Those are signals that the attachment needs to be released, redistributed, or resized. Hair that feels “tight enough” in the chair often becomes the service that has to be taken down early.
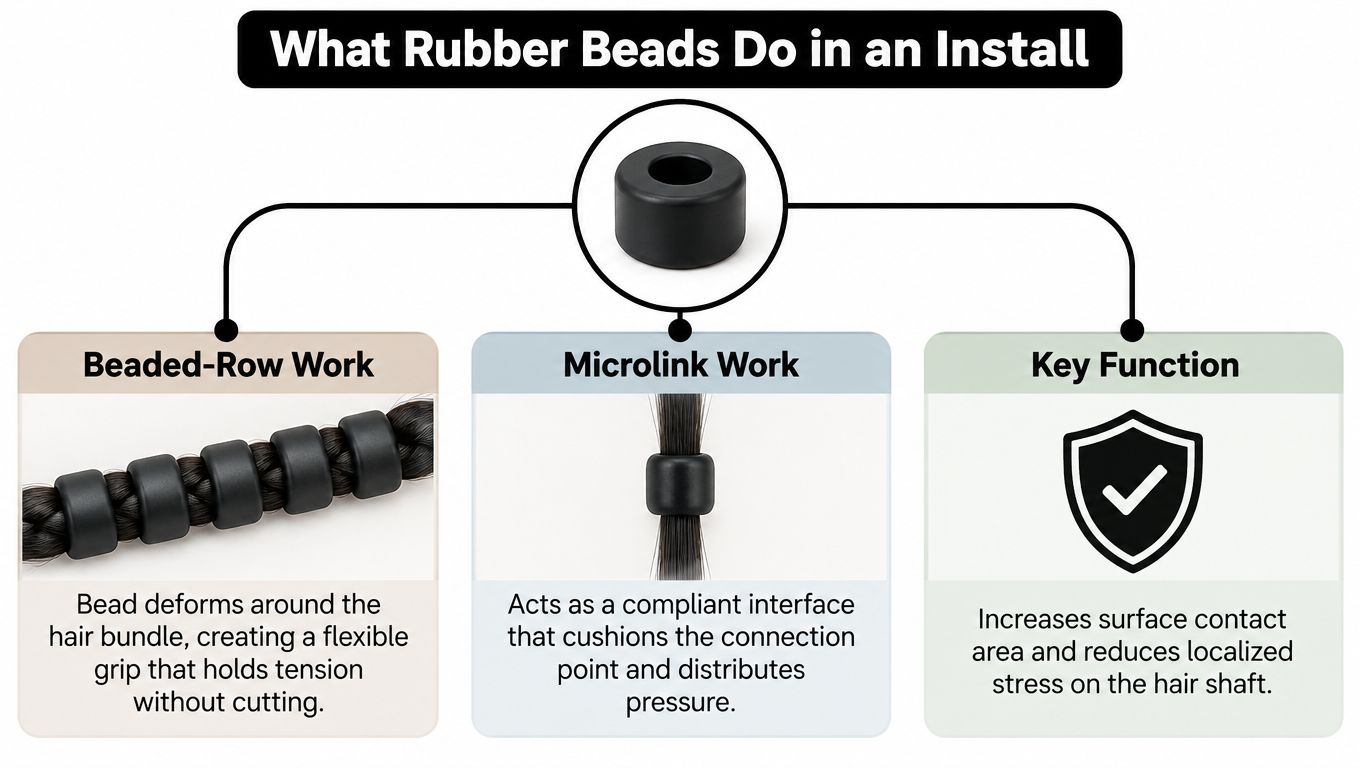
Rubber beads for hair are best understood as a compliant fastening component, not a magic safety layer. In beaded-row and microlink work, the bead deforms around the natural-hair bundle, increases contact area, and reduces hard metal-on-fiber contact. That's the engineering advantage, the bead can distribute pressure better than a rigid clamp when it's properly chosen and properly closed.
The material story behind that flexibility matters because it explains why these fastening components exist at all. Natural latex from rubber-producing plants was used long before European contact, European scientific documentation followed after de La Condamine's 1735 expedition and the samples sent to Europe in 1736, Priestley later coined “rubber” in 1770 after noticing pencil marks could be erased, and Goodyear's vulcanization in 1839 made rubber far more stable under heat and wear. That history matters as context, not as proof that every modern bead contains natural latex. Modern professional beads may rely on natural rubber, synthetic elastomers, or silicone-lined constructions, but the principle stays the same, controlled elasticity secures hair without a rigid metal clamp.
For pros, the useful classification is functional:
The installation language also changes by method. In a beaded row, the bead has to hold a clean row without sliding. In microlink work, the bead has to cushion the connection point and stay put under movement. The bead itself is only one part of the system, because safety is material plus geometry plus installation pressure.
The internal education for I-tip methods is worth keeping nearby for method matching, and the related professional reference is Conde Professional's I-tip guide.
The right choice depends on what the hair can tolerate, not on which bead sounds gentlest in a product description. Rubber, silicone-lined aluminum, silicone-lined copper, and keratin-adjacent attachment methods each solve a different problem at the chair. The goal is to match grip, weight, and wear behavior to the client's density, texture, and sensitivity.
The comparison below is the fastest way to sort the options before installation starts.
| Bead Type | Grip Mechanism | Best Fit Hair | Visible Wear Signal | Replacement Trigger |
|---|---|---|---|---|
| Rubber bead | Elastic compression around the bundle | Sectional installs where flexible grip matters | Flattening, loss of rebound, visible scuffing | Slippage, brittleness, or repeated adjustment |
| Silicone-lined aluminum | Metal structure with cushioned inner contact | Fine or chemically treated hair | Lining irregularity, seam wear, reduced hold | Snagging, loss of lining integrity, or movement after wear |
| Silicone-lined copper | Similar cushioned hold with a different metal body | Fine hair that needs stable, controlled grip | Dulling, lining wear, compressed interior edges | Visible deformation, slippage, or sharp contact points |
| Keratin attachment | Heat-formed bond rather than bead clamp | Method-specific installs where bonded tips are chosen | Cracking, crumbling, or lift at the connection | Any sign of bond failure or movement |
Silicone-lined beads tend to be the pragmatic choice for fine, fragile, or chemically treated hair, because the lining separates the natural hair from the harder edge of the bead. Rubber or elastomer beads still have a place when the install needs a more compliant interface, but they're not the default answer for every head of hair. Heavy beads can tug thin hair, and a bead that looks gentle can still cause trouble if it's too heavy for the section it's sitting on.
Chair-side rule: If the bead is holding by squeeze alone, the section is too small or the closure is too aggressive.
The method link matters too. A beaded-row install and a microlink install don't ask the bead to do the same job, so the best default changes with the method. For a closer method reference, the corresponding professional guide is Conde Professional's beaded-row resource.
Sizing comes before brand loyalty and before plier force. Internal diameter, wall thickness, and elastomer hardness have to match the hair density and the specific section size, or the bead starts acting like a compression tool instead of a fastening tool. That is where a lot of installs go wrong, especially on thick texture or on sections carrying extension weight already.
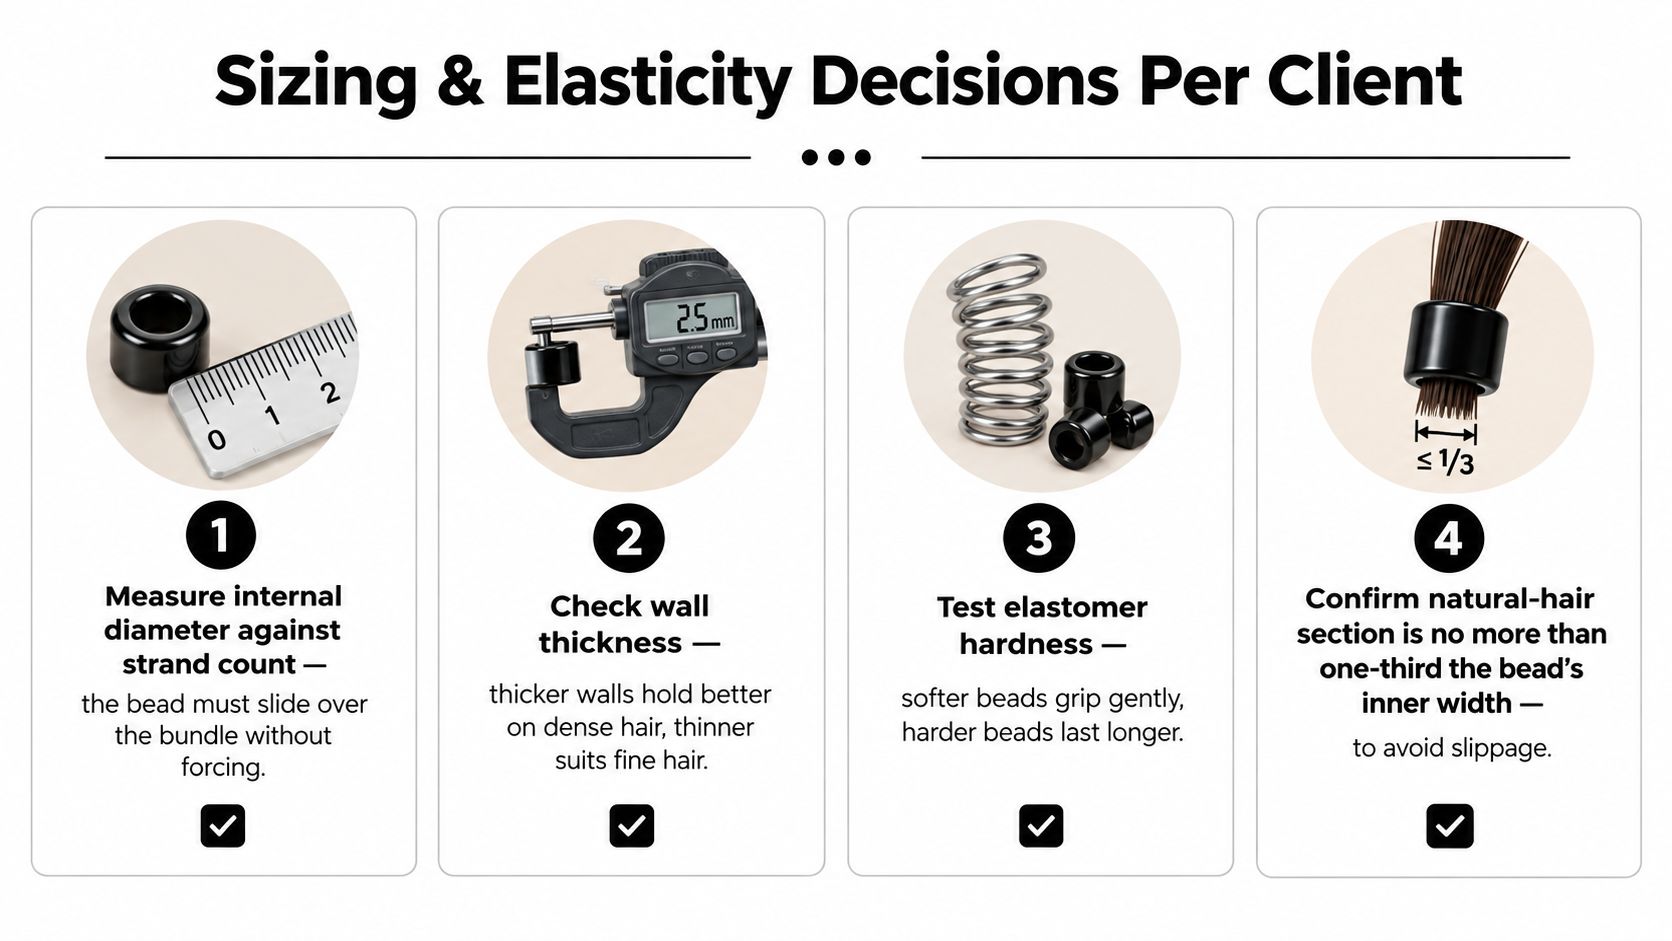
A practical sizing rule holds up behind the chair, the natural-hair section should fill at least half of the bead before the extension tip is inserted. That gives the bead enough hair to hold onto without forcing the strands into a compressed plug. If the bead is too small for the section, the clamp has to be overworked, and overwork creates pressure damage rather than security.
Supplier sheets should tell a stylist what the bead is built to do, but the real fit test happens on the section. A typical silicone-lined bead range of about 4 to 5 mm is useful on many installs, but it can be too small for thicker locs or larger braids. In those cases, the opening needs to be at least 2 mm wider than the braid base so the bead can sit without crushing the section.
The same logic applies to wall thickness and hardness:
The key is not to chase the tightest possible crimp. Tightest is not safest. A bead should be selected to match the section size, then closed with enough pressure to secure, not enough pressure to flatten the hair bundle into a compressed mass.
Selection check: If the bead needs extra force to close cleanly, step up a size before the install starts.
A close supplier conversation helps here. Ask for actual elastomer data when it exists, especially tensile stress, tensile strength, elongation, and tensile set information from ASTM D412-type testing. That won't replace chair-side judgment, but it does tell a salon whether the bead's recovery is credible or just marketed as flexible.
Placement geometry does more for follicle safety than bead material alone. The standard starting point is simple, place the bead about 1 cm from the scalp, keep horizontal rows about 2 cm apart, and close the bead until it is nearly flat, not crushed. That gives the attachment room to move slightly with the hair instead of levering directly against the root.
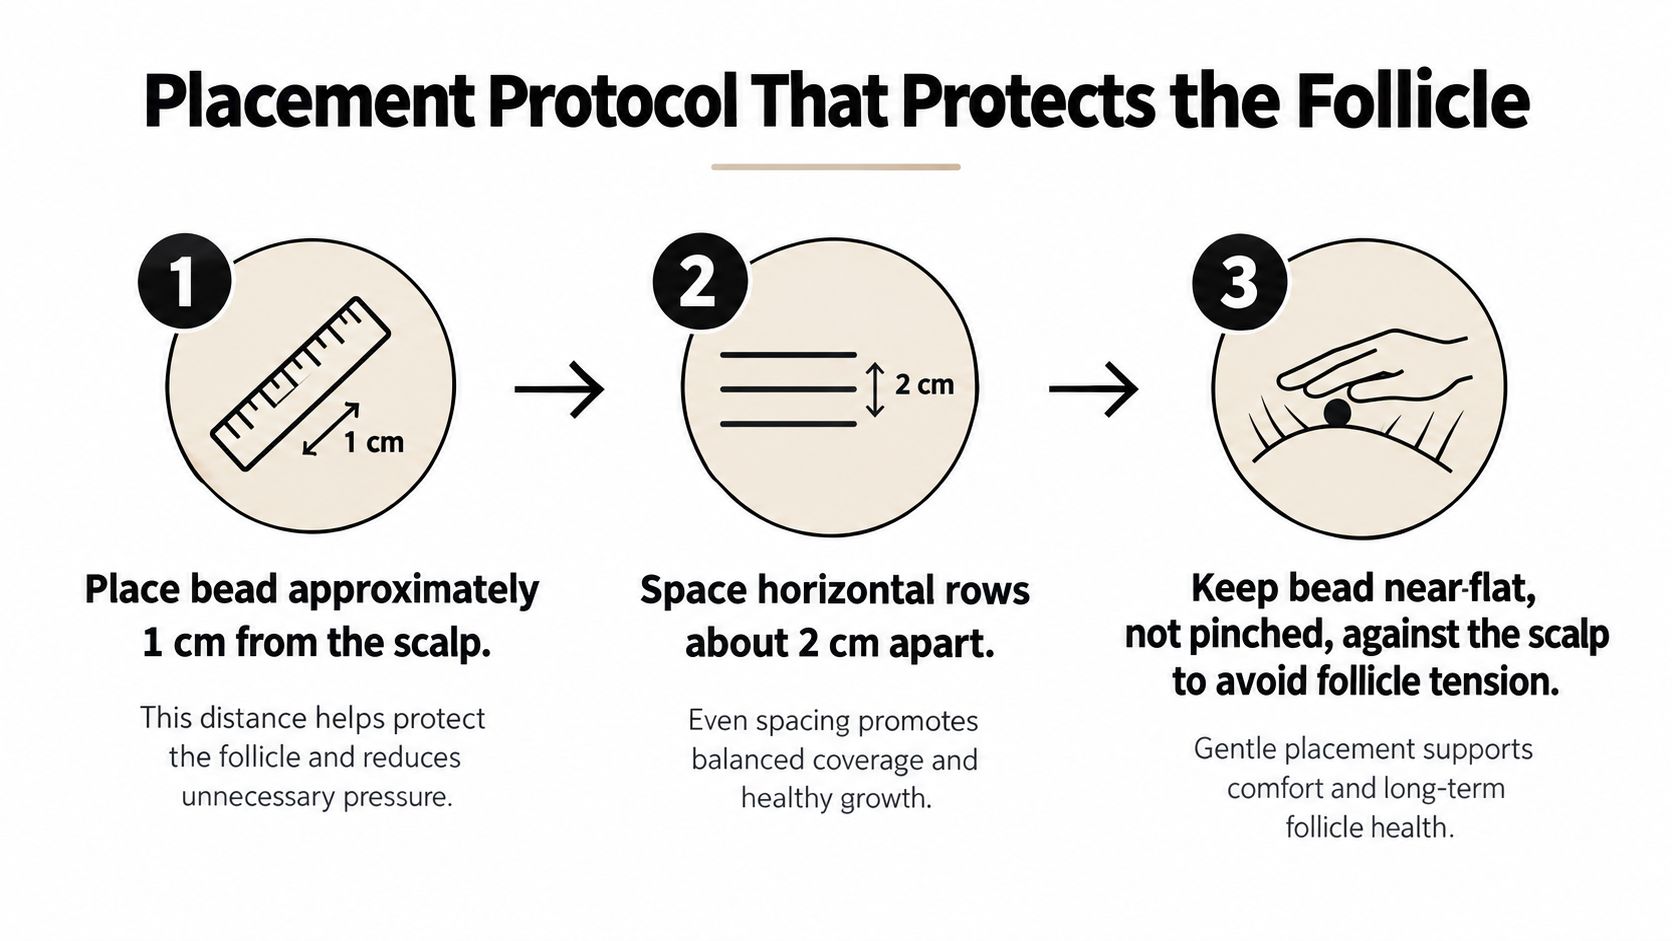
The plier jaws need to meet the bead squarely. If one edge is tighter than the other, the bead can create a pinch point on one side and a loose edge on the other, and that's how migration starts. A gentle parallel tug before the client leaves the chair confirms that the attachment neither rotates nor slides.
If a bead rotates during install, the issue isn't always the bead itself. It can mean the section is too small, the hair is too slick for the selected interface, or the extension load is too concentrated on that spot. The solution is usually repositioning, redistributing weight, or choosing a different bead size, not just crimping harder.
The internal bead guide for invisible attachment setups is useful for placement logic, and the related professional reference is Conde Professional's invisible bead guide.
The bead should never be used to compensate for a weak natural-hair section. Thin, broken, miniaturized, or already compromised sections shouldn't be asked to carry the same load as a fuller section. Weight distribution is part of follicle protection, and a smart map across the head matters more than squeezing a bead tighter.
The warning signs are usually there before the client insists something is wrong. Tenderness, headache, itching, redness, broken hairs, and widening of the part are all signals that the attachment needs attention, not more force. The cleanest move is to reduce weight, reposition the bead, or release the attachment the same day.
Traction alopecia is tied to excessive or repeated pulling, and medical guidance notes that early injury can improve after tension is removed, while chronic exposure can become scarring loss. That makes monitoring part of professional service, not an afterthought. A secure install that hurts is not secure enough.
Re-tightening should respond to visible slippage and growth, not a fixed calendar trigger. If the bead is still stable and the scalp is calm, there's no reason to force an adjustment. If the client reports pain or irritation, the conservative answer is to stop treating that discomfort as normal.
A secure install should feel present, not punishing.
The tension posture should stay conservative throughout the wear cycle. University-level guidance on traction-related loss also warns against rubber bands and elastic holders, which supports the same salon principle, less root tension is safer than more. That doesn't mean every bead install is fragile, it means the root should never be asked to tolerate discomfort as proof of success.
Removal is where a lot of damage happens. The safest rule is to work from the attachment outward, and if the bead won't release cleanly, cut rather than drag it through the strand. Sliding a stubborn bead down the hair often creates more friction than it saves.
The install should start on dry hair. Wet hair can snag more easily, and rubber memory is harder to judge when the strand is damp. That matters on textured hair and on chemically treated hair, where the cuticle can already be more vulnerable to mechanical stress.
Re-tightening is not the same as full repositioning. If there's simple growth and the bead has drifted, a move-up may be enough. If the section has broken down, if the bead is showing compression set, or if the client feels pain, the better move is to remove and reset rather than keep forcing the same spot.
For thinner hair placement decisions, the internal guide is useful, and the related professional reference is Conde Professional's thin-hair extension guide. Decorative beads also deserve a safety note, detached beads can be swallowed or placed in ears or nostrils, so salon work and home care need to stay separated clearly.
The smartest bead decision starts before the client sits down. Inventory should be checked for sharp seams, inconsistent lining, compression set, and slippage after simulated brushing, because a bead that looks fine in the drawer can fail under real wear. If the material doesn't rebound, or if the lining looks uneven, it doesn't belong in the install tray.
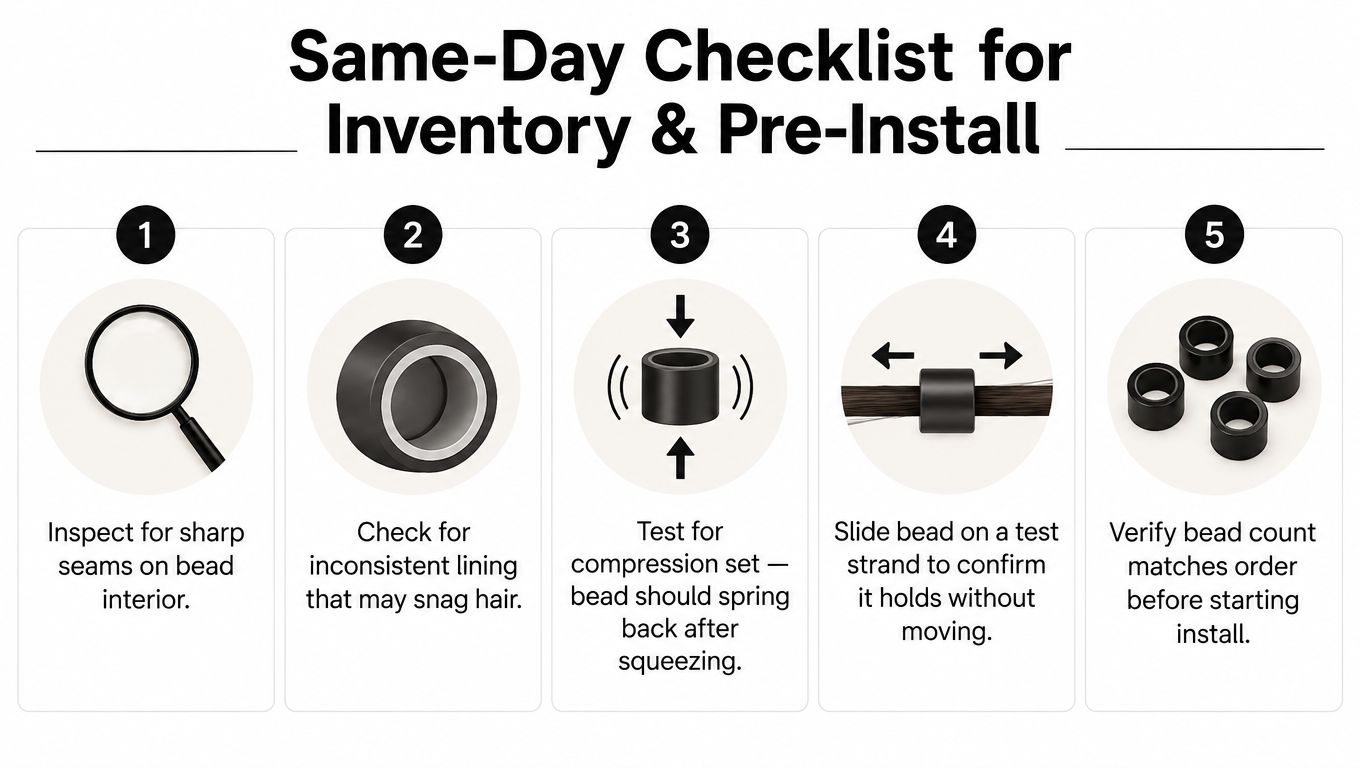
Ask suppliers for the details that help with selection:
The installation tools matter too, because the right bead still performs poorly if the application tool is dull, misaligned, or the wrong size for the job. The related professional reference is Conde Professional's installation tools guide.
Choose rubber over silicone-lined metal only when the install benefits from a more compliant interface, the section size supports it, and the scalp is comfortable with the hold. Choose silicone-lined metal when the hair is fine, treated, or needs a more structured hold with cushioned contact. Choose neither if the section is too small, too fragile, or already showing signs of stress.
Before the next install day, review current bead stock against that checklist and pull any beads with visible wear, brittleness, or poor rebound. That single inventory pass prevents the kind of chair-side compromise that turns a decent install into a repair appointment.
Conde Professional supports licensed stylists with extension methods, pro tools, and education that fit real salon work, including bead-based installs that need careful sizing and safer placement. For method-matched hair, accessories, and professional support, visit Conde Professional and open a professional account before the next full-day install.


