Your cart is empty
Tax included and shipping calculated at checkout

Drawer menu
Tax included and shipping calculated at checkout
A professional account gives you stylist pricing, priority support, early access to new releases, and education developed by working stylists.


A client is ready for a beaded row, but the natural-hair section is fine in one area and denser in another. Bead tips work when the supporting hair, extension load, bead fit, clamp pressure, and placement are balanced, not when every attachment is just squeezed tighter.
That's the practical answer to how to use bead tips in a professional install: control the load at each attachment, then check how it behaves on the head. A bead can retain an extension, but it can't compensate for poor sectioning or an unsuitable method choice.
A bead-tip attachment mechanically anchors an extension. The stylist isolates a controlled section of natural hair, threads it through a bead, places the I-tip alongside it, positions the bead near but not against the scalp, and compresses it with dedicated pliers. That sequence is described in the documented bead-tip installation method.
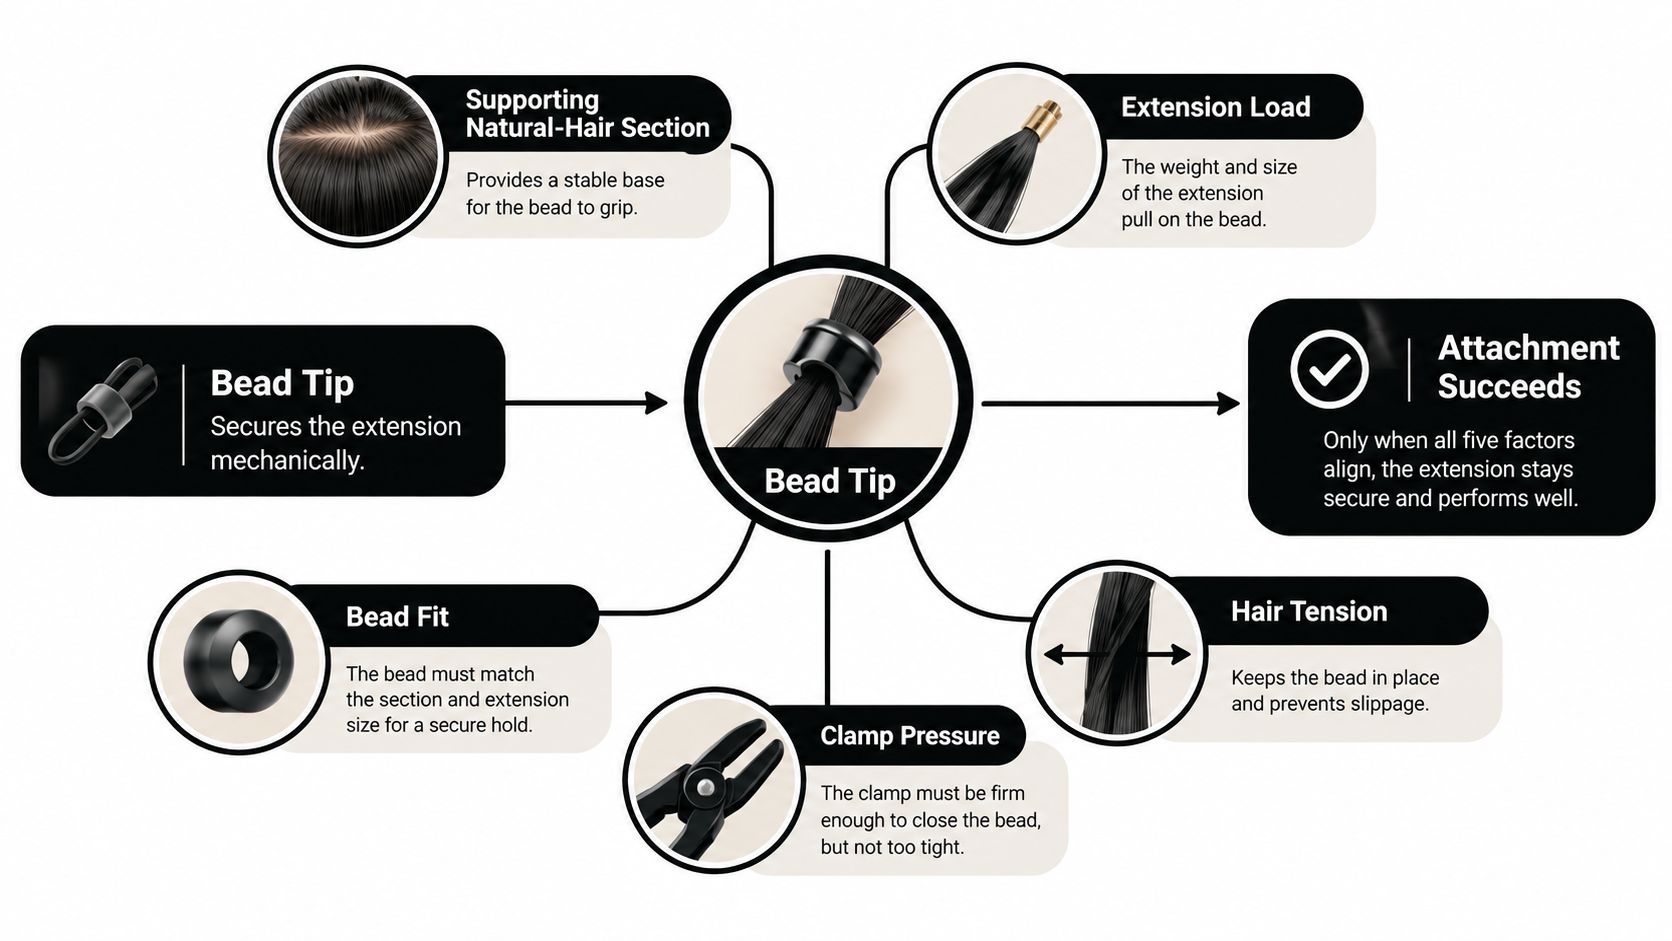
The bead creates retention; the natural section carries the load. If the section is too small for the extension, the attachment may slip or concentrate pulling on too little hair. If it's too large, the bundle can become bulky, harder to enclose evenly, and unnecessarily compressed. Neither problem is fixed by a more forceful crimp.
A secure-looking bead isn't automatically a good attachment. Check how the natural section sits inside it, whether the extension tip is fully enclosed, whether the bead lies flush, and whether the hair moves comfortably. Visual symmetry matters for concealment, but it doesn't confirm that the attachment is stable or that the load is well distributed.
The supporting row matters too. Parting, spacing, extension weight, bead fit, and the client's existing hair integrity affect how the attachments behave together. A single strand may feel stable at the chair while the row still has crowded attachments or inconsistent tension.
For a broader method comparison during consultation, use this guide to types of hair extension methods. The choice isn't just bead tips or no extensions. A stylist should match the attachment system to the client's hair, desired result, and tolerance for maintenance.
Treat preparation as a service-readiness check, not just a tool setup. Start with fully dry, residue-free hair, a loop tool suited to controlled sectioning, dedicated micro-link pliers, clean parting tools, clear lighting, and a mirror for checking the finished row. A review of professional hair-extension installation tools can help with planning the station.
Inspect the beads before they touch the hair. Check their fit against the extension tip and intended subsection, confirm that the lining is intact where applicable, and set aside any ring that's deformed or has a rough or damaged edge. Pliers should close evenly. If the tool or bead prevents a controlled, flat closure, don't compensate by squeezing harder.
At consultation, assess density, existing hair integrity, scalp condition, desired placement, and the anticipated load. Discuss whether the client can return for inspection and adjustment as the hair grows. A cuticle-intact Remy or double-drawn extension may suit the desired blend or fullness, but those labels don't replace checking strand alignment, shedding, combability, and how the hair behaves in salon handling.
| Check | Proceed when | Pause or choose another method when |
|---|---|---|
| Natural hair | The subsection can support the planned strand without an oversized bundle. | The section is fragile, compromised, or too fine for the planned load. |
| Bead and tools | The bead fits, its lining and edges are intact, and the pliers close evenly. | A bead is damaged, deformed, or difficult to close without excess force. |
| Service plan | Placement and maintenance expectations are understood. | The client needs a result or upkeep pattern the method can't reasonably support. |
| Alternative method | Beads suit the hair and planned design. | Another option, such as K-Tips, Tape-In, Clip-In, or a carefully selected weft, better matches the client's needs. |
A different method can be the more professional decision. For example, K-Tip Amber Glow #7/10 Superblend is a flat keratin-tipped extension designed for hot-fusion application, so it isn't interchangeable with a bead-tip strand. Business purchasing intent belongs with a professional account: Conde Professional serves licensed salon professionals, rather than routing stylists to a consumer checkout.
Begin with clean, horizontal partings and work from the nape upward. Hair should be fully dry and residue-free so the bead can grip predictably. Isolate a small, controlled subsection, close to the width of one extension strand, rather than pulling a thick bundle through the ring.
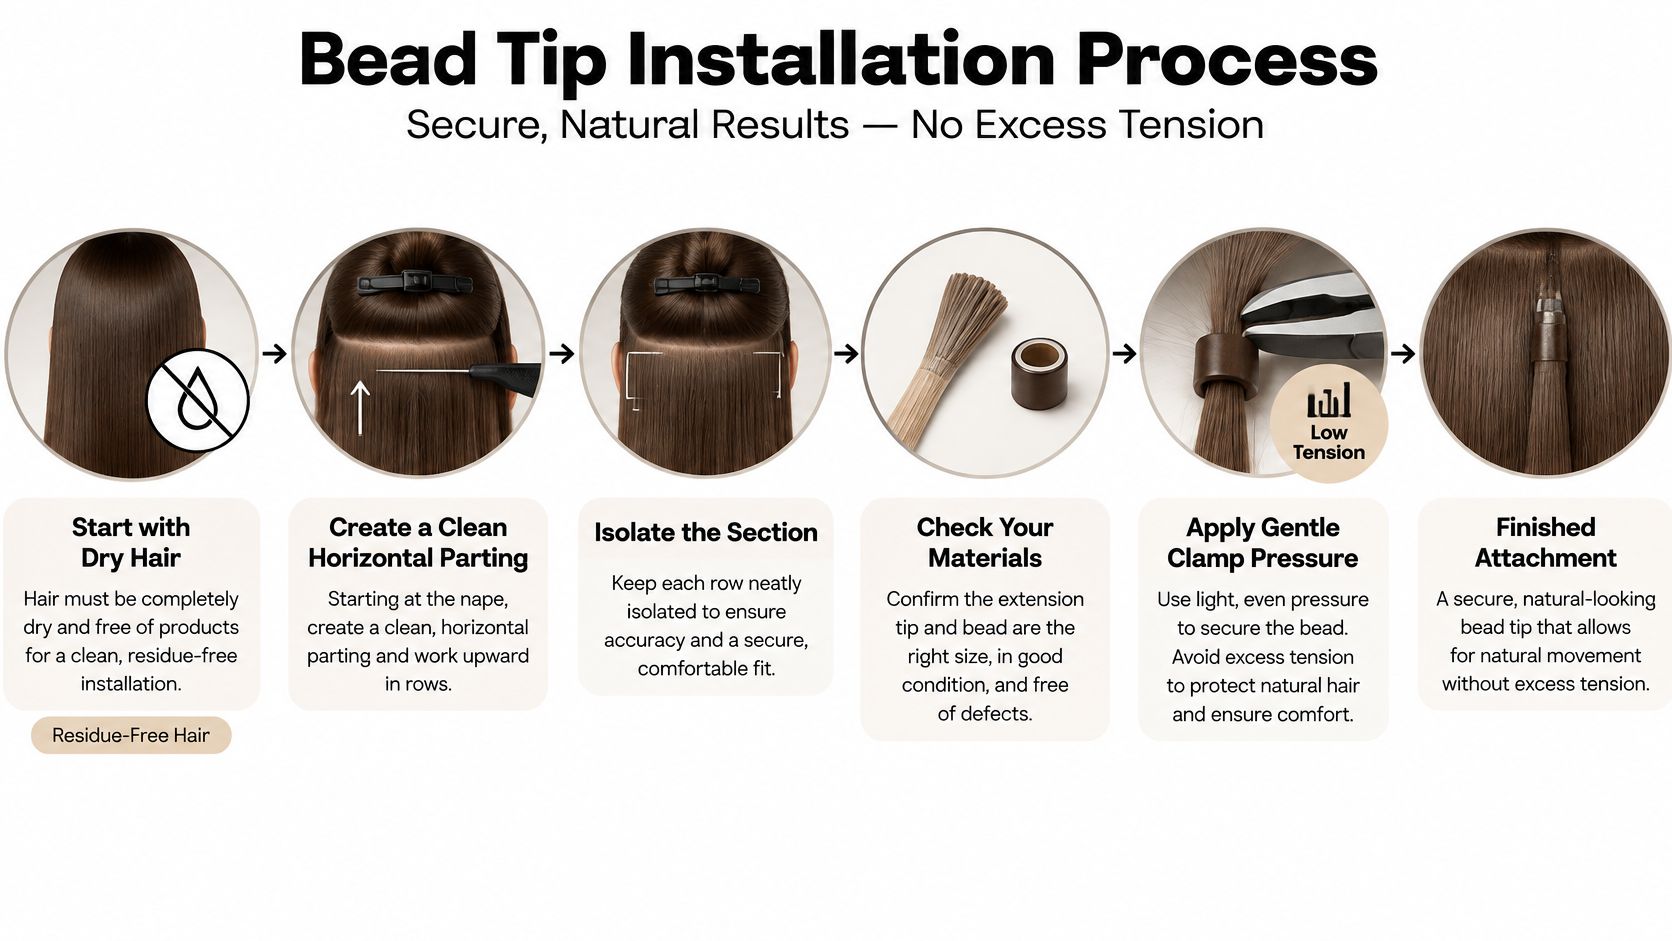
Use a loop tool to thread the natural hair through the bead, then insert the I-tip alongside it. Leave room for movement instead of setting the bead hard against the scalp. Professional guidance places the bead about 0.6–1.5 cm from the scalp and recommends even plier pressure followed by a gentle, parallel-to-scalp tug test, as detailed in this bead-tip placement guide.
Use dedicated extension pliers and make a controlled center press for positioning, followed by measured pressure at the sides to form a secure, flattened shape. The goal is an even closure, not a twisted, crushed, or figure-eight crimp. Aggressive compression can deform the bead and create hard edges or localized pressure; too little compression can leave the attachment able to rotate.
Check that the bead sits flush against the extension tip and doesn't visibly pinch hair at its opening. A bulging subsection or an exposed gap is a cue to assess the captured hair and bead fit, not an invitation to clamp repeatedly.
Run a gentle pull parallel to the scalp. The attachment should stay stable without rotating, lifting the supporting hair, or causing discomfort. Then look along the row for consistent concealment and room around neighboring attachments. The professional placement guidance also emphasizes checking movement and scalp response, rather than relying on appearance alone.
Keep oil-based products away from the attachment area. A client's routine can affect how the attachments wear, so cover placement and home-care expectations before the service is finished.
A bead that spins after the first wash was usually a load problem before it became a plier problem. Start with fit: the bead must enclose the extension tip and the controlled natural-hair section without forcing extra hair through the opening. Density, subsection size, tip shape, and extension load decide whether the closure stays flat or leaves bulk at one edge.
Conde Hair Aluminum Beads Silicon Lined measure 5 mm × 3 mm × 3 mm and have a silicone-lined interior for smooth clamping with standard micro-link and I-tip extension pliers. Their listed color options include Burgundy, White Blonde, Vanilla Blonde, Dark Blonde, Black, Brown, Light Brown, and Platinum Blonde. Color selection can support concealment, but it doesn't correct a poorly fitted or badly positioned attachment.
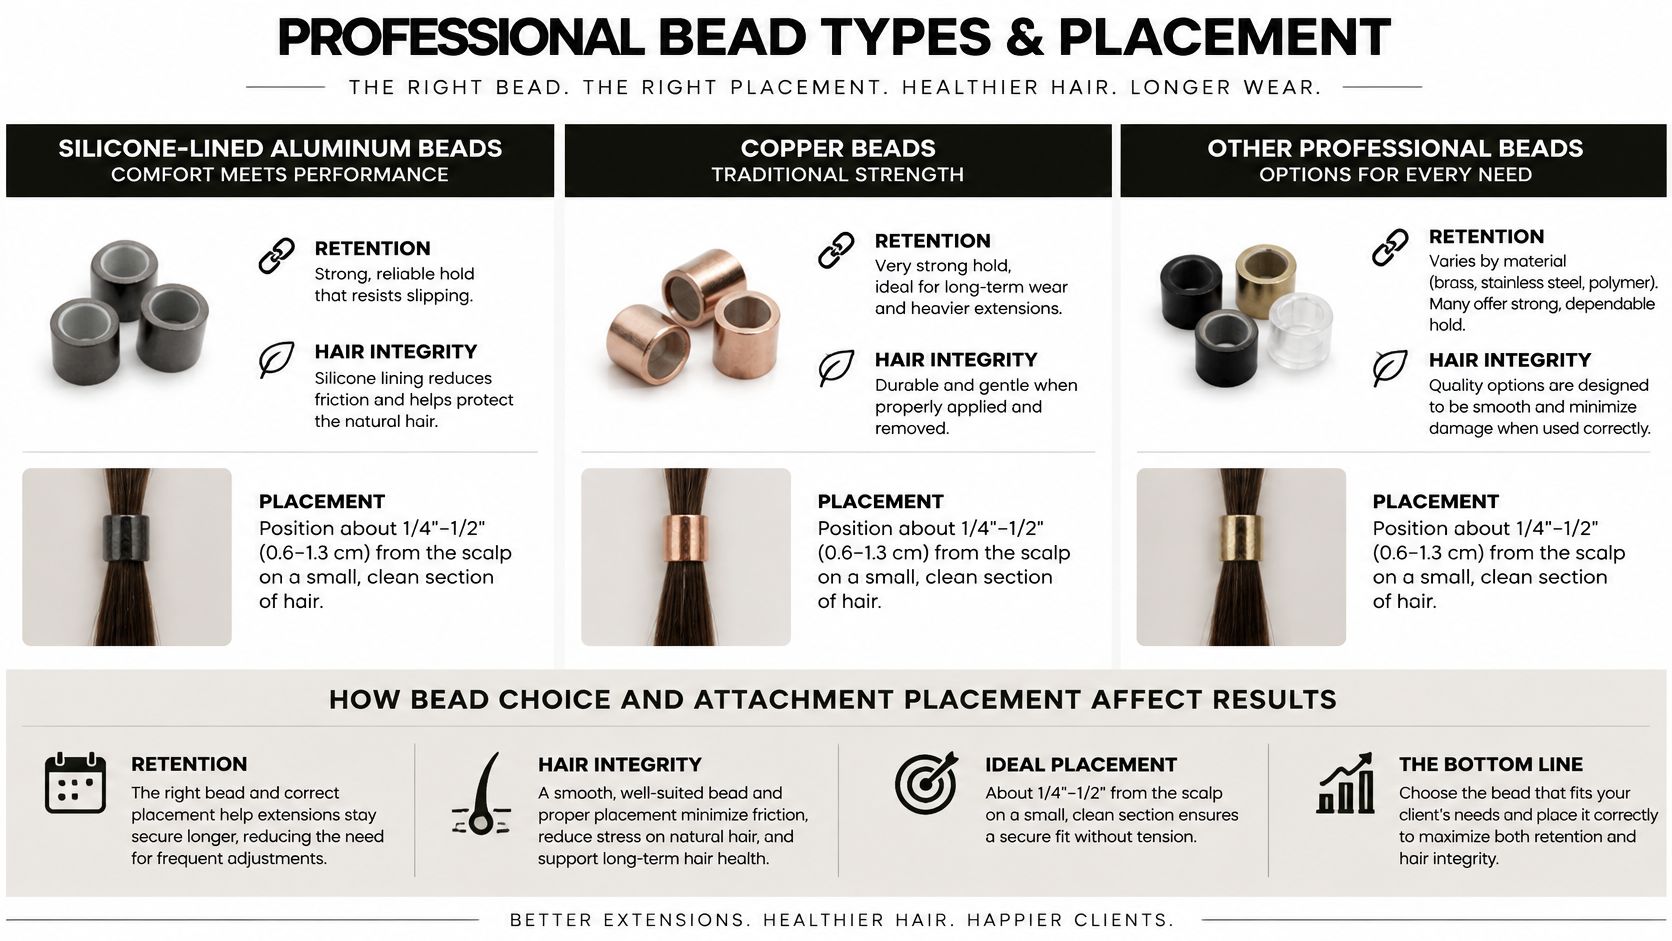
Silicone-lined aluminum beads offer a lining between the metal and hair. Conde Hair Copper Beads Silicon Lined have a copper construction, silicone-lined interior, and listed dimensions of 4 mm × 2.5 mm × 4.5 mm. These product details help compare bead formats, but they don't establish that one material or size is suitable for every client.
If the decision is between bead formats rather than positions, compare options in this guide to beads for hair extensions, then test the selected bead against the actual tip and section. Use the symptom as a diagnostic clue:
Beads set close together can restrict movement and make neighboring hair harder to manage. Plan the row with the client's density, desired placement, and load in mind; don't copy a spacing pattern without assessing those factors.
Extension quality deserves the same evidence-based scrutiny. Letter-and-number grade labels aren't a governing quality standard. Evaluate measurable characteristics such as cuticle integrity, alignment, shedding, combability, and wash durability. A method and a shade label can't substitute for inspecting how the hair performs.
A client returns saying one attachment twists every time she pulls her hair into a ponytail. That single symptom already narrows the field: the bead is rotating because subsection size, captured hair, bead geometry, or clamp compression is off, and squeezing it harder only transfers more stress to the natural section. Read the attachment as a load-bearing connection before reaching for the pliers.
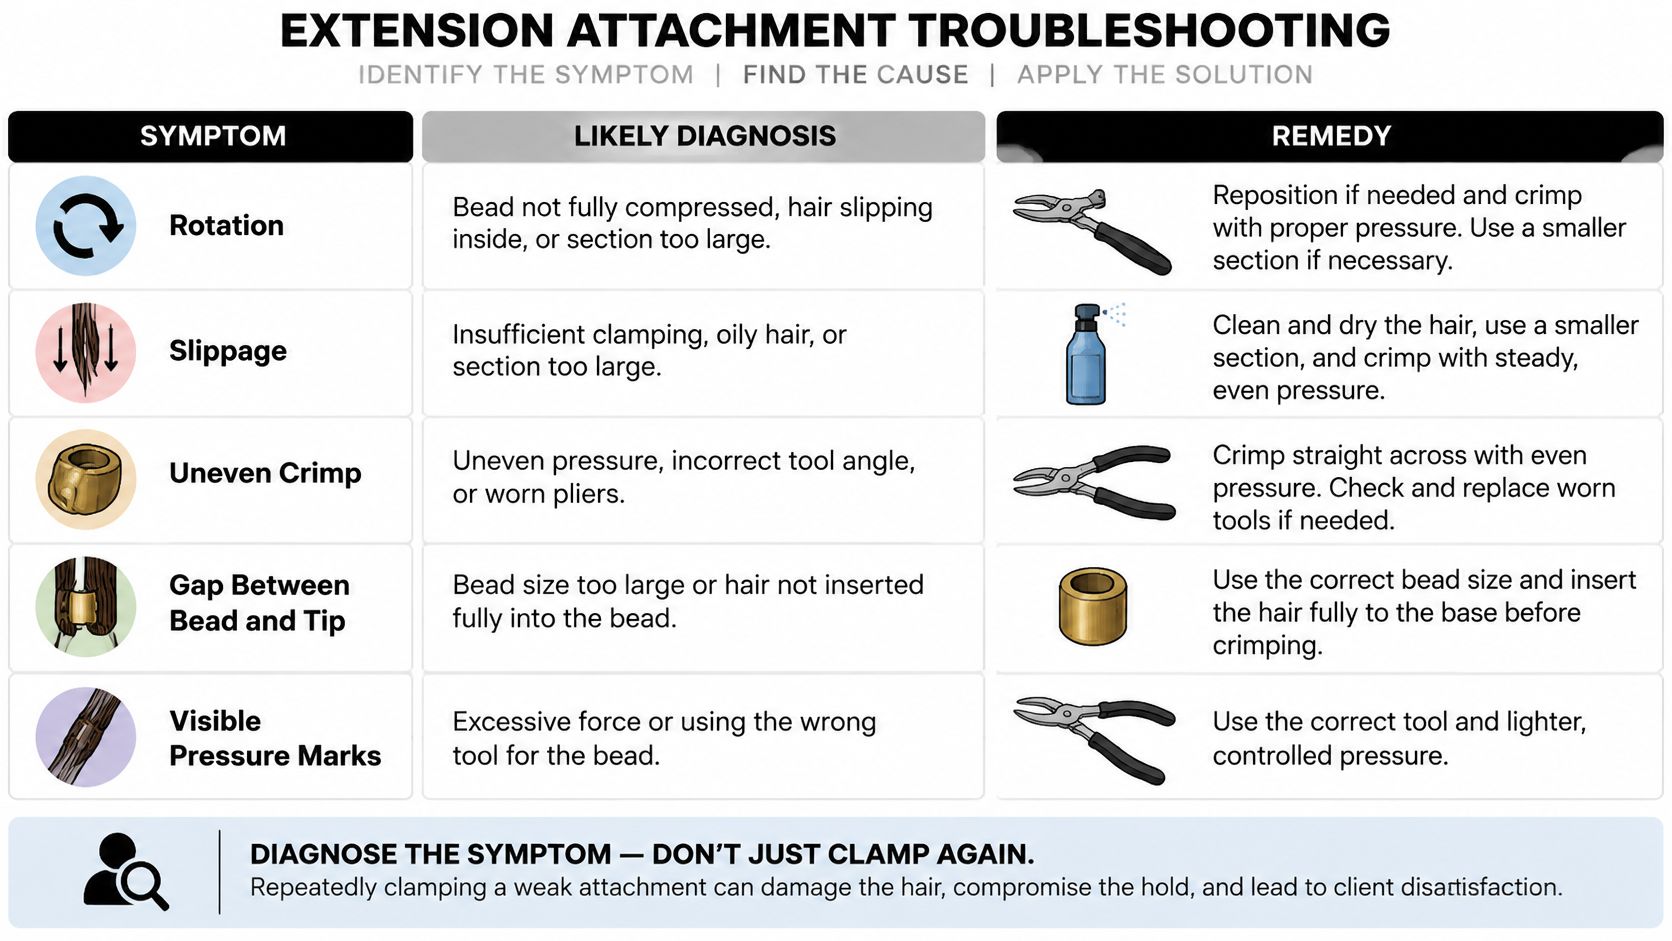
A rotating bead shouldn't stay in service. Release the crimp, check whether the subsection is too small for the extension's weight, confirm the bead interior still matches the tip, and re-seat it cleanly instead of flattening the same bead a second time. Re-crimping works when fit was the problem. Repeated compression of a weak bead isn't a correction.
The same release-and-reassess logic applies to row spacing. For method-specific context on spacing and load distribution, review this guide to microlink hair extensions, which recommends spacing individual beads about 1–1.5 cm apart so a corrected attachment sits without pressing on its neighbor.
For the remaining symptoms, work measured:
Quality control starts with a pause: observe the attachment, assess movement and tension, and release it only when necessary. After any adjustment, recheck stability with a gentle pull parallel to the scalp. A bead that keeps rotating or pulling needs rework or removal, even if it looks symmetrical in the mirror.
Track slippage at maintenance, discomfort reports, breakage, and rework by stylist, bead type, client density, and service interval. That record gives the salon useful operational feedback on where installs are failing without claiming a universal success rate.
Tighter clamping and indefinite wear don't make an attachment better. The bead's position changes as natural hair grows, which can alter support and concealment; the service needs scheduled inspection and a decision about whether to move up, replace, or remove each attachment.
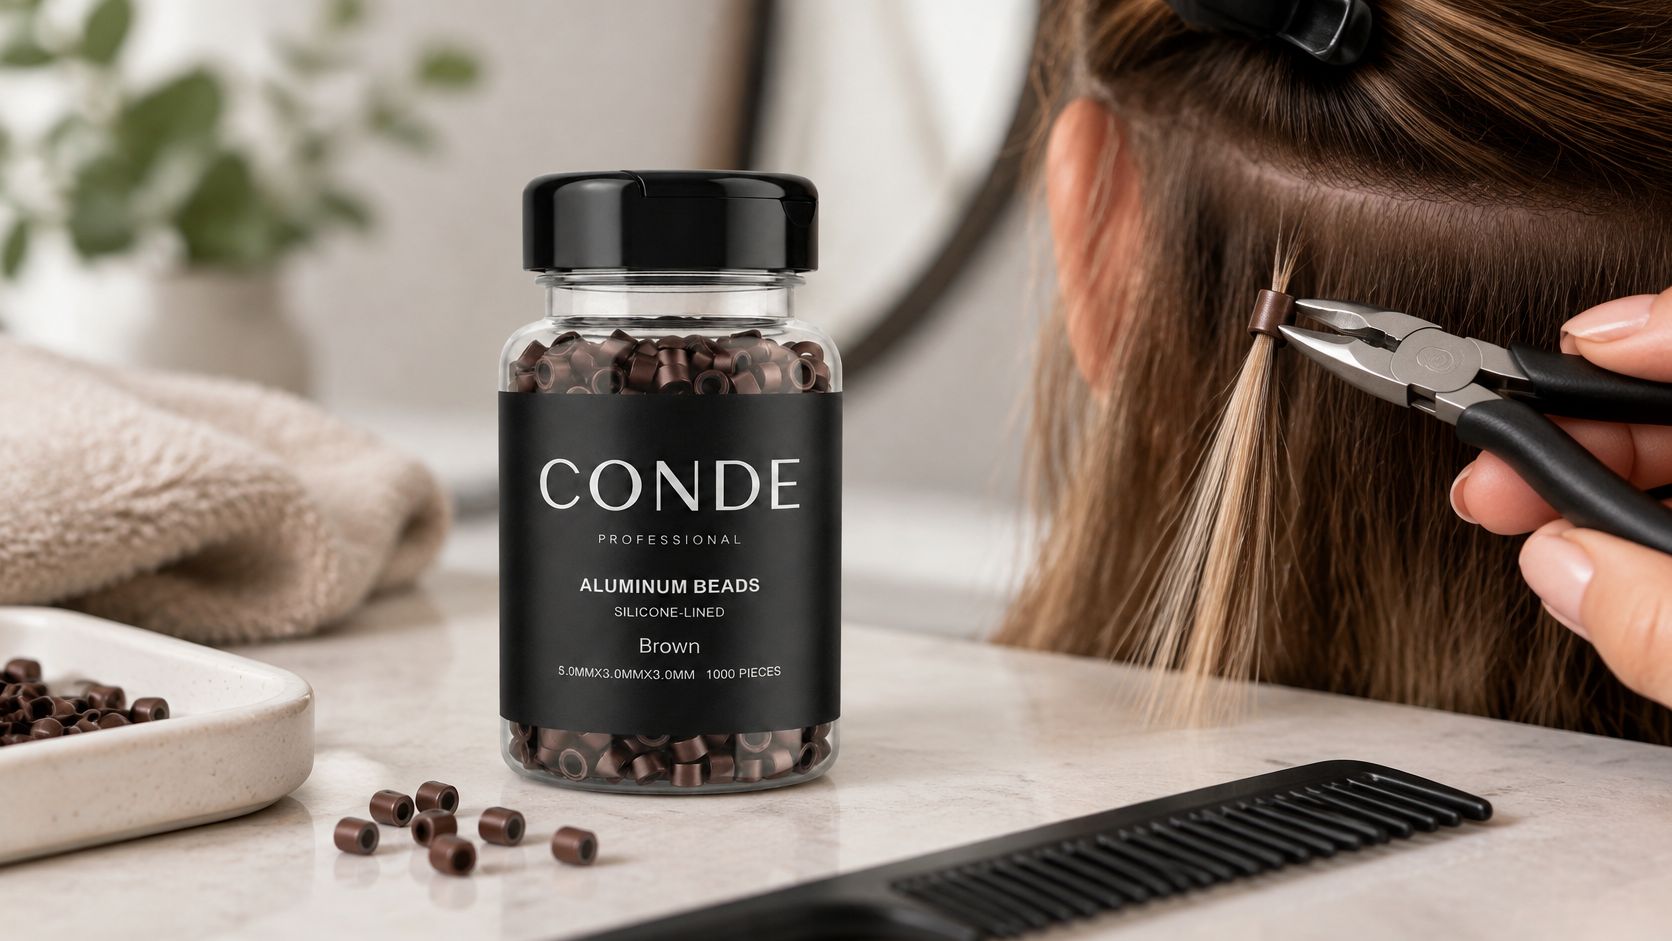
Isolate each attachment before removal and support the extension strand so it doesn't tug on the natural section. Use suitable pliers to release the crimp in the reverse direction of installation, then slide the bead away without pulling the tip through the hair. If the bead won't release cleanly or the subsection is tangled, stop and reassess instead of tugging.
At a move-up, inspect migration, rotation, tangling, shed-hair accumulation, subsection integrity, attachment height, and client comfort. A professional microlink guide recommends a return appointment every 6–8 weeks to adjust for natural growth, while distinguishing that maintenance timing from the overall install period. Treat the interval as a scheduling reference, not a guarantee: the client's hair, home care, buildup, and the condition of each attachment still need individual assessment.
Give same-day care guidance that supports the attachment: keep oil-based products away from the bead area, detangle without rough handling at the attachments, and arrange inspection if migration or discomfort appears. At the salon, record the client's maintenance plan and note any bead, load, or spacing changes. Use those records to review recurring issues and refine the next service rather than assuming every row will wear the same way.
A repeatable standard matters more than a bead that merely looks straight. Before discharge, assess each row as a mechanical system: the natural subsection should carry a proportionate load, the attachment should have room to move, and the bead should close without pinching. Concealment and comfort count only after the mechanics pass.
Use pass/fail results rather than a general impression. If an attachment needs a different subsection, bead position, or clamp correction, isolate it and recheck that point. Record the exception because one weak attachment can change how the surrounding row wears.
Document bead type, subsection size, placement pattern, spacing, and each load or closure correction. At the move-up, compare attachment condition against that baseline. Repeated wear in the same zone points to placement or distribution; isolated wear can identify a single problematic attachment.
Bead tips do not suit every consultation. Conde Professional's range includes Volume Weft, Thin Weft, Tape Weft, K-Tip, Tape-In, Clip-In, and Bulk, each with a different load path. Match method to hair integrity, desired result, load distribution, and maintenance expectations.
Before the next bead-tip install, run the readiness check and document the final bead, load, and spacing decisions.
For professional bead-tip supplies and extension options for licensed stylists, visit Conde Professional. Review the bead fit and installation tools needed for the next service, then direct business purchasing through a professional account.


