Your cart is empty
Tax included and shipping calculated at checkout

Drawer menu
Tax included and shipping calculated at checkout
A professional account gives you stylist pricing, priority support, early access to new releases, and education developed by working stylists.

Most red extension failures aren't depth failures, they're undertone failures that only show up once the added hair sits in the lengths. Extensions for red hair should be planned for the shade the client will still be wearing after the first maintenance cycle, not for the glossy color present on install day. That single shift changes shade selection, method choice, batch inspection and the refresh appointment booked before the client leaves.
Red also isn't one service. A natural copper client needs close replication. A brunette asking for dimensional cherry or strawberry needs a blend, a root strategy and a fade plan. Treating both consultations the same way creates banding, off-tone lengths and remakes that could've been avoided at the color ring.
Match undertone before depth. Depth can sit a level off inside a good blend, but the wrong undertone reads orange, muddy or violet through mid-lengths and ends, especially in longer lengths and denser wefts. A stylist choosing only between labels such as copper or auburn skips the detail that decides the result.
Natural red variation has a genetic basis, which helps explain why one generic red never covers the chair. A UK Biobank genome-wide study published in Nature Communications found that MC1R accounted for 73% of the single-nucleotide-polymorphism-based heritability of red hair, while many people carrying two MC1R variants had blonde or light-brown rather than red hair. Natural appearances therefore range from bright copper through auburn to darker red-brown. Shade selection has to separate undertone, depth, saturation and root color instead of relying on a broad name.
| Family | Dominant undertone | Check first on the client | Watch for in daylight |
|---|---|---|---|
| Copper/orange | Warm orange-gold | Warmth and brightness through the mid-lengths | Reads too orange under warm salon lighting |
| True red | Balanced red with low orange or violet | Red balance against the natural base | Reads pink or violet when the base is cool |
| Auburn/red-brown | Red over a brown base | Depth and the brown level of the natural base | Reads too brown next to a lighter root |
| Strawberry/gold | Warm pink-gold | Lift and the gold-to-pink balance | Turns brassy in daylight |
| Burgundy/violet | Cool red with violet | Violet level against a cool or warm base | Reads too dark or purple at the root |
Two different jobs sit inside that table. Close replication suits natural copper and auburn clients whose mid-lengths, ends and root already belong to one family. Dimensional or fashion red needs more caution, particularly over dark regrowth or previously lightened mid-lengths. A solid match in that case often creates a hard transition. A rooted or blended plan gives the eye somewhere to travel and hides small differences as the natural color shifts.
Color matching works better as measurement than as shade-name shopping. Forensic hair research summarized in an Australian Journal of Forensic Sciences analysis of CIE color models reported that the CIE XYZ model assigned hair samples to an individual 88.9% of the time. Behind the chair, the practical version is simpler. Score lightness, red-green balance and yellow-blue balance separately under controlled, neutral lighting. That discipline prevents a swatch that looks right under warm salon light from turning orange, violet or unexpectedly dark outdoors.
A good match shows no visible band at the blend point and still reads correct in daylight. A fuller walkthrough of extension color matching technique helps standardize that process across a salon team instead of leaving every stylist to improvise at the ring.
Only after the family is set should the consultation move to treatment names. Conde shade families include Solid, Balayage, Bronde, Highlights, Superblend, Rooted and Fantasy, and each solves a different blend problem. Solid suits true replication. Rooted and Superblend forgive regrowth and mixed bases. Balayage and Highlights build dimensional red without forcing every strand to carry the same saturation. Education reinforces that sequence, and The Hair Extensions Workshop covers color matching using the full Conde shade system within its two-day program for licensed stylists.
Consultation rule: Order the family first, the treatment second. Reversing that order lets a pretty swatch name override the client's actual undertone.
Salons building a red extension menu also need a consultation pathway that captures shade family, method preference and maintenance tolerance before the appointment is confirmed. A structured intake, similar in spirit to turning inquiries into booked appointments, reduces the common failure where a client books “red extensions” and arrives with faded burgundy ends, copper regrowth and no realistic maintenance window.
Method choice follows placement area, density, hair condition and maintenance tolerance, in that order. Shade comes after those constraints because the perfect copper installed with the wrong attachment still slips, shows or overloads fragile hair. Method and shade also interact. A fine-profile weft reveals undertone differently at the blend than a denser weft, so the same red can look softer in one construction and heavier in another.
| Method | How it attaches | Strongest red-blend use | Choose another method when |
|---|---|---|---|
| Volume Weft | Sewn weft track | Seamless fullness and movement across a red blend | The client needs minimal total weight near the part |
| Thin Weft | Sewn, lower-profile weft | Blends in fine-density hair where a low profile matters | The goal is maximum fullness |
| Tape Weft | Tape-installed weft | Fast application with a natural-looking result | The client's scalp or hair condition makes adhesive placement a concern |
| Tape-In | Sandwich application | The classic blend near the crown and sides | The placement needs individual, custom repositioning |
| K-Tip | Individual keratin fusion | Near-invisible blending of individual sections | Session time is too short for many individual placements |
| Brazilian Knots | Glue-free knotted attachment | Secure, flexible installs without adhesive | The client's hair cannot take added knotted attachment points |
| Clip-In | Removable clips | Temporary red dimension for events | The client wants long-term wear |
| Bulk | Loose hair attached by the chosen method | Added fullness within a red blend already placed | Used with no attachment plan |
Volume Weft earns its place where full, natural-looking coverage and movement matter across a broad blend. Thin Weft is the lower-profile answer for finer density. Tape Weft trades some customization for speed and a natural result, while Tape-In remains the classic sandwich application for crown and sides. For tape work, the Power Hold - Double Sided - Tape Tab is a pre-cut, double-sided tab option, and its maximum-strength bond means removal needs adequate remover and a residue-removing shampoo.
K-Tip gives individual keratin placement that blends almost invisibly, which helps around face-framing copper or isolated strawberry pieces. The trade-off is session time. Brazilian Knots provide glue-free attachment with flexibility, but knotted points still load the natural hair and shouldn't be treated as automatically gentle. Clip-In handles temporary dimension without commitment, making it the honest recommendation for a client testing burgundy before a permanent service. Bulk is loose hair, not a method by itself, so it only works once a stylist has chosen the attachment suited to the placement.
Fine, chemically lightened or already fragile hair may need a lower-tension or removable option even when the client asks for maximum fullness. A dense weft through compromised copper lengths can deliver the photograph and create the breakage. Fashion red placed over a heavily fused root area may also need a different plan, with fewer attachment points and more reliance on blending through the lengths.
A method isn't premium because it stays in longest. It's premium when placement, weight and maintenance all fit the hair carrying it.
Stylists should state that trade-off plainly during consultation. Reducing total hair, shortening length or switching to Clip-In for a trial period protects the client relationship better than installing the requested method and managing complaints at the first move-up.
A comfortable install doesn't prove a safe install. Tension-related loss can appear after the appointment, so comfort in the chair is only the starting check. A clinical review indexed by PubMed Central on traction alopecia risk factors identifies extensions, weaves and braids among tension-producing styles, with risk rising alongside pulling force and duration, and notes one clinical report of extension-related hair loss appearing 7 to 20 days after application. Prolonged excessive tension can progress from temporary, nonscarring loss to permanent follicle destruction.
Screen before the color plan, not after hair has been ordered. For fragile-density cases, the screening logic behind extensions for thin hair applies directly to red services, where repeated lightening and glossing may already have reduced resilience.
Length and total weight must adjust to density. Dense red blending tempts stylists to add another weft or overlap attachment points for saturation, but color payoff shouldn't be bought with mechanical load. Low-, medium- and higher-tension choices should be named during consultation so the client understands why a lighter build may be the professional recommendation.
At every move-up, check for pain, scalp tenting, crusting, folliculitis and sudden shedding. Ask about tenderness during sleep, ponytails and brushing, then inspect the attachment line instead of relying on the answer alone. Previous successful wear doesn't clear a client whose density, chemical history or scalp condition has changed since the last install.
The stop-and-refer line is firm. Don't reinstall over compromised areas. Don't install over existing traction alopecia. Remove the source of tension and refer the client to a qualified healthcare professional when inflammatory symptoms or patterned loss appear. A stylist can observe, document and stop a service. Diagnosis belongs elsewhere.
A red extension is only as predictable as the hair it's made from, so batch inspection happens before the client is in the chair. Color accuracy at the swatch means little if cuticle condition, porosity or shedding varies across the wefts. Inconsistent batches absorb gloss unevenly, fade at different speeds and tangle through the blend.
Alphabetical grades don't solve that problem. Labels such as 6A, 7A, 8A, 9A and 10A are supplier marketing with no governing body, and they don't predict whether a batch will hold red. Measurable criteria matter instead, and the background on Remy human hair extensions helps separate construction claims from properties a stylist can test.
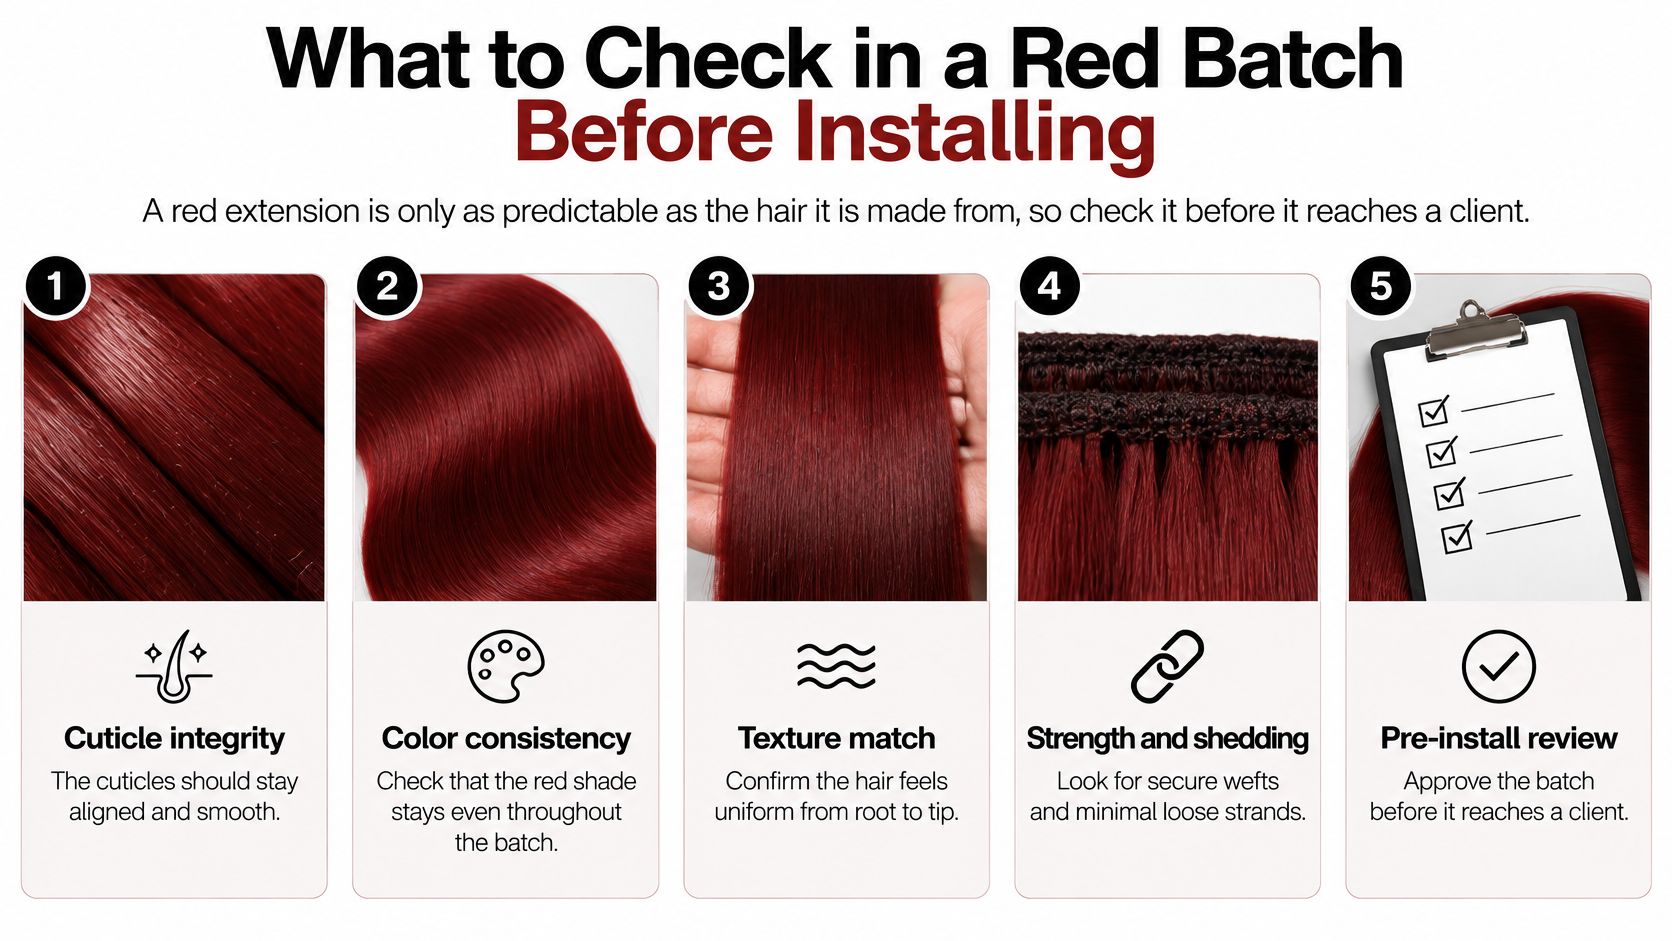
Choose the closest compatible red base instead of repeatedly lifting extensions into a custom shade. Research on bleaching damage in the International Journal of Cosmetic Science describes alkaline peroxide and persulfate bleaching reaching the cortex, degrading melanin and converting cystine disulfide bonds into cysteic acid, with protein loss observed even after relatively mild bleaching. That structural cost shows up later as porosity, rapid fade, tangling and uneven uptake.
For red-on-red correction, deposit-only color or a low-alkalinity gloss is less aggressive than high-lift correction. Run a strand test, control processing time and condition after color, every time. A porous tip and a resistant weft won't take copper at the same rate, and discovering that across a full head wastes both hair and appointment time.
Three supplier questions close the loop. Ask how cuticle integrity is inspected, how color is verified across a batch, and how batch consistency is tracked across reorders. Vague answers to those questions predict vague results behind the chair.
Match extensions for red hair to the color the client will wear after the first maintenance cycle. Natural hair and extensions don't fade together. Glosses and color-depositing products shift the natural hair faster, while porous extension ends release warm pigment at their own pace. An exact install-day match can therefore be the wrong target.
Demand also keeps splitting into narrower families rather than settling on one red. Trend data cited by Allure in its red hair color coverage shows dark cherry and burgundy searches rose 265.2% over roughly the February 2024 to January 2025 period, while strawberry blonde rose 31.7% and copper rose 34.4% across Google and TikTok. The same coverage notes glosses may fade in approximately four to eight weeks. Each family leaves differently, so the refresh plan belongs in the initial consultation, and home care should follow consistent extension care practice rather than whatever shampoo happens to be in the client's shower.
Record the current formula, regrowth color, undertone, porosity, expected fade and every maintenance product in rotation. Then decide whether the extension targets the fresh color, the faded color or a blend that tolerates both. For intentionally temporary red, a blended or rooted result is safer than an exact solid match because the transition stays believable as saturation drops.
| Symptom | Likely cause | Adjustment |
|---|---|---|
| Lengths turn brassy or orange | Warm pigment releases faster from porous ends | Plan the shade for the fade, or refresh the natural hair with a cooler gloss |
| Extension dulls faster than natural hair | Porosity and repeated washing | Reduce heat, use color-safe care, and reassess the batch porosity |
| Visible line at the blend point | The natural hair was glossed and the extension was not | Re-gloss the natural hair toward the extension and reassess the blend |
| Dark cherry turns muddy | Violet pigment fades unevenly | Refresh with a deposit-only tone matched to the extension |
Daily handling decides how slowly those symptoms arrive. Detangle from the ends upward in small sections, supporting the attachment instead of dragging through it. Keep heat low, clean brushes regularly so old product and pigment residue aren't redeposited, and separate natural hair from extension lengths during washing to limit friction at the blend.
Agree the gloss or refresh timing before the appointment ends. A client booked inside the expected fade window gets a small correction. A client who returns after the natural hair and extensions have drifted in opposite directions needs a bigger color service, more chair time and sometimes replacement hair. Prevention is cheaper for both sides of the chair.
Take one upcoming red client through the full sequence this week. Confirm the family under neutral light, document shade and method, pass the tension screen, inspect the batch and set the fade plan before ordering. That single worked case teaches more than another hour of scrolling shade photos.
Business intent belongs on the professional route. Licensed stylists can register for pro access with Conde Professional for shade guidance and wholesale ordering. Consumer checkout isn't the pathway, and retail clients shouldn't be sent to guess at professional shade families alone.
Plan length to placement across the 18 to 28 inch range in straight and wavy textures. Longer isn't automatically better for red. Extra length shows fade variation across a bigger surface and adds weight that fine or lightened hair may not support. Match the requested silhouette against density first, then select among Solid, Balayage, Bronde, Highlights, Superblend, Rooted and Fantasy to build the blend.
Before the next red client sits down, ask the Conde team which hands-on training is currently available and practise unfamiliar methods on a mannequin or a willing colleague. Conde methods include Volume Weft, Thin Weft, Tape Weft, Tape-Ins, K-Tips, Bulk Hair and Clip-Ins, and each handles red saturation at the blend a little differently. Practice reveals that faster than product descriptions do.
Pick three red clients, match one in neutral light, and record what changed under a second light source, including the family and method selected.
That small record becomes the salon's working evidence. Patterns appear quickly, whether strawberry keeps reading brassy under salon lighting or burgundy keeps going dark at the root. Better notes produce better first orders.
Conde Professional supplies licensed stylists with professional extensions across multiple methods and shade families, plus education and shade guidance built for behind-the-chair decisions like complex red matches. Open a professional account, run the neutral-light match on the next red consultation, and order with the fade plan already documented. Start at Conde Professional and put that process to work on the next client in the book.


